What I want to do is quite simple- I want to move vertices in UV space from geometry nodes, like this but without doing it by hand:
Essentially, creating shape keys for UV mapping.
If it’s only possible to move the whole UV map, that could work too, but vertex-by-vertex control would be much preferable.
If there’s another way to do this, very cool- but something like keyframing won’t work, I’m looking for vertices moving in response to a value - that is to say, “if X is 0, put vertice 0 at (0,0), if X is 1, put vertice 0 at (0,1)”.
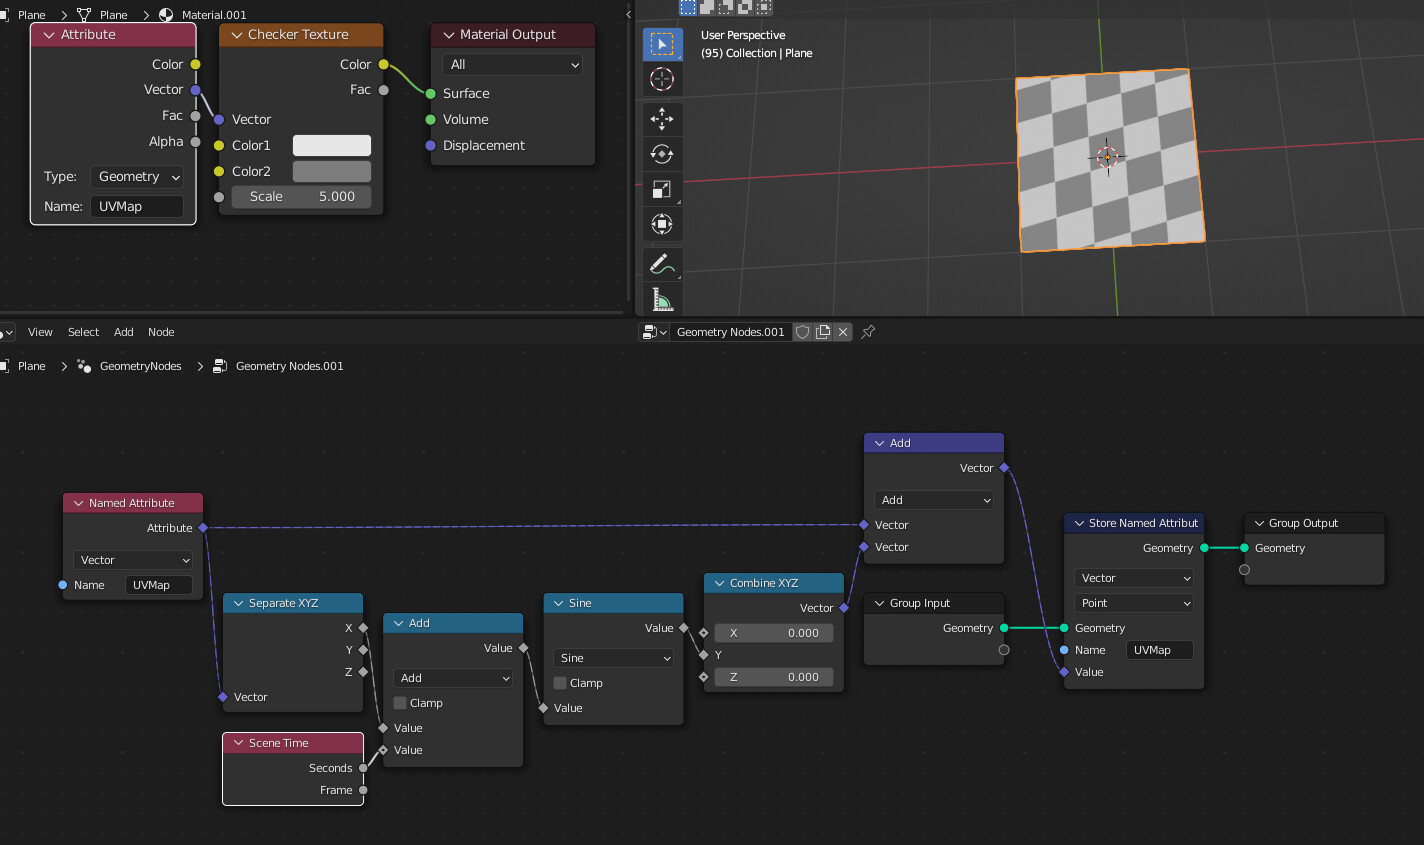
… but to be clear, you just need to know that you can access the UVMap as a Named Attribute, transform it somehow using Math nodes, and then store it using the Store Named Attribute node.
EDIT: Correction: The Store Named Attribute node needs to be in Face Corner mode!
This is excellent- although I’m not fully grasping how you’re getting a specific index. It looks like you’re moving two vertices, I’d like to move just one at a time as well, should I still use the Greater Than for that? Or maybe math Equal? Or a Switch of some sort?
Perfect now I just need loops, since my intended use case is going to require moving a lot of UV indices Until then, a million copies of a node group will do thanks, and thank you also @zeroskilz
In order to use vertex selection, you can put a vertex group into Float input, and then use Capture Attribute in Face Corner mode to convert it into the same domain UV coordinates use. Additionally, Vertex Colors operate on Face Corners by default (if you use face selection with them), making this step unnesessary.
And finally, you can use the same algorithm the regular shapekeys use. Have the main UV map, add extra UV channels to serve as shape keys. Calculate shapekey deltas (extra - main), then multiply each delta by some intensity float, then add to main again. In this case, only those UV vertices you’ve modified will be animated.
One thing I’m not following about this file: switching between UVMap and UVMap.001 doesn’t seem to make any difference, they look exactly the same in the UV Editor. Changing the UV shape key influence does have an effect, so clearly the maps are different, but why are they not showing as different in the UV editor?
Let me doublecheck, but it may be because geonodes is fucking up the UV editor. They were different. Try turning off the realtime display of the modifier
Yeah, it defaults to showing map 2 with Geonodes active. Integration process is a pain. Also, you probably know that, but if you edit UVs with geonodes, you need a shader that takes Attribute - [insert your UV name] input instead of regular UV input, as geonodes will convert them to “generic attribute”
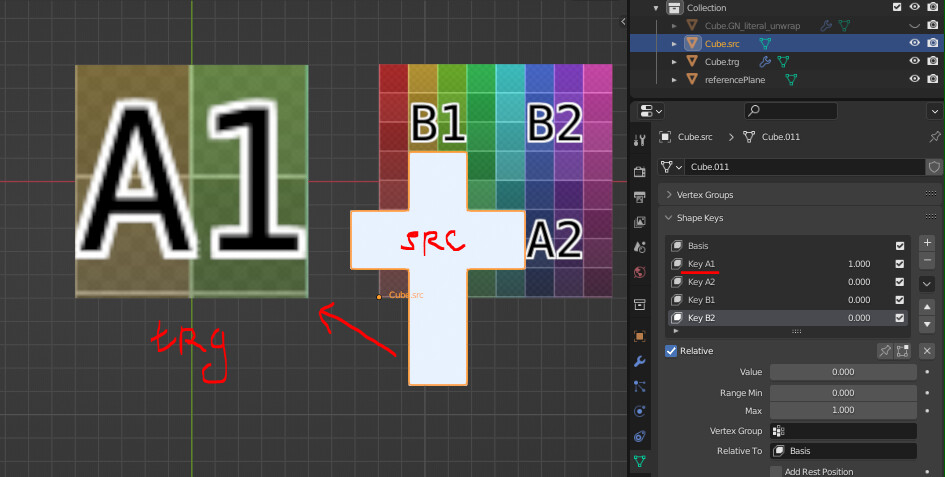
Source object is “unwrapped” in 3d space and has a bunch on Shapekeys on it. Point positions are literally transferred to Target’s UVMap (which is simply plugged as Attribute in shader node)
Did not test it much, who knows what can go wrong. It worked in test case.
Possible pros: dead simple node trees (both GN and shader). Easy-to-add new “maps” (simply another shape key on the list).
Cons: that one extra object in the scene.
Also, I can’t think of a comfortable way to access Keys…
This might actually save my bacon… I’ve encountered a nasty hard-coded limitation with my shader nodes-only solution, but… this might work I’ll have to test this, thank you for sharing!
This is so cool! I’m having a little bit of trouble wrapping my head around it, but I think it might be exactly what I need I think I get it in concept, but I’m struggling to grasp how to do this with a more complex UV map than a cube. How did you make the unwrapped flat cube that’s being used for coordinates: did you start with a cube, or is it just an extruded plane?