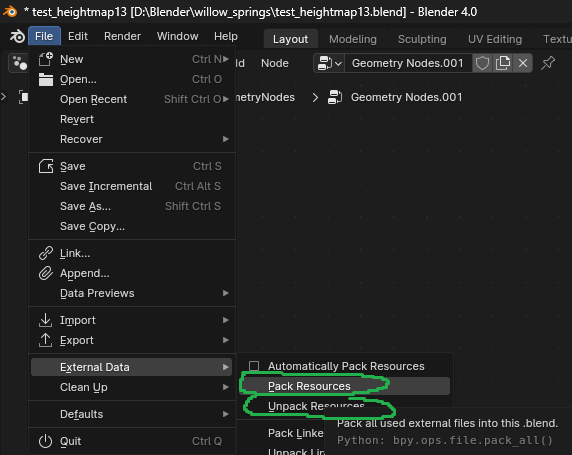
Next time, you can pack Blender files into .blend file itself and unpack it again. This copies all textures into a dedicated Texture folder where .blend file is located. All textures are now being loaded from this folder instead (not the original locations per each texture).
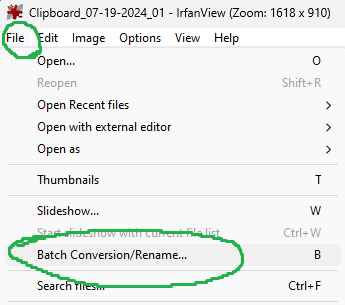
Now use any image handling app like IrfanView that allows batch resizing. You can now resize all of them at once and just reload the scene or restart Blender to see the effect.
is there a best practices when picking textures?
I’d say render only what you see. Meaning if you’re using a close up on a wall, it can have high res texture on it (looking at it from a very extreme angle for example where you see most of the object from up close), but any other texture can have 1/4th of that resolution in the background. Very far objects can have even 512x512, just enough to display “some” color variation. This can be also masked by additional effects, smoke etc. Then you can go with even just color or gradient. It’s up to you entirely. Your scene, your rules.
Also, with batch resizing explained above, you can do this like with LODs. If you have large scene with many textures, you can take batch of textures from certain radius, resize them. Then select larger radius and resize even more. However, you need to compile all those textures again the way they won’t rewrite high res you want to keep. This takes a bit more planning and folder managing at this point. You can always load in “lost textures” with Find missing data function - this will load in textures from a folder specified by you (need to have same name and suffix).
There’s another option I learned only recently and that is baking textures together. This is even more advanced process and requires specialized addons like Zen UV and SimpleBake, so you wouldn’t pull all your hairs out while doing it the standard way in Blender.
Baking many textures together simlifies render by a lot I understood. Then you can also of course resize them as needed and this also removes the hurdle of packing/unpacking and batch resizing in external program.
If you’re willing to go an extra step and invest a few bucks that is.
And the general rule for rendering in my opinion is “fake it whereever you can”. If it’s cheap and looks good, it will render fast. Instead of creating a complex scene with volumetrics, why not just render that volumetrics once in a static scene and then use it only as an image on a flat plane while rendering fast moving animation in front of it? Barely anyone will notice. An extreme example, but I hope you get the point.
This is a few things I picked up along the way, but I rarely render anything, so there are people that could give you better advice for sure.
Edit.: Yes, and like oo_1942 said
In this case, you are most likely using too many polygons.
Again, if you can fake it, do it. If you have many modeled pipes in the background, you can render only those, then render the rest and compose the final image together in compositor.
Or render those pipes as a parallax map and use highly detailed 2D texture (128Mb) instead of thousands of pipes costing your 3Gb of VRAM instead. Just an example. You need to figure out what’s the real bottleneck, ideally by some profiler (if that’s a thing in Blender) or just take individual parts of your scene and “measure them” separately.
Have fun!