“Armature has no mesh children” means that there are no meshes parented to the armature. In Blender in a correct character setup the mesh objects are parented to the armature object. So, just parent the meshes to the armature, and select only the armature when exporting either the character or animations.
About 2.80, it’s still too early to update addons for that version.
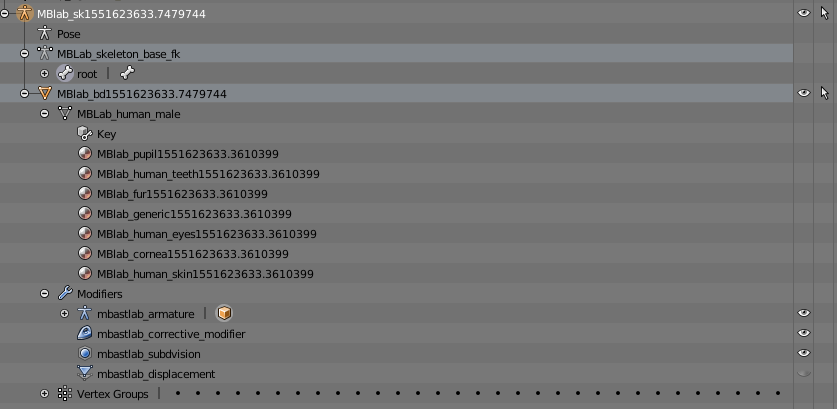
Sorry (and thanks for trying to explain) - I’m a total amateur to armatures and a mess with meshes… what is it I am going to do? The armature seems to be below the modifiers… and I can not drag drop any of the other parts to that… also I can not select mbastlab_armature…
In 2.79 the outliner is only for giving info about the hierarchy and not for changing the hierarchy. To parent an object to another you select the children(can be multiple) THEN the parent and hit CTRL+P. Your hierarchy seems to be ok, though. The addon is not a scene exporter, so you need to select the skeleton for export by right clicking on it in the viewport. (Strictly speeking, it doesn’t need to be selected but to be the active object and the active object can be unselected, so let’s just say that it needs to be the object that was selected last.)
So, what you need to do is
1, right click on the armature in the viewport to make it the active object,
2, hit export
And whenever you can, post a blend file to speed things up a great deal.
I am trying to do that, but absolutely nothing happens. Now I can’t even get that message to happen… I made a folder for this, but nothing goes there… ! (Blender file is too big to upload here)
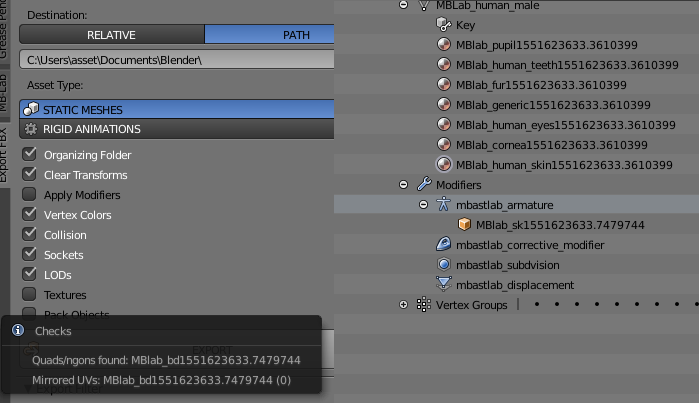
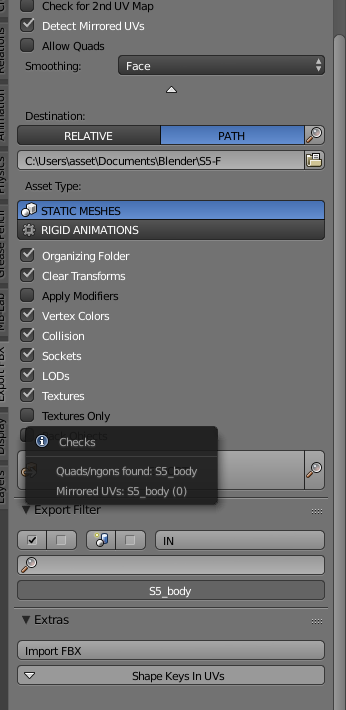
To suppress these warnings in Options uncheck Detect Mirrored UVs and check Allow Quads.
Mirrored uvs can cause shading artifacts. Quads can cause shading artifacts too, if you have unique (non-tile) normalmap that was baked for this object, since in that case the mesh needs to be triangulated BEFORE baking.
These warnings are for advanced users who strive to achieve perfect results. You can even deactive them in user preferences > addon to never see them again in any blend file.
Nice, now I get another message though… the textures are at the destination path, where do I set the path that is searched? (see below)
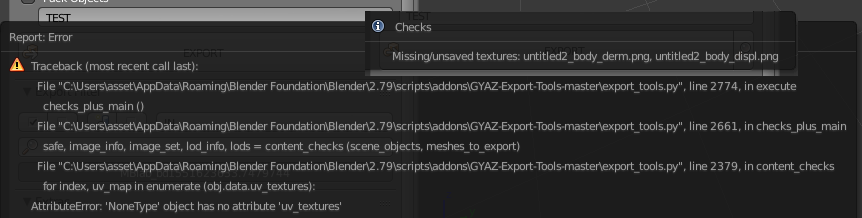
When I uncheck textures i get some uv_texture error. (Should I generate the UV map, is the export looking in the wrong place all together? !
Two sets of messages, first with texture check on…
If not, use Dropbox, OneDrive, GoogleDrive or sg else, but you should be able to bring the file down to 30MB by deleting anything unnecessary. All I need is the mesh and the armatue. A file with a default MBLab character is 5MB.
I don’t get any errors when exporting this character from 2.79 except for the missing texture warning, which happens when the textures are just empty image objects without any data.
I can see that the active object is a mesh and not an armature. The tooltip of the export button says that in order to export a skeletal mesh, you have to select one armature. So, take the shot while the ARMATURE is selected not the mesh. You have to make selections in the viewport.
The panel is context sensity, so it is different based on what objects are selected.
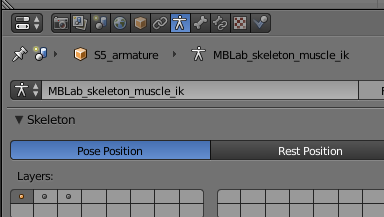
Sorry - i have been doing other things, like taking on more Blender/UR4 tutorials. I found that to get to select the Armature I need to go to POSE mode and from there you can select the “layers” where the armature is… ! (I can probably do that in other ways also) This looks something like this…
Once the armature is visible, I could select the mesh, then shift-select the armature and parent it - to bone. (My guess is that I do not know (still!!!) what I am doing, and that I did not parent the Mesh correctly to the Armature…)
Because when select the mesh, it is showing up S5_Body - but still absolutly nothing happens when I press EXPORT , but the “(!) Checks” message. I can not finde anytning saved… i think the saved files should end up at the path that i specified? (C:\Users\asset\Documents\Blender\S5-F)
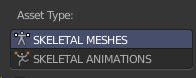
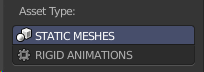
The addon is context sensitive, to export a character, you need to select the armature object, just right click on it in the viewport and the asset type options turn to “SKELETAL MESHES”, “SKELETAL ANIMATIONS”, if a mesh is selected than the options are: “STATIC MESHES”, “RIGID ANIMATIONS”.
Skeletal Options:
Mesh Options:
Seriously, just right-click on the skeleton, not the mesh, the skeleton. Do not go into pose mode, you can select objects in object mode.
Again, to suppress those warnings you get, check “Allow Quads” and uncheck “Check Mirrored UVs” in the Options.
Finally! I got it working, I will run this a few hundreds times more, - clear up the post above and make a fial how-to-for-dummies-post. Thanks so much for being so patient with me…
That’s it, the tool tips are on almost everything - so as a beginner you wont know what to focus on.
(Blender is not easy to access and I am having a hard time just navigating…)
I guess my problem is that I do not understand the process you are running, say I made a backup/delete of some of the files… and then things went wrong again. (The MB-lab process is also a bit odd, as you must save/finalize on the way… )
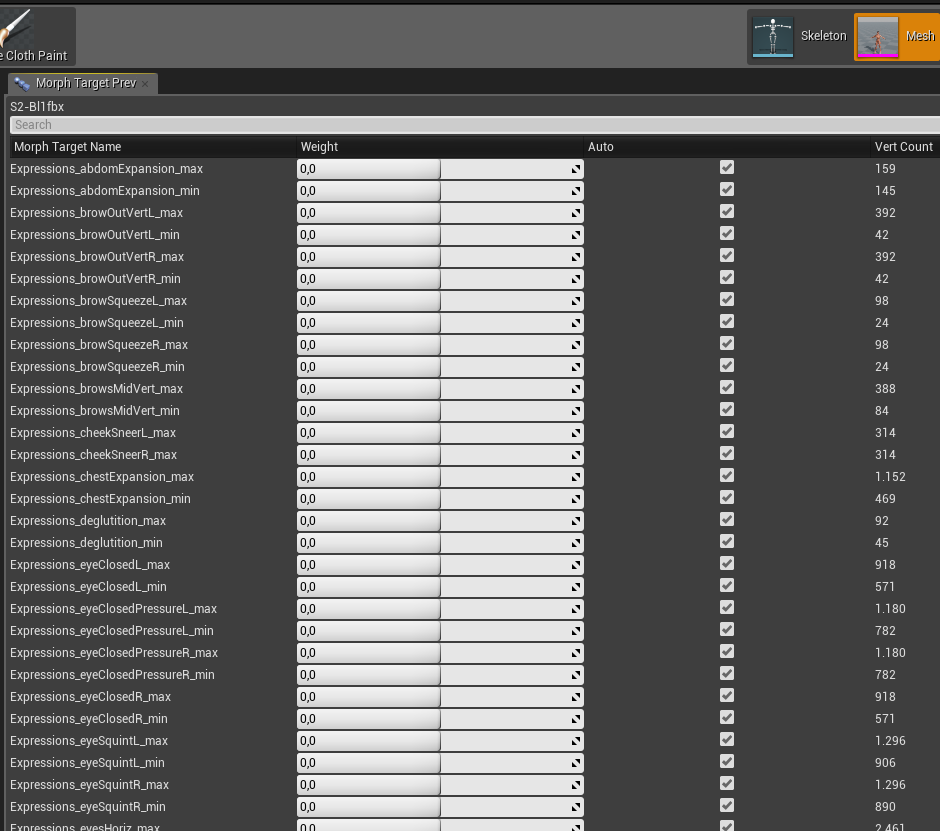
Any ways - it now looks perfect, however I am missing the morph targets all together. And I don’t understand what your writing. I managed to export all the shape-keys/morphs using the normal export at some point - but then that “lost” most of the skeleton… so it looks like you can export the shape keys, but from what you write I understand that there is somehow limit to the number of morphs?
This is what I managed to do… sadly i do not remember if that was in 2.79 or 2.8.

 Thanks so much for being so patient with me…