Would be too much hassle for little to no gain, the count in itself doesn’t tell you much. Much more important is the size of the triangles on the screen as it gets exponentially more expensive to render them the smaller they are. There’s no better way to visualize this than observing the model in wireframe view and if you see “patches”, those are the expensive parts. As you zoom out you’ll see more and more “pacthes” that’s why it’s important to use LODs. Don’t worry about polycount, worry about too many small polygons.
(How does a game engine change polycount?
When importing to a game engine, edges are split on uv island borders(seams), material borders, hard edges and hard borders in vertex color.)
@helluvamesh I need to congratulate you on your script, I haven’t the faintest idea why, but both the vanilla exporter and the Blender for Unreal addon do not get joints in the right place, so that when you try to edit collision, you cannot rotate the pivot of the collision node.
Yours is the only exporter I’ve found that seems to get this right. Collision seems to work fine with the blender Y primary bone orientation and the scaling issue with the vanilla exporter seems fixed.
There are two issues where it falls short however:
The first is that while the vanilla exporter and Blender for Unreal will properly apply all modifiers and combine meshes, your exporter doesn’t, which for an iterative workflow, is a bit of a pain.
Secondly, it doesn’t have the option for setting a different primary bone orientation which means you can’t retarget easily (or at all?) in UE4.
Despite those two niggles, I’ll definitely be using GYAZ for character work, if not for quick iteration.
First, thanks for the kind words.
Now, let’s get to business,
The Pack Objects option exports all selected objects into the same .fbx file, all you have to do is check Combine Meshes option in the UE4 importer to have one mesh.
The 2.80 version applies all modifiers, the 2.79 version has Apply Modifiers as an option. Which version are you using?
After a lot of trying I came to the conclusion that it’s impossible to retarget the Mannequin anims in UE4 to anything exported from Blender because no matter what settings I tried, in UE4 the bones never had the exact same orientations as the Mannequin. But animation sharing between characters with the same skeleton works fine. It would be trivial to expose the settings, so if that would help, just say so. Currently, they are hardcoded to
– Primary Axes: -Y
– Secondary Axes: X
Regarding point two, I am on 2.80, and it doesn’t seem to apply properly, but perhaps that is user error, I must check again to be sure.
Regarding three, I am more or less in the same frame of mind as you on that in the sense that I am happy to export in the current bone orientation since there seems to be no loss of function in physics and animation. I reserve the right to come back and complain if I have any issues in the future, obviously.
I don’t plan to use any of the mannequin animations for most of my characters as they would be too different in proportion and layout anyway, so no great loss for me. Might have been nice for prototyping but you can’t have everything.
EDIT: I think I’ve changed my mind; if is as simple to expose as all that, maybe I would request it, since it might mean one less operation to do building character physics and I’m still experimenting with workflows so it would be nice to have the option.
Actually, another last comment on point 2, is that I probably wouldn’t use GYAZ for rough prototyping anyway as it makes use of checks preventing export, which I don’t disagree with from the perspective of making sure exports are safe, but for throwing in something quick and dirty into the engine, having to add UVs or triangulate is a bit of a hassle.
It might be nice to have a garbage mode that will export anything with no checks for lazy iteration. That might be too much work though, and as I say, I have another exporter for that.
The way you install any other Blender addons, (Header) Edit > Preferences > Addons > Install.
Leave the unit scale at 1.0, because in Blender default value of everyhing is set with that value in mind. Forward axis in Blender is -Y. Respect these and read the first post carefully.
Hey @helluvamesh, just a quick query about the animation export, when you have named an action, does it export the whole timeline that is keyed or the part you have set as the start and end?
I’m exporting some looping animations so I need to cut the timeline back to where I have set it.
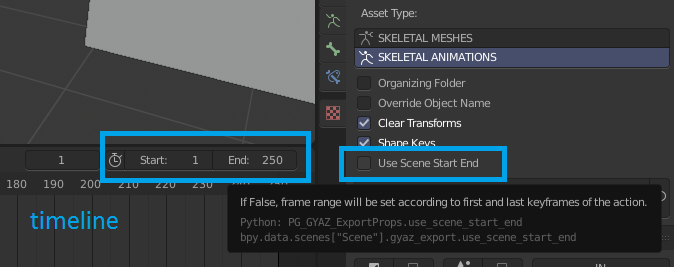
New settings to handle action start, end requested by @anon2581475.
Properties > Scene > Export Animations > Active Action > Start, End
– (only shows up, if the active object is an armature with an action assigned)
– (properties are stored on the Action data block)
Properties > Scene > Export > Asset Type = Skeletal/Rigid Animations > Frame Range
– options: Auto (first/last keyframe of the action), Scene Start End, Action Start End
– specifies the method to set the exported action frame range
Fairly bowled over with the blistering speed of these updates, I just tried it and it works splendidly; perfect for batch exporting lots of small and particular animations.
My life managing a load of different skeletons and animations just got much easier, thank you.
Hello! Please help me, your addon can help with this – https://developer.blender.org/T54159 ? I am stuck: when I exporting rigify there is damn distortion only in fbx, in original scene all just fine. I tried many ways but no luck((( And fbx only deform doesnt work with rigify - a lot of ORG bones in fbx file.
If it possible plese tell me steps how to did it
To export a rigify rig, you have to generate a simplified skeleton using the Extra Bones feature (in Export Bones Panel), while Export All Bones should be unchecked, Constraint To Source and Rename Vert Groups should be ckecked.
This is not easy to pull off, your best bet is posting or PM-ing me a .blend file with a test rig.
Thank you for the wonderful plugin. Now exporting to UE4 is as seamless as it should be and as simple as clicking a button. I willl add this in the credits of my games!
First off, amazing script! It is saving me lots of time going from Blender > UE4.
I had a question in regards to exported materials and texture connections. When I import in my FBX, the materials are there but the textures are not imported nor connected. I have the UE4 flag enabled to import textures, is this a limitation of Blenders .fbx export?
If the first node connected to the material output is a Principled BSDF, the Blender’s fbx exporter can gather the BaseColor and Normal textures, BUT Roughness, Metal, Specular are not gathered, so the addon doesn’t use this functionality and simply copies textures into a folder next to the fbx file.
My workflow is that I have master materials in UE4 and when I import a model, I select Create New Instanced Materials based on one of the master materials, then all I have to do is manually assign the textures to the parameters in the Material Instance editor.
I was using your addon yesterday (it’s still awesome ) after quite some time since my last use and at first I had to remember under which tab again I could find it. This left me wondering: Why is it in the Scene tab, why not add it to the Sidebar like most add-ons?
IMHO that would make it more accessible/discoverable.

 ) after quite some time since my last use and at first I had to remember under which tab again I could find it. This left me wondering: Why is it in the Scene tab, why not add it to the Sidebar like most add-ons?