It used to be on the left side bar but BF turned that into an exclusive place for the active tools. So now, every addon go to the right side bar that makes it overcrowded. So, if one of my addons makes sense to be elsewhere, I gladly put it elsewhere.
I see where you’re coming from. For me it’s not really an issue since I only have 2 add-ons there.
Is it possible to make that a configurable setting without investing too much effort?
in ui.py change in every class that inherits from Panel:
from:
bl_space_type = 'PROPERTIES'
bl_region_type = 'WINDOW'
bl_context = "scene"
to:
bl_space_type = "VIEW_3D"
bl_region_type = "UI"
bl_category = "Export"
2 Likes
That works as well, thanks! 
interesting emm… issue?:
it is removing UV tab when deactivating addon ![]()
Not just the UV panel but the Vertex Color panel, too.
The addon adds new functionality, like
– reordering uv maps and vertex colors,
– setting the active uvmap on all selected objects,
– adding new uv map to all selected objects,
– and mark which uvmaps/vertex color layers should be exported (icon before the name).
For adding these I had to write a custom version of the panels. After deactivating the addon and restarting Blender, the original panels come back.
1 Like
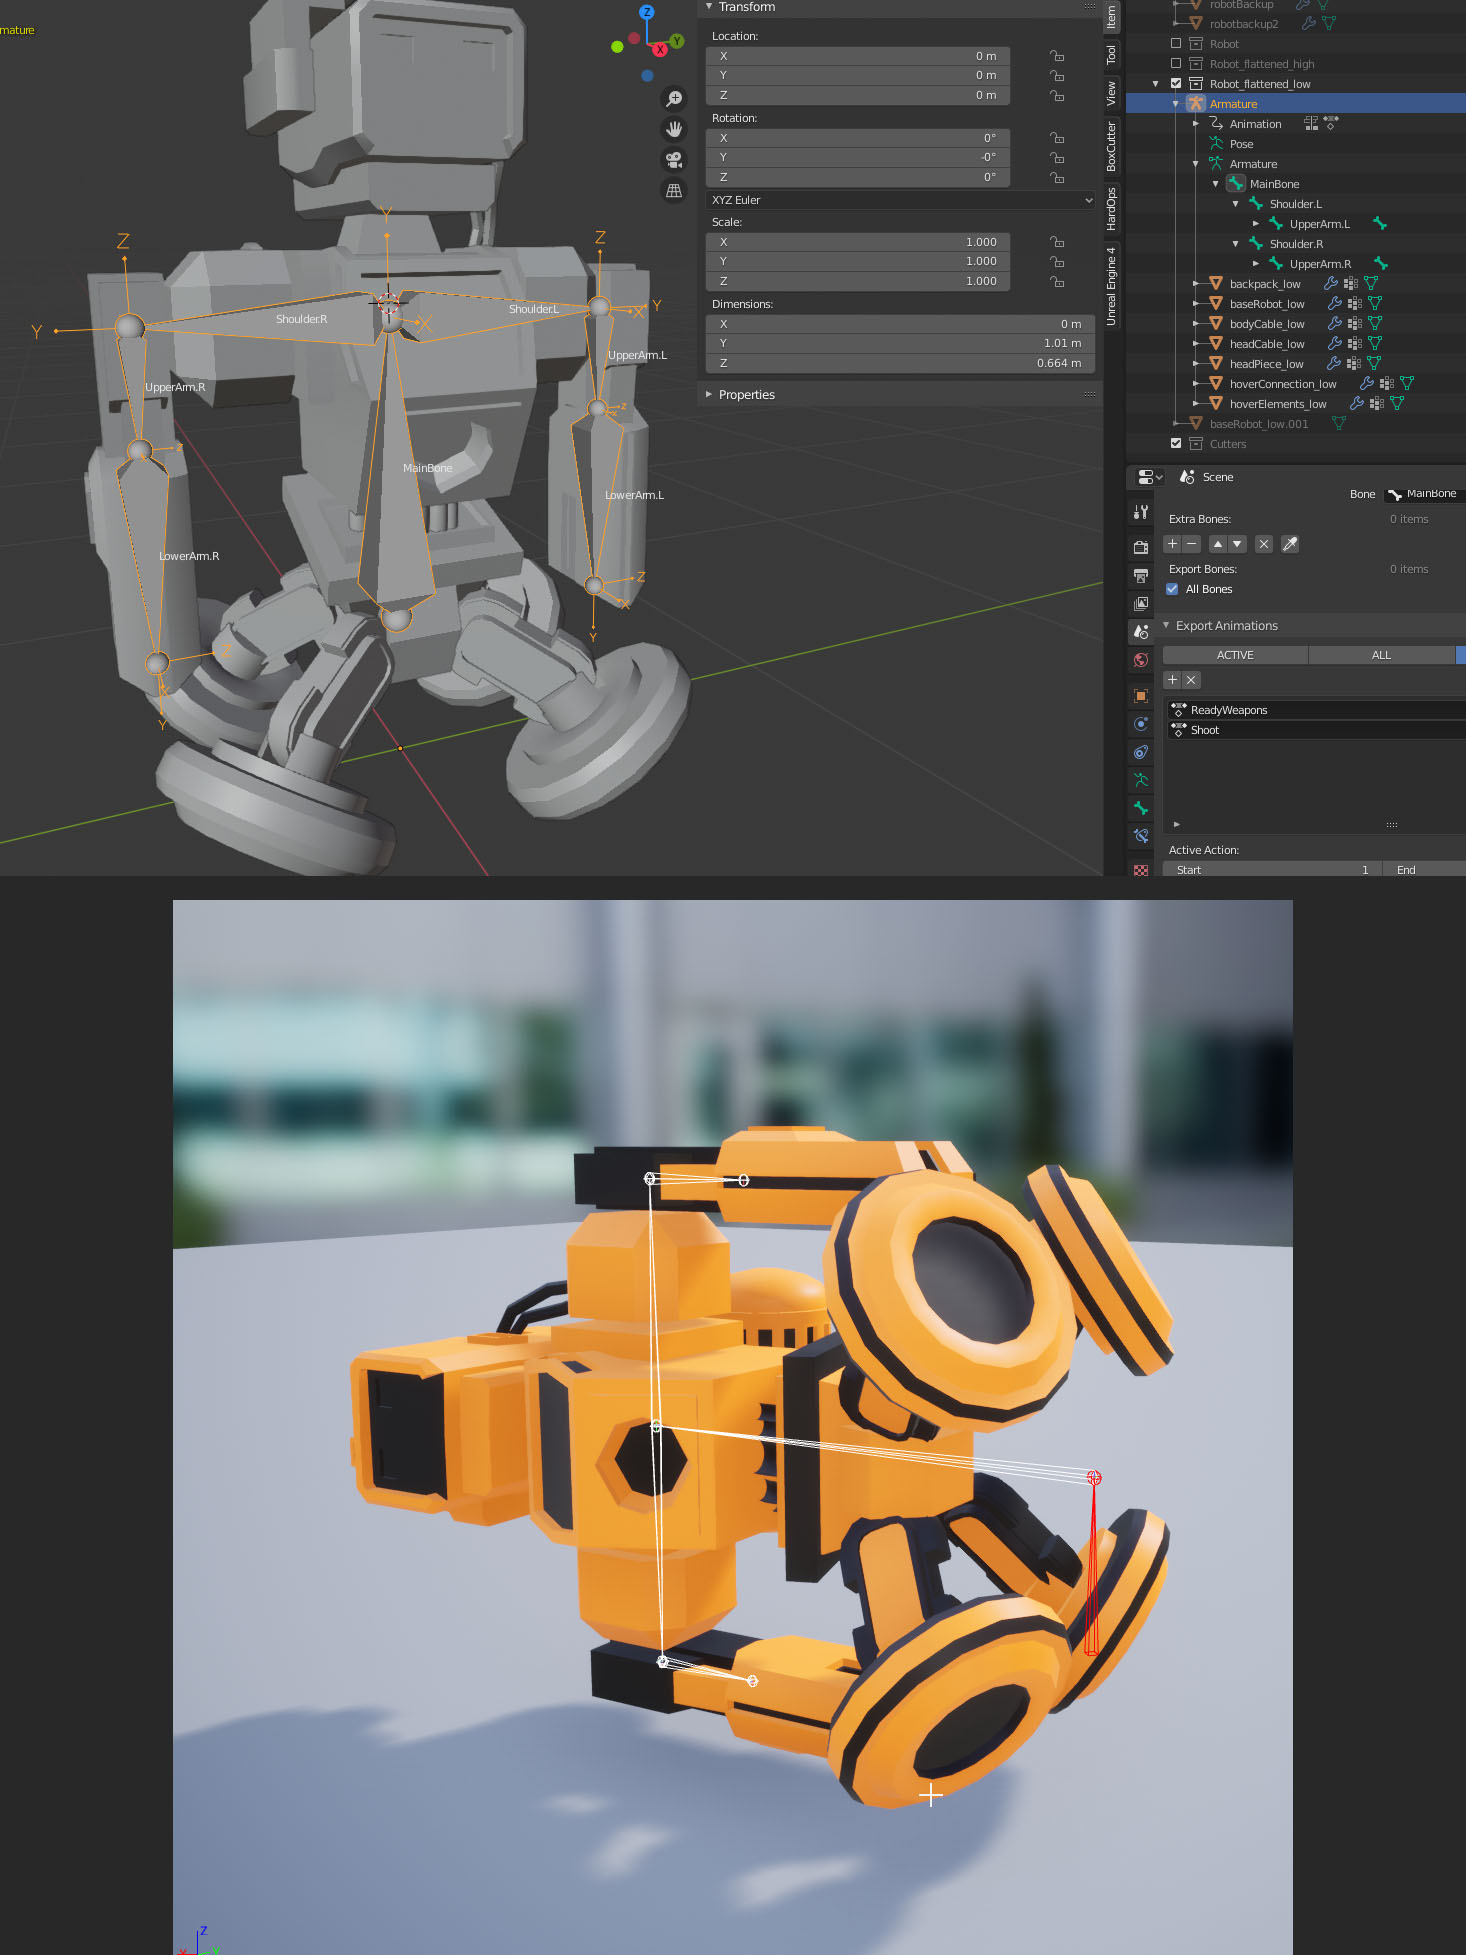
I use this little plugin a lot but can’t use it for my skeletal meshes. It needs a way to turn off the scaling it does and also turn off the Root Mode so Unreal can root the Armature like normal. It also needs to add Only Deform Bones button like the regular exporter (in fact, it should have all the options of the standard exporter somewhere).
It sucks because I’m having to export 50 characters, all with the same Armature. This plug would work perfect if it had those options above. I could export them all as separated FBX skeletal meshes… but alas, I’m having to select and export each character individually. 
-
If Root Mode is set to “Object”, an extra root bone is added on top of the whole hierarchy and the source of root motion is object animation. If Root Mode is set to a specific bone, no extra root bone is created and the skeleton’s root will be the specified bone. There’s no other possible scenario.
-
An “Export Only Deform Bones” option would be of very limited use. Even game rigs have bones that don’t deform the mesh. It’s important to correctly flag every bone as deform or non-deform for Blender’s auto weight calculator to work properly, which of course on its own gives sub-par results but is a good start nonetheless. The correct way to decide which bones to export is create a list of bones and save it as a preset so you only have to specify once.
-
You have to specify what your problem is with the scaling. It’s set up to export correctly when Blender’s unit scale is set to 1. It’s not a good idea to change that setting because default values of everything in Blender was set to work with unit scale 1.
I’m using Uefy which takes care of some of this already (like root and deform bones) as long as the armature is named “Armature” as UE4 will change that to root and I have to choose “Only Deform Bones”. It marks the deform bones for me so I have a perfect Mannequin skel.
I haven’t tried importing a skel mesh using your tool and working, then exporting using your tool (mainly because I just can’t do that with Uefy based on the issues I’ve stated), but that might fix the scaling. It would be nice to have an option for these things though. It’s a great tool for static meshes and I love the fact that I could export seperate skel meshes based on the same armature. If it just had a few more options, I could do just that and it would work great with Uefy.
The addon can export any rig. Just make a list of bones to export and set the Root Mode to “Bone” and choose the root bone.
If it doesn’t work, post a blend file with the rig.
The script of the addon is quite long and there are already too many options. It is crucial for my work so I want to avoid making unnecessary changes that could break things.
Is there a way to mass select or multi-select bones and add them to that list or is it one at a time?
There’s the eyedropper next to the add button that adds all selected bones in pose mode to the list.
1 Like
Nice! Thank so much for the help!
Just saw this here https://youtu.be/poJcQNGqwfI and wondered if this is also possible with this add-on?
I found it quite troublesame to have a game model setup both for rendering in Blender and to be used in Substance Painter without having a mess of the texture sets myself in the past, so I quite like this. But I like this export tool better than the one presented in the video since it offers a lot more features.
Hej!
I’m currently trying to get a simple SK to Unreal, but no matter what I try, the Mesh has a different orientation in UE than in Blender.
I checked if all Rotations/Scale/Transforms are applied and tried different settings for primary and secondary bone axis, to no avail.
Any idea what could cause this? I can export the SK with the blender fbx exporter without it being tilted in UE.
1 Like
Your character is facing +X axis, in Blender -Y is forward. The addon expects a character that was correctly setup for Blender.
Changing the Unit Scale in scene settings to 100 is also not a good idea because it breaks a lot of things in Blender. Basically, just keep to Blender standards and let the addon do the conversion to UE4.
Properties > Material > Merge Materials on Export
1 Like
Oh nice, didn’t notice that one. Thanks!
Hej!
Thanks for your reply
I changed the Model to face -Y and applied transforms everywhere…also changed the primary bone axis to -y and secondary back to x.
The model still lies on the ground in blender (I also checked the options mentioned in your first post force front x and convert scene. I couldn’t find the first setting you mentioned)
I’m also not sure why you think my scene scale is 100… it’s standard metric 1.0, I just checked that.
The mesh exports fine if I remove the Armature. It’s only tilted as SK.
I’m not sure why that happens as the normal fbx export works.
I also tried the Blender for UnrealEngine Addon (which I try to avoid as it’s way too overloaded for what I want to do) and the export works fine there too, including the Animations.
I’m sure it’s just some small mistake on my side, but I have no idea what could cause these problems.
I uploaded the blend file if you’re interested in checking it out
Option A:
Export Bones > Root Mode > Object
This will generate a correct skeleton root.
Option B:
Export Bones > Root Mode > Bone, Name of the root bone
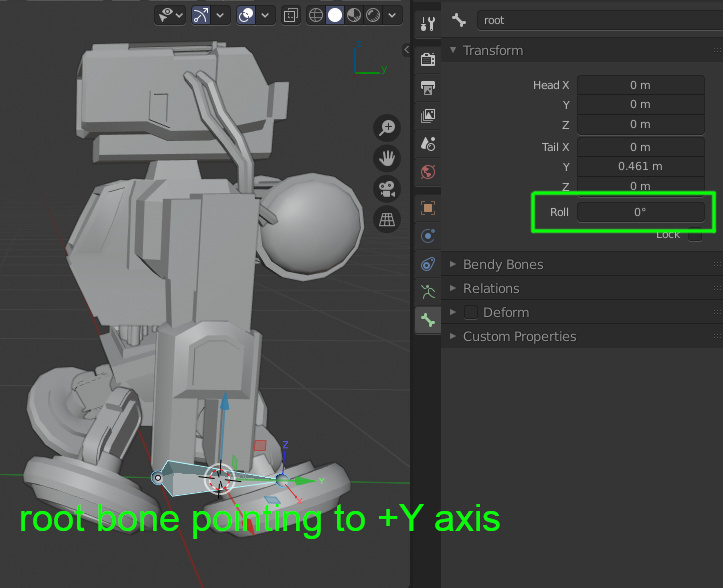
If you want to have a root bone, it’s tail needs to point in Positive Y direction with Roll set to 0. (Properties > Bone > Transform > Roll in Armature Edit Mode)
Can I add this image to the first post?
1 Like