i’m having a lot of problems controlling hair particle parents. i’ve tried both vertex groups and textures.
using textures. I only get 1/100 (this is an exact number) of the parents to emit from the designated area. the rest of them get scattered throughout the rest of the model with zero length. so for instance to put hair on the ears I have to emit 10,000 particles, and only get to use 100 of them, which still leaves weird bald spots after adding children.
using vertex groups they don’t stay in the group. they might start on the ears where they belong but then trail down the back of the head and around the front up under the chin. so there are some faces that just don’t get any parents. upping it to like 10,000 will make the bald spots smaller but also create really dense areas and send more parents trailing off to other parts of the mesh.
scale applied. normals are correct. completly confused.
You would think that if you use a texture to control density that it would only emit particles from the white areas. Not true, it emits everywhere and then uses the texture as a mask, result being you need absurd particle numbers. So to use a texture, you need to first use a vertex group to define the general area first. Make sure your vertex groups includes verts slightly otuside the uv area of the texture.
As for craziness in in placement make sure these things are done:
‘Use modifer stack’ is checked in the particle system
The particle system is below any subsurfs in the stack, and in general will do better toward tghe bottom of the modifer stack.
Before you comb the hair, make sure your subsurf preview and final levels are the same. If you have combed already, you may need to free edit, get the suburfs matching and recomb.
weird. first thing I did was delete most of the extra parents in edit mode. but that had the effect of the amount of children being 1/100 of the actual displayed number. so i’d have 10,000 parents x 200 children resulting in about 2000 rendered hairs, not 2 Million like that math suggets. with 700mb memory usage instead of 70mb. last time I tried to use modifier stack things got crazy, i’ll try it again. I probably had different subsurf levels at that point.
/rant/ the hair system needs to be seperated from the general particle system and refactered so bad. how about using local object coordinates instead of global so I can scale the character later on without destroying my lengths and edits… i’m hoping the artists working on gooseberry get kicked in the balls so much with the hair system that it happens. /rant/
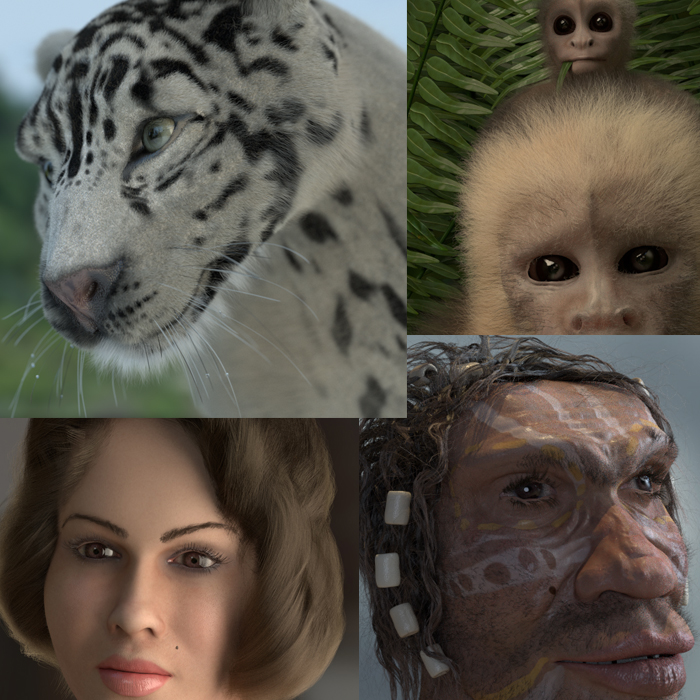
thats all good. any of those rigged? hair transparencey is great. can’t use it on this project though cause its an animation and it x10s my rendertime.
All but the neanderthal are rigged. The female is a makehuman I just textured and made hair, all the others I modeled completely from scratch.
Rendering animations with hair is tough. For one thing long hair doesn’t respect collision well. Also you get bad noise patterns. You can keyframe the seed, and run despeckling compositing but it is really difficult to render a clean animation.
I took a break and took care of something I know how to do, change the oil in my car :]
I saw some hair collision improvements coming out of gooseberry that looked exciting.
what kind of noise are we talking about here. like #frame in the render seed or something specific to hair. i’m not afraid to clamp that shit and let the video guy color correct it in after effects.
what was the render time on the leapard tiger thing. and if you grabbed the root bone and scaled .1 the hair would stay the same length wouldn’t it.
not using the modifier stack was the problem with parents not following vertex groups right. yay. thanks for helping with that before I got too far.
so I thought I was ready to go, then pow! right in the kisser. so I made a vertex group, fine tuned it with a texture. everythings right, numbers are making sense, hair renders. now comb it in edit mode, go back to object mode, they’re gone! now I can’t see any parents or children in the veiwport, can’t see children in edit mode. nothing renders. if I select render parents then the parents show up in the viewport in the right place but still don’t render.
notice the density texture is all black now. the source says generated… well maybe it was when I created it but its a png now, so I reload it back in. after that its taken all the parents and placed them in a weird cloud next to the model lol. so when I assign a texture to a particle system I need to go ahead and open it from disk instead of grabing it from blenders list of textures cause it decided to generate a new black one over it and blow everything up. at least i’m assuming thats what happened.
My best guess is that you painted the texture in blender, but you never saved it as a png or jpg. It’s only stored in memory during the paint, but must actually be saved to disk. Not sure I understand completely.
i painted it. saved it. then went to particle settings, added texture, jumped to texture panel and selected the image from the list of images already loaded into blender. by doing that instead of clicking on the folder icon and opening the .png it kept the source of the file set to ‘generated’ instead of ‘single image’. then it overwrote the image with a new generated black image when I went back to object mode after editing the hair. sometimes blender is just a bitch thats all.
I see, I am not sure why they have those two image paths, it’s like I am using one image, just use it. It seems like needless complexity and duplication. But hey that’s the core principle of blender! I’ m kidding of course, kind of, Blender is amazing and I have written a lot of code myself I can’t even begin to imagine how a suite of functionality this complex exists.
sometimes when I go to save the image from the texture paint toolbar it will throw up an invalid path error and forget the paths to all the images and i’ll have to save it from the uv/image editor. then all the hair dissapears. then I go to an image texture for any hair system and refresh it and it magically remembers all the paths and everything shows up again. I might file this bug when i’m done with this. I know thats part of the new texture paint functionality. which is a lot nicer then it was in 2.7.
I only started using blender with 2.7. I can’t imagine the pain people went through in 2.4-2.6.
[ATTACH=CONFIG]343519[/ATTACH]
things are starting to shape up now though. i’m gonna have 30 particle systems on this thing when its done lol.
do you do freelance work? i’ve got a freind whose branching out into post production/commercials/etc and i’m trying to build a contact list of people I can give work that I can’t do or don’t have time for. https://www.facebook.com/Moonranchstudio