I am wondering how to create a halo like effect using either Cycles or EVEE.
The Dragonball reference image is not quite what I want to achieve since I want to be have control over the distance of the halo from the object it is being emitted/coming from. Hope my sketch illustrates what I mean. Basically to have control over the distance of the inner border of the halo (lightblue).
In my naive mind I was thinking maybe a color ramp plugged somewhere with an Emission Shader would do the trick, but I don’t know enough about Nodes to build the shader …
Does anyone have an idea how something like this could be achieved?
I thought about this for quite a bit and I think I found a way to create a similar effect:
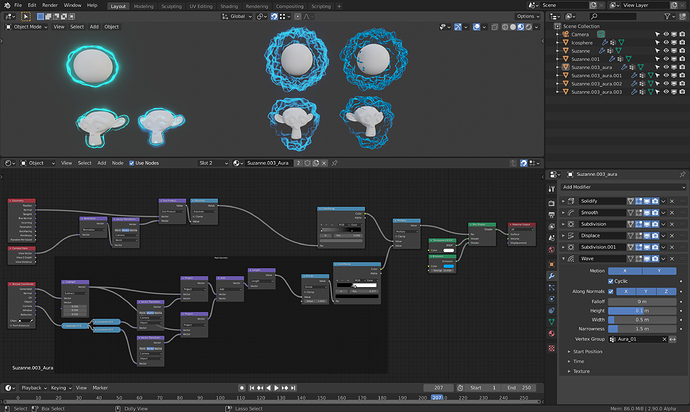
It’s not just a shader but at least completely procedural using modifiers and it allows layering of multiple auras.
Each aura consists of a Solidify modifier that creates the geometry for the aura, a Displacement modifier to give the aura a wavy look and optionally a wave modifier to maybe animate the aura. (Note: If you’re using Cycles, you can use the shader to displace and animate the aura instead)
The shader uses the flipped normal of the solidify modifier and backface culling to (mostly) only be visible behind the object. The glow in the screenshot is created using Eevee’s bloom.
The setup is a little involved and it’s quite late where I am, so for now I’ll only upload the blend file in case you wanna take a look.
If this seems interesting to you, I can write a breakdown of the setup. 
aura-effect.blend (1.2 MB)
EDIT: I think the animation looks pretty neat:
7 Likes
thank you for sharing the file , its amazing
omg @lone_noel this looks very interesting! I see a color ramp!  … and modifiers , very interesting
… have to take the time and check this out in detail!!
Off-Topic (Sorry)
I am working on an animation denoiser and would like to use this as a training example. If you allow me to use it under CC-0 or CC-BY, I would add it to my dataset and certainly attribute the file to you. I am only allowing those two licenses to make it simpler for myself and to avoid as many legal issues down the line as possible. Once the dataset is further advanced, I am going to make it freely available, most likely as a torrent due to its size.
@DeepBlender Sure, you are free to use it under CC-0.
I played a little more with the effect today, mostly because I wanted to get rid of some of the ‘artifacts’ around Suzanne’s facial features caused by the self intersections of the solidify modifier.
I could decrease them a little by using a Smooth modifier on the aura, but not really to my satisfaction (and the Remesh modifier doesn’t support vertex groups…).
I found that for larger auras you can add a mask in the shader making the middle of the aura transparent (the examples on the right):
I think it’s experimenting with the shader in cycles, as it would allow the displacement of the halo to be setup based on the camera/view to give it a more ‘2D’ feel.
2 Likes


 … and modifiers , very interesting