he could be your neighbor

long time no post, but today i want to share what i did recently. my goal with this portrait was to learn to paint textures in blender and to create a realistic portrait in blender. what do you think?
everything was done in blender, except signature, which was added in photoshop.


and an image briefly showing how i did this portrait


i hope you enjoy…

So good to see you back Doris! The texture painting /shading looks top notch indeed.

Top row quality, 5 stars from me :smiley: Thank you so much for sharing your texture breakdown

I didn’t notice this thread at first, and I posted a comment on your sketchbook, which I’m pasting it here:

<<A very good piece of yours Doris, in his simple expression he looks so natural and alive.
I seem to notice in it a pathos, a sort of sadness that your previous works had not.

Technically it is very well done, hair are perfect; the only thing that lets understand it’s not a photo is some lack of deep of the skin folds, due perhaps to the sss transparence, as Michalis always pointed out.>>

Now that I see your workflow I think that perhaps the normal map is not large enough, but I may be wrong since I have very little experience of the matter and, I confess, I don’t understand the need of such workflow: why the retopo and why the normal map? If you don’t mind could you kindly explain a bit?

Thanks for posting here again, your work is always inspiring.

paolo

Hi, Doris!

First of all I want to congratulate you for your work. From time to time I land in your blog.
When I first took a look at this portrait in the thumbnails, I was quite impressed. It is a very good work, but there is a few details that I think they could be improved, so if you don’t mind I’m uploading your image with some marks. I hope you don’t find this disrespectful.


  • The line of the cloth makes me think that the T-Shirt is backwards, which I don’t know if it’s intentional.
  • I’m not sure the sternocleidomastoid muscle is correctly depicted. Actually the neck is not working (from my point of view, in the right border)
  • I know the hair particle system can be a hell sometimes :wink: But be care with the forehead. It is showing the trick of the CGI images (some strange patterns)
  • And finally (not marked) The irises are for me too much sharpened. They tend to be blurred in the eyeball.

On the other hand, the lighting, shading are great for me. I could remark the hair shading. It is very natural and realistic.

Thank you again for your work. And thank you for sharing your textures and process.

This is only a friendly review.

Have a nice day!

thank you harleynut. it is good to be back :slight_smile:

craig, thank you for the stars. and i am glad the breakdown is appreciated.

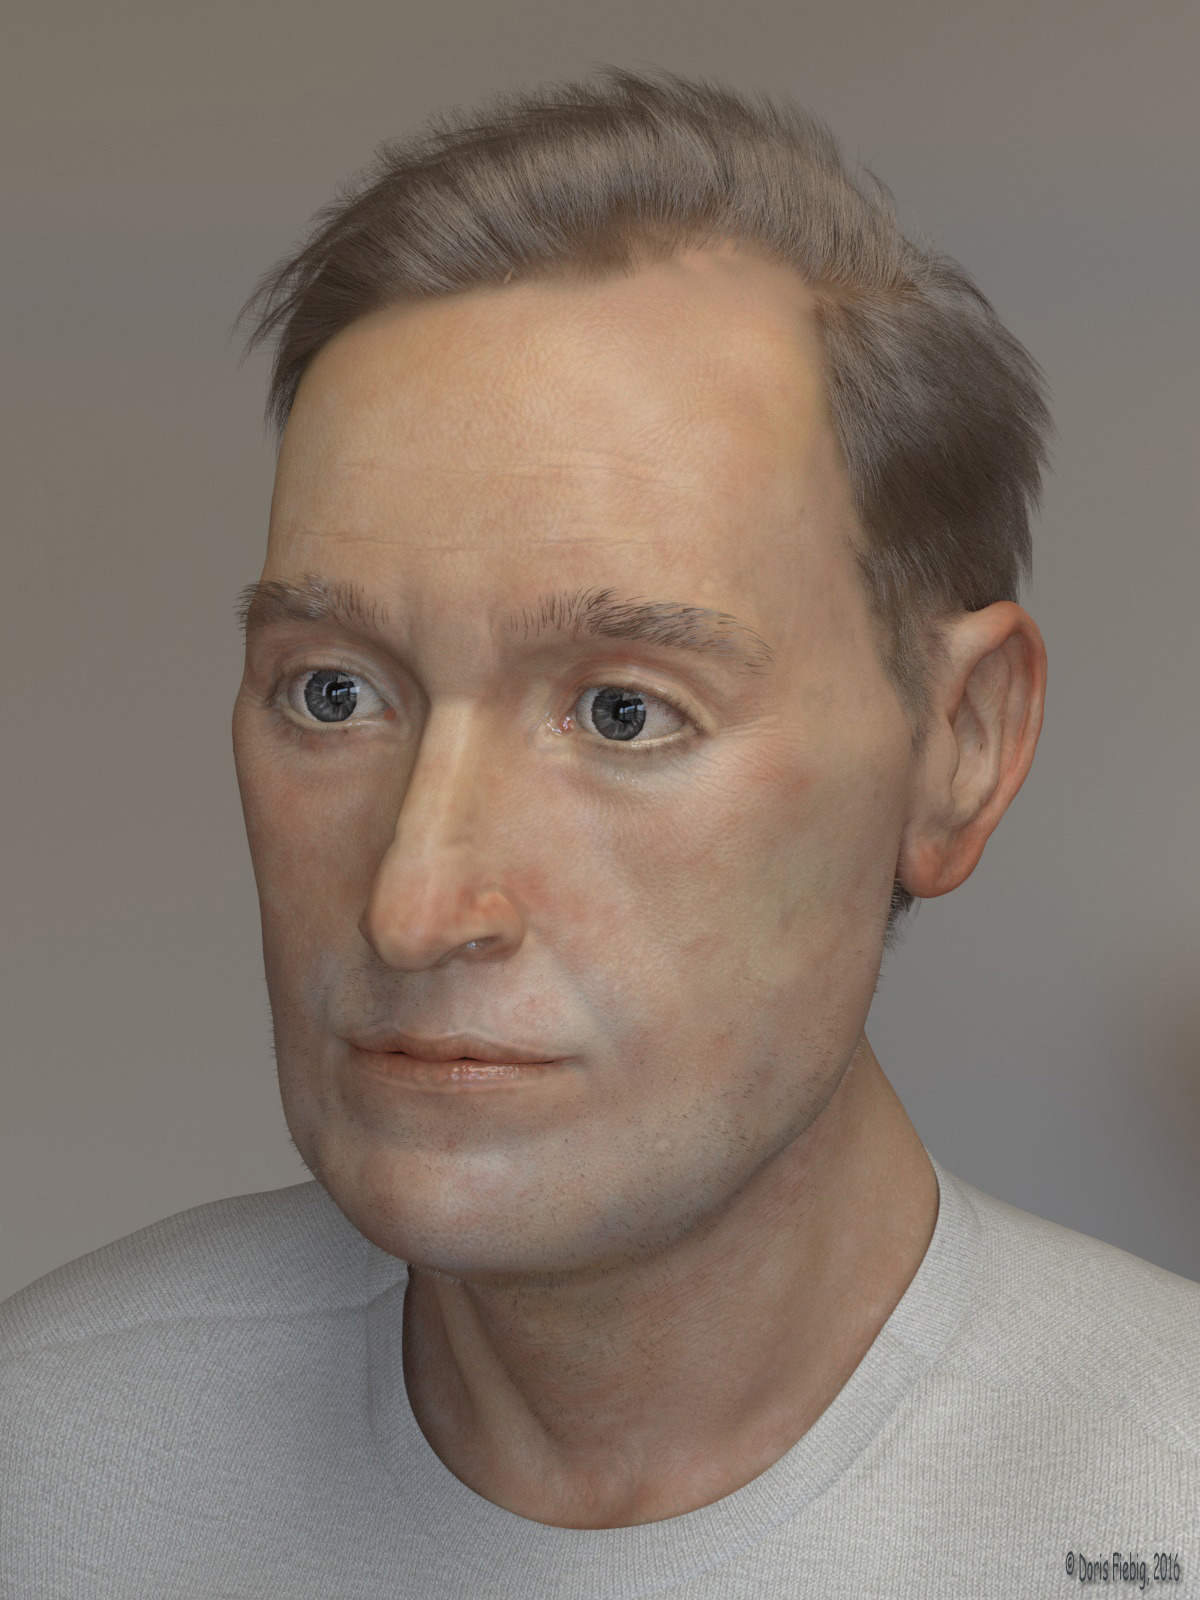
paolo, yes with the strength of the normal map we can choose how good the detail shows. in this case, making the normal map stronger to show the skin folds better also increased the skin pores and made the unrealistically pronounced. in my next project, i will separate them, into different maps for more control…
as to your question, why retopo etc. for me it has several reasons. if i would work with the dynatopo sculpt alone, and sculpt into that the fine detail like the pores etc, then i have a very dense mesh (at least on the face). now when i want texture it, i could use vertex paint. but this is terribly slow on such dense meshes. not good. so, i would need an uv map to be able to apint the texture. creating a uv map directly from a dynatopo is a nightmare too, because of the high polycount. and i like to have the uv layout so that i can see where the pieces go on the sculpt, so an aoutomatic uv will not work… and the last reason is performance. when you paint a texture on a highpolysculpt, it is slow too. painting it on a low level multires is super fluid… and, finally, when i test the shaders, i need rendering in the viewport, and that is not so smooth when i have to render a highpoly dynatopo… so, i retopo, multires shrinkwrap two levels. this gives me a very light basemesh, which is easy to make nice uvs. and when you compare the multires two level with the dynatopo, you see it is already much cleaner, even though it is just shrinkwrapped. now, when i subdivide and sculpt further, i have the advantage of good flowing edges. meaning for example the edge loops run along the border of the lids, the border of the lips, along the bigger folds etc. this makes sculpting these ares clean and with correct detail easy. sculpting along bad flowing edgeloops is harder, and needs more polygons… so, the time needed to retopo, is easily saved in the later stages of the work…

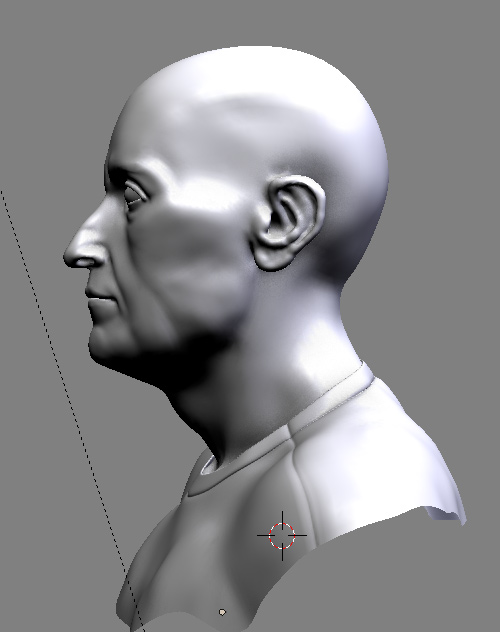
mr chuan, thank you. your constructive critique is very helpful. yes, thirt seams are too far forward, i did not notice that, but you are right. same with eyes. i struggled a lot with them and am doing already different ones in my new project… whoops, i overlooked the blotches at the hairline, should not be there, you are right… as to the neck, i think, i have it excately as the person i used for reference, and it looks only so odd in this particular camara angle. i just tried it, when i rotate the camera just a tad it looks natural. so bad camera angle, should have seen that… here is a side view to show you why it looks ood, namely sinse he has a strong bend from back of head down to neck… the image also shows that the tsihirt seam is too far forward… thanks a lot for helping by pointing out trouble spots.
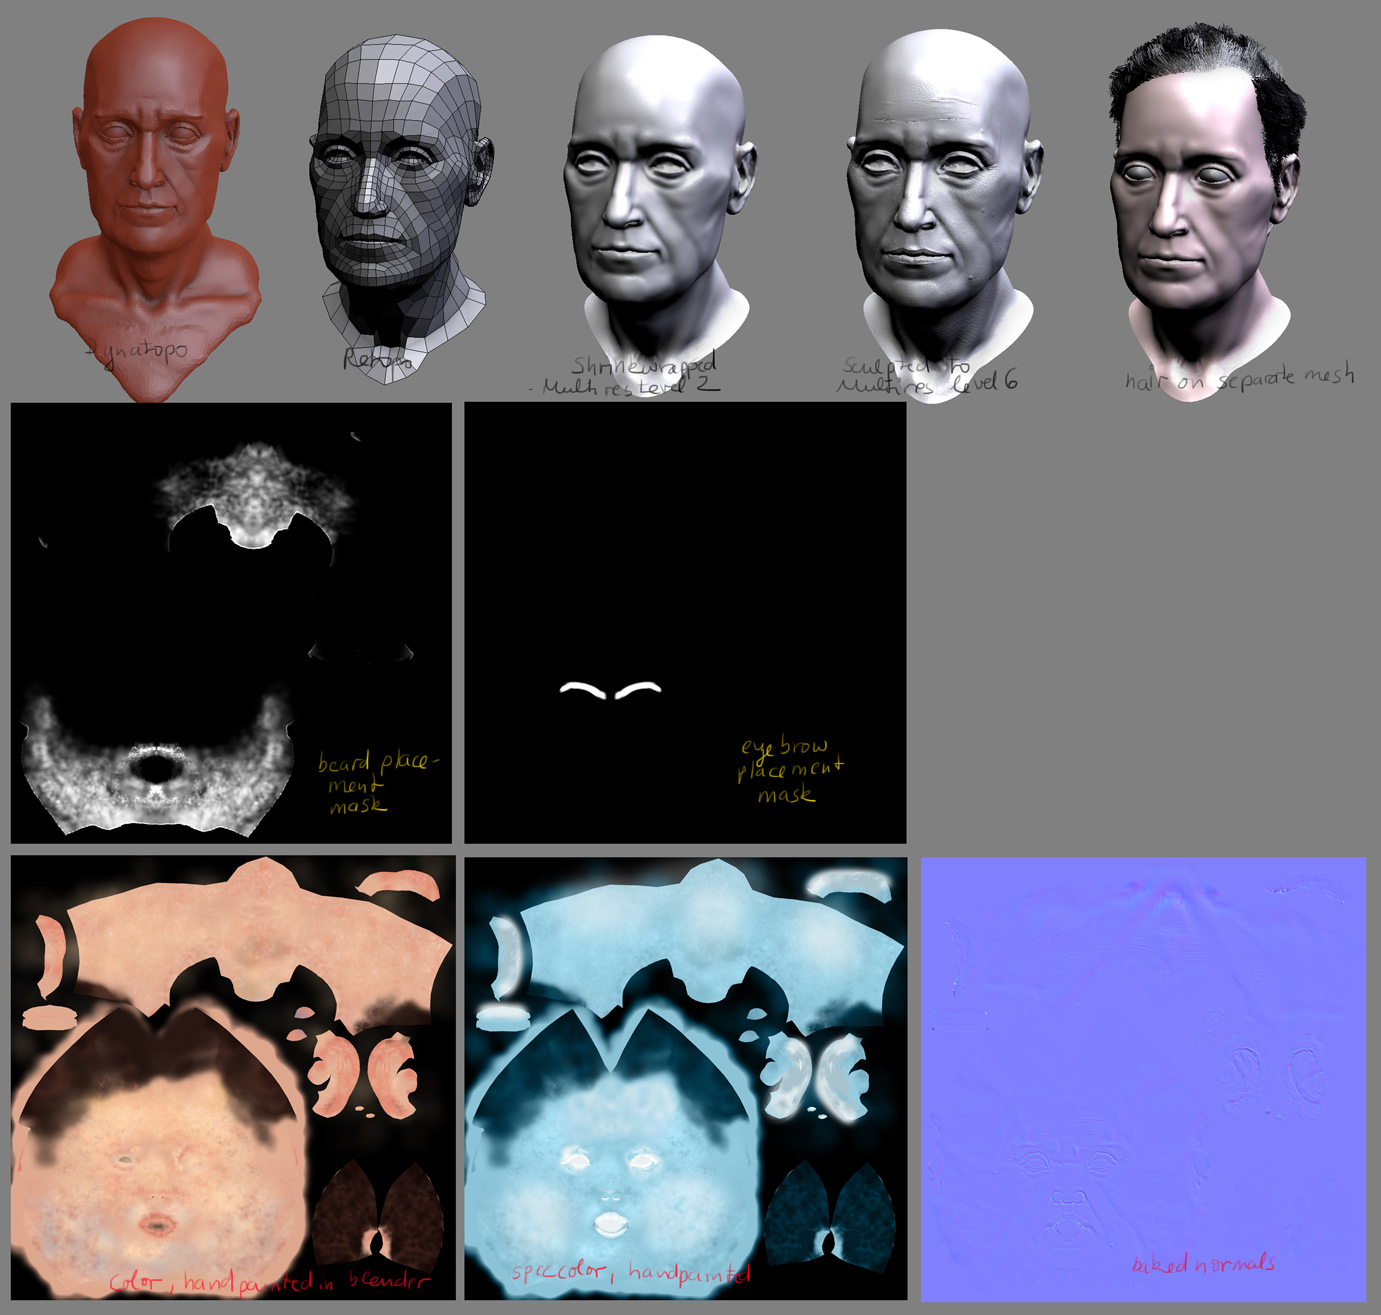

Thanks to you, Doris. Maybe the strange neck effect is due to the camera angle, as you say; as I see everything perfect in the side view. Have a nice day!

Thank you Doris,
what you explained has much of sense, the fact is that I hate the multiresolution, and since my sculptures usually have not so many vertices as yours but just around the folds, and I rely on textures for the pores, it’s not difficoult to me to UV unwrap and paint them.
Furthermore I find the look of dyntopo and its irregularities can give some naturality to the skin.

But the time that I will have to do some more accurate thing I will remember your suggestions.

Cheers,
paolo

Beyond any technical issues already discussed, I would like to compliment your handling of the skin texturing, it has the look of a finely-done oil or egg tempera, rarely seen in CG work, but for me much more effective for portraiture that striving for “photo-realism.” But then, I was a painter & pastellist long before CG was even possible, so I’m prejudiced (in a good way!). Beautiful work in the classic portraiture vein.

paolo, yes i hated multires too, since the spikes bug it had. but i had not met in lately and so it works finde for me. for sculpting without texturing, i would use dynatopo only too…

chipmasque, thank you. glad you noted this, i did not paint really pores etc, like on phototextures, but strived for the general look of skin as we perceive it and to capture that through the color “blobs”. glad you like that.

what really drives me nuts of multires is when you go for sculpting over an open mesh, such as dresses, and you can’t help getting the boundaries all distorted, and the smooth brush just shrinks them rather than fixing them.
Of course dynatopo doesn’t fit to such meshes at all, so, better than nothing, sometimes I have to adapt myself to multires. But then a new problem arises, the basic mesh has a quite regular squared topology, and when you come to sculpt folds they always have a flow conflicting with the mesh, and the result is disgusting even at high subdivision.
Now you are going to hint to retopo, aren’t you? No, thanks, I’m too lazy.

paolo

yes, unfortunuately blender has no smooth settings, like in zbrush, where you can say “smooth vertex only when at least four edges coming in”, this makes staying border edges fixed under smoothing and smoothes only inside vertices… one trick you can use though is to add a second edgeloop very close to the boundary loop, before you enter multires. then when smoothing the boundary is mainly fixed. at the cost of more polygons, that not really used otherwise… for dresses, the border would be at fixed height, so you can lock the z while smoothing. then at least the length stays fixed…
about the retopo, you could replace the evenly squared topology only at the places where you want folds, adjust the topology there in edit mode. its much less work than doing a full retopo.

Hi Doris,
you came up with meaningful suggestions, unfortunately I have already tried to add an edge loop close to the margins, but this made things even worst, because they got deformed and smoothed altogether and overlapped each other, making far more difficult to fix vertex by vertex (I mean virtual vertices in this case, the mesh doesn’t have such vertices, you know, so in wireframe view and by zooming very close I have managed sometime to adjust them, but if some ‘vertices’ are too close each other then the grab brush will move them altogether).

Instead I like the idea of a partial retopo, I didn’t think about it, it deserves a try! But I have to guess in advance where the folds will be, I wonder whether I’ll be able to do, it’s a quite abstract process, at that point perhaps it is easier to shape them directly in edit mode.
Ok, I will see next time.

Thank you,
paolo