Hi,
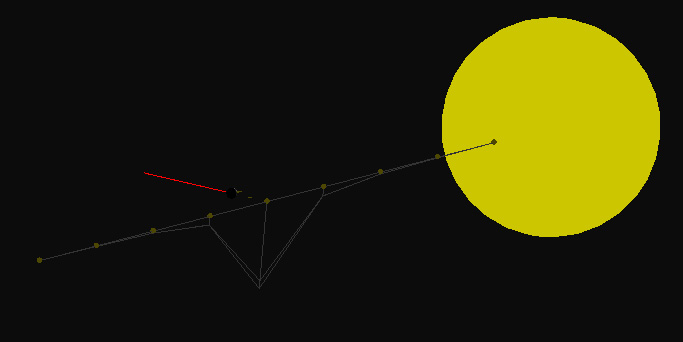
I am working on a planet simulator, which will show the space-time distortion caused by the gravity fields of the planet(s) and star. This is what I have been able to accomplish so far using Python, by using one object “grav” and positioning it on the Y axis 10 times, in 10 BU increments (using a locator" object called “grav_loc”).

I need help with writing python code which will take one object “grav_loc” and use the “scene.addObject” command to create a 10x10 grid pattern centered around the star. The spacing between each object is 10 BU, so in the end, I want to have a grid 100BUx100BU, with 10BU spacing between each instance (the dark yellow dots).
The solved code should be able to create the grid by only defining two variables, the grid spacing between each object, and the number of grid instances (centered from the star position).
Portion of my code as shown in the image above:
import bpy
import bge
import GameLogic as g
from mathutils import Vector as v
from math import *
from bge import render as r

cont = g.getCurrentController()
sce = g.getCurrentScene()
list = sce.objects
own = cont.owner

GOD = sce.objects["GOD"]
STAR = sce.objects["body_star"]
PLANET = sce.objects["body_planet"]
GRAV = sce.objects["grav"]
GRAVLOC = sce.objects["grav_loc"]


### DRAW BACKGROUND COLOR AND LIGHTING ###
bg_color = [ 0.05, 0.05, 0.05, 0.0 ]
amb_color = [ 1.0, 1.0, 1.0 ]
r.setBackgroundColor(bg_color)
r.setAmbientColor(amb_color)


stg_size = 10 # number of grids to create
stg_spacing = 10 # spacing between each grid

stg_color = [ 0.2, 0.2, 0.2 ]
grid_color = [ 0.07, 0.07, 0.07 ]

G = GOD["G"]


### DRAW SPACE-TIME GRID ###
for i in range(stg_size):
    if i > 0 : # repeat by stg_size value, set to -1 for draw center
        interval = stg_spacing * i
        GRAVLOC.position = [0,interval,0]

        ### RETRIEVE PREVIOUS FRAME VALUES FROM "GRAVLOC" ###
        prevGx = GRAVLOC["x"]
        prevGy = GRAVLOC["y"]
        prevGz = GRAVLOC["z"]
        prevGzz = GRAVLOC["grav_ZZ"]

        ### CALC GRAVITY FORCES ###
        def calcGrav(obA, obB, G):
            m1 = obA.mass
            m2 = obB.mass
            M = m1 * m2
            loc1 = obA.worldPosition
            loc2 = obB.worldPosition
            v = loc1 - loc2
            r = v.length + 0.0000001
            F = G * ( (M) / (r*r) )
            obA["F"] = F
            return F

        ### ADD GRAVITY "METERS" ###
        ob = sce.addObject(GRAV,GRAVLOC,1)

        ### IDENTIFY ADDED INSTANCES ###
        gravObID = id(ob)
        ob = sce.objects.from_id(gravObID)

        ### RUN GRAVITY CALC PER METER ###
        calcGrav(ob, PLANET, G)

        ### CONVERT GRAVITY MEASUREMENT TO CONTROL GRID Z-AXIS ###
        F = -ob["F"] * 100


        ###
        '''
        WRITE VALUES TO "GRAVLOC" OBJECT, BECAUSE "GRAV" IS
        DESTROYED EVERY FRAME (BECAUSE IT IS ONLY AN INSTANCE)
        '''
        ###
        grav_x, grav_y, grav_z = ob.position
        grav_ZZ = grav_z + F

        GRAVLOC["x"] = grav_x
        GRAVLOC["y"] = grav_y
        GRAVLOC["z"] = grav_z
        GRAVLOC["grav_ZZ"] = grav_ZZ

        ### DRAW GRAVITY MEASUREMENT ON Z-AXIS ###
        r.drawLine(
            GRAVLOC.position,
            [grav_x, grav_y, grav_ZZ],
            stg_color)

        ### DRAW GRAVITY MEASUREMENT ON X AND Z-AXIS ###
        r.drawLine(
            [prevGx, prevGy, prevGzz],
            [grav_x, grav_y, grav_ZZ],
            stg_color)

        '''### DRAW GRID ###
        grid_size = 10 # number of grids to create
        grid_spacing = 10 # spacing between each grid

        grid_max = (grid_size * grid_spacing)
        grid_min = -(grid_size * grid_spacing)


        for i in range(grid_size):
            if i > -1 : # repeat by grid_size value
                interval = grid_spacing * i

                # draw X lines
                r.drawLine(
                    [grid_min,interval,0],
                    [grid_max,interval,0],
                    grid_color)
                r.drawLine(
                    [grid_min,-interval,0],
                    [grid_max,-interval,0],
                    grid_color)

                # draw Y lines
                r.drawLine(
                    [interval,grid_min,0],
                    [interval,grid_max,0],
                    grid_color)
                r.drawLine(
                    [-interval,grid_min,0],
                    [-interval,grid_max,0],
                    grid_color)


                # draw Z on X lines
                r.drawLine(
                    [grid_min,0,interval],
                    [grid_max,0,interval],
                    grid_color)
                r.drawLine(
                    [grid_min,0,-interval],
                    [grid_max,0,-interval],
                    grid_color)
                r.drawLine(
                    [interval,0,grid_min],
                    [interval,0,grid_max],
                    grid_color)
                r.drawLine(
                    [-interval,0,grid_min],
                    [-interval,0,grid_max],
                    grid_color)

                # draw Z on Y lines
                r.drawLine(
                    [0,grid_min,interval],
                    [0,grid_max,interval],
                    grid_color)
                r.drawLine(
                    [0,grid_min,-interval],
                    [0,grid_max,-interval],
                    grid_color)
                r.drawLine(
                    [0,interval,grid_min],
                    [0,interval,grid_max],
                    grid_color)
                r.drawLine(
                    [0,-interval,grid_min],
                    [0,-interval,grid_max],
                    grid_color)
                    '''
The “grav_loc” object contains 4 game properties (“x”,“y”,“z”,“grav_ZZ”). The “grav” object are the 9 yellow circles, which contains one game property (“F”). The “grav” object is also set to “dynamic” and “ghost”, with a mass of 1.000. For extra-credit, the space-time grid in the image above is only showing the PLANET mass effect, not both the PLANET and STAR combined…I can solve this later.
Any help will be greatly appreciated. I imagine this involves using IF, FOR or WHILE statements, which I am still getting my brain to wrap-around and understand. :spin:
If you need me to post the .blend file, please let me know.
Thanks so much!
- cswita
