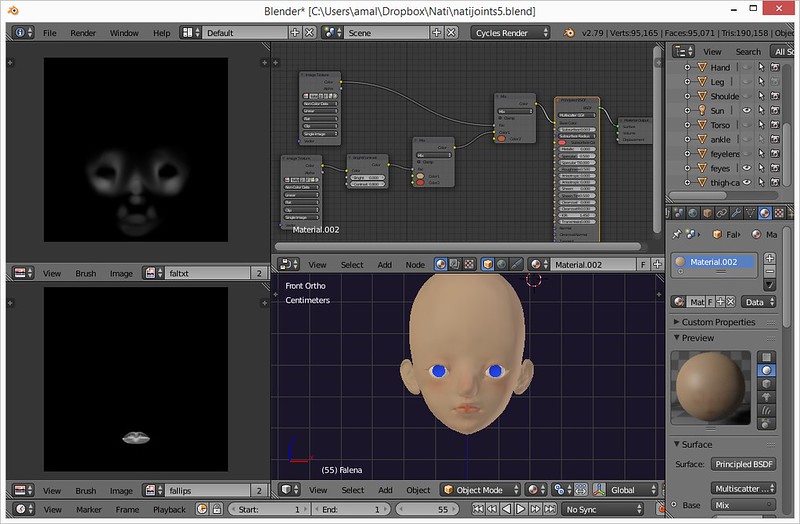
My first post. Please be gentle. I’m completely self-taught and still much of a novice. I’m learning mostly by a combination of trial and error and watching youTube!
So, I want to render a character with a very simple skin texture, the base of which is a Principled BSDF.
I wanted to add some depth by ‘painting’ layers of colour ontop of this shader, for example to make the cheeks and lips darker for example.
So far, I have created two vertex paint slots, one for cheeks and one for lips and have painted them using grayscale with a view to using these attributes to mask the paint colours (so that I can later adjust the colours with nodes rather than repainting the colours themselves. (Hope that makes sense?)
What I’m struggling to understand in the node setup below is why is the ‘mix’ node which uses the ‘lip’ attribute as a mask affecting the neck??
If anyone can point me in the right direction for setting up a simple node system whereby I can control the cheek and lip colour separately from the base colour, I would be most grateful!
Can’t say for sure without seeing more. Best would be if you posted a .blend someplace that we could look at. Almost as good would be a view showing your “lips” vertex color only.
A good thing to do to troubleshoot here is to plug your vertex color directly into your material output/surface to visualize it. Here, it looks like you’re using a black “lips” color to indicate whether something should be lips or not. I suspect you’ll find that your neck is painted black as well.
Note that using vertex color to mask like this isn’t the best way to do things, because Blender assumes that you want to gamma correct vertex color. What that means is that if you paint 0.5 gray, you won’t get the even mix you expect.
MixRGB is mixing Color1 with Color2 based on the value of Fac. When Fac is 0, Color1 is used, when Fac is 1 - Color2 is used, for all intermediate values - a linear blend between the two (the greater the Fac, the less of Color1 and the more of Color2).
If you want to use your vertex colors as masks, paint the whole model black, except add gray/white in areas you want to affect (i.e. for your lips layer you’ll have a black model with lips painted white/shades of gray). Just like you would paint an alpha mask in Photoshop, Gimp, etc. But keep in mind what @bandages said about gamma correction. Then your shading setup will look something like this:
So, mixing skin with lip color where lip vertex colors aren’t black, and mixing result of that with cheek color where cheek vertex colors aren’t black.
I checked the neck - it’s actually a different object and doesn’t have any vertex colours associated with it. However, as Stan_Pancakes mentions, I was using the colours the wrong way round for alpha - I didn’t realise I should be painting white/gray onto black?! I was doing it the other way round.
You’re right, the masking isn’t giving the results I’m expecting.
If this isn’t the best way, do you know of another method to achieve this effect? I’m looking at the models of Nazar Noshenko, for example, whose characters have very simple, smooth, subtle skin and I just can’t figure out how to get the same effect?!
It doesn’t really matter. You can have black represent lips and white represent not-lips, or vice versa. Blender doesn’t know what a lip is. But the fact that you didn’t have any vertex colors on the neck meant that your vertex color was being read as 0 black, which you were interpreting as lips in your nodes.
Getting good textures is about a lot more than just this kind of technical knowledge-- you can have all the technical knowledge in the world and still be a poor artist. (Like me, I’m a lot happier with my technical knowledge than my art.)
But to avoid the gamma problem, what is more commonly done in Blender is to use an image texture to mask. That requires a UV map, but you can get away with a smart project most of the time, if you’re not good at seaming yet. Then you’d paint the mask using texture paint, and read it as non-color data, instead of using your vertex color as a mask.
I was painting the wrong way round with black and white for alpha!
I will have to look up what you mention about gamma correction…
Do you know if there is another way to use the vertex colours as layers without relying on masking? If I use the attribute colour itself, I can’t seem to layer these onto the BSDF shader without using a different mix method, like ‘multiply’, which in turn affects the base colour.
You’re welcome! And yes, as @bandages says, it’s not so much that you were painting the “wrong way”, more like inconsistently using the Fac value. You can have it the other way around, but then you’ll need to switch the Color1 and Color2 inputs everywhere.
As vertex colors don’t have alpha, you can’t really “layer” them without using some kind of mask. I guess you could “fake” the mask by plugging in the color itself into a Fac input (or, more explicitly, separating the Value from color using the SeparateHSV node and using the Value, but I believe that’s what plugging a color into a single-value input would do anyway; separating it explicitly would allow you to filter it through, say, a ColorRamp, to increase/decrease the whites). Which again, then would be helpful that vertices with no influence should have a black color.
Aha, ok, - that makes sense! I get what you are saying about using the texture paint as a mask instead. I think this will be my next step and see if I can get further that way.
Oh and, one other thing, in the vein of gamma correction. You can approximate the sRGB to linear conversion and back using a Gamma node. See, for example, the “Pro tip” here.
You can set an image texture to cube project on mesh, you will need to add a texture coordinate node and I would go with generated, I’ll do that when I’m doing sculpts and I just want to get a feel of where I am, but I’m not motivated enough to do the UV thing. And if you wanted to find an easyish skin shader to rip and modify…honestly the more porn based cg sites have some of the better ones I’ve seen. Ginny skin shader comes to mind, it is at that nice cross roads between efficiency and quality…just don’t google that on a work machine or in mixed company/around kids.
Just wanted to come back with an update to show that I’m using the image textures as masks and I think that I will use this method for now, as it allows the colours to be altered via the nodes rather than having to edit the images themselves.
I used the smart projection to get the uv map, which worked quite well for this face (as I’m not going to need much detail).