HELP! UV mapping wont work!!!!

Hi guys, I am a complete newbie to Blender, only been using it a few days for a university project (which has to be handed in this week hence why I’m panicking). My question to anyone able to help is, why won’t my UV mapping work?!

I have made a model of a glass bottle, and simply follow a youtube vid on how to place a label on a 3d model using uv mapping etc. I do everything correct, but for some reason the image just doesn’t show up, even in edit mode, and on any viewport shading option. What am I doing wrong?!

Please can someone help, many thanks!

What am I doing wrong?!
Supplying no example blend file with your post so we know nothing about your scene, your model, your material, your UVs, your texture, your renderer, your render settings, your texture mapping etc etc etc


Sorry yeah Im guessing screenshots would help! This is the label I am trying to put on this bottle. The only issue I seem to have when comparing to online tutorials is that the ‘Texture’ Toolbar to the right gives me a different ‘mapping’ section, whereas on the online tutorials they are able to put in ‘UVMap’ etc in location - something I can’t seem to do?

[ATTACH=CONFIG]396321[/ATTACH]Sorry, well here is my label in the UV mapping section, and the bottle I want to place it on. Also as you can see on the right side of the screen my mapping options for my material seem to different to what many tutorials say? they say ‘map it to UVmap’ but as shown I can’t choose any option like that. maybe this is why it doesn’t show up?

Again this shows nothing about your materials and you have not supplied any blend file for review.

tutorials they are able to put in ‘UVMap’ etc in location - something I can’t seem to do?
If you watch tutorials then actually follow them. have you UV unwrapped your object ? If not then do so. Show us your node setup in the node editor (as well as supplying your blend file)

Bottle is a glass, sticker is paper - another material, different object. Why would you want to cheat- make them different objects in your file too ;).
Import image as a Plane, subdivide or loopcut a bit and ‘stick’ it using Shrinkwrap modifier. Would allow to have sticker slightly skewed, more natural.
http://www.pasteall.org/pic/show.php?id=92220

Okay here is my blender fileuntitled.blend (764 KB)

thanks very much I appreciate your help, This model might not have any uv mapping on it as I kept quitting and not saving because I didn’t want to mess too many things up!

Since there is a silence around… i’ll try…

So you’re stuck on doing UVs for a bottle/sticker while following some YT videos/tutorials, yes?
Could you please be more specific as to point to some where you later have problems following to? Would make much more easier to point to the better one or to give some explanations related to the subject.

Now, there is a blend file in attachment finally which is supposed to show/describe the problem yet there is no UVs at all neither there is any material or texture image which you would base material on - what’s our task then?
Hint: File - External Data - “Automatically Pack into .blend” - check - ON. “Compress File” checked in User Preferences - File tab and saved as User Settings on a default file takes care of this always.

To the mesh included in the file-

  1. Scale
    It is considered a good measure to always work with Objects which have Scale = 1 (N-tab, object mode, Scale xyz fields show 1).
    Scaling in Edit mode is the way to model.
    Applying any of Object’s Rotation, Location - depends. You have to know what you do though, some parts of blender could get confused.

While generally one could choose to model any size, Cycles, which is considered physically plausible renderer, is programmed to use metrics which are close to the real world based on 1BU (Blender Unit) = 1m. Things like Refraction, IOR belonging to glass physical parameters are calculated using this relation; you wouldn’t want your bottle to have 1m thick walls. Will look fake on render.
You wont be able to light the bottle using one or two 60watt point lights properly if the bottle is two storeys tall.

  1. Mesh.

Double vertices and free floating vertices not belonging to any faces could cause all kinds of UV unwrap problems; you have both in your mesh. Edit mode W key - remove doubles, menu Select -> Loose Geometry will allow to find and delete these.

Cycles - physically bla bla bla… Thus, glass object which is modeled as a infinitely thin surface will not render correctly if GlassBSDF shader node is used. You need to model thickness of the bottle.

To make Object smooth you use Subsurf modifier; Subsurf works badly on triangulated meshes, “triangle fan”, which you have on the bottom of the bottle. I’d suggest using Grid Fill (Space Bar Search for “Grid”) on selected ring of vertices after deleting triangles.
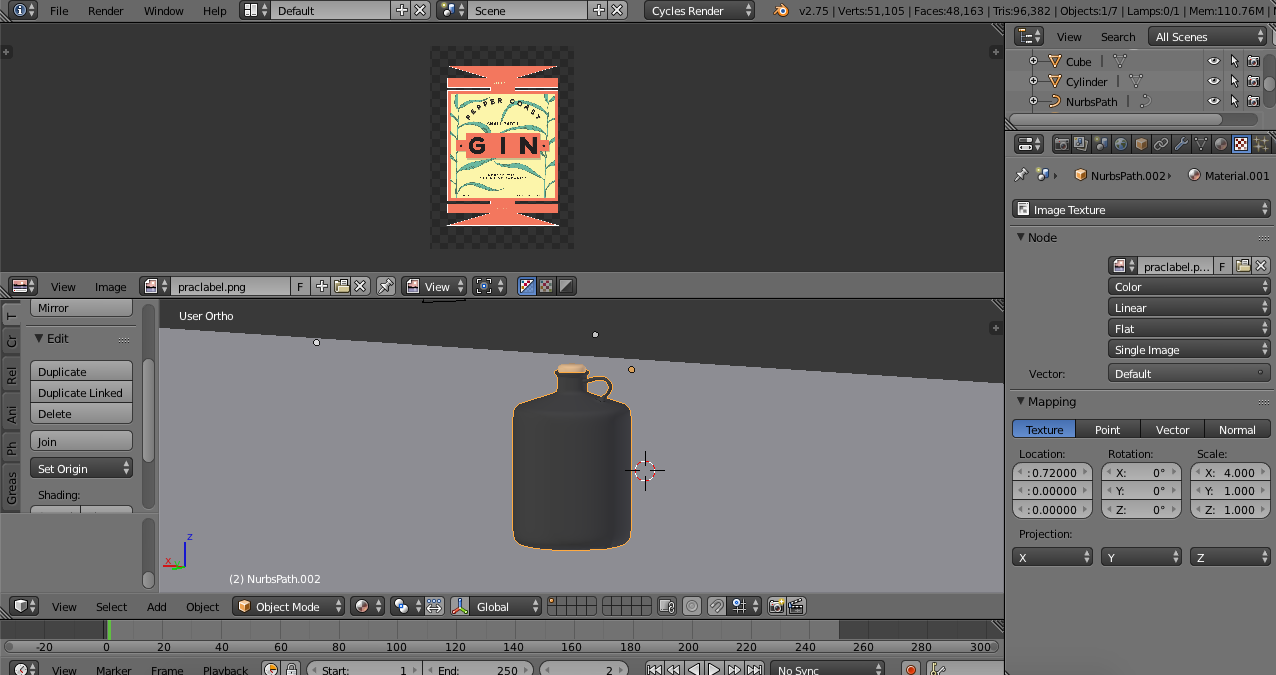
  1. UVs

In Edit mode, select faces you think your sticker will cover, press U - Unwrap while sticker’s image is in UV editor’s window. Drag’n’drop image’s icon from UV editor’s window menu image selector to Node editor.
Add nodes you find by googling “Cycles bottle sticker site:blenderartists.org”, done.

P.S. File - Save button, little to the left, there is a “+” which neatly adds version number to your files. Helps to not to mess things up in original files.

Hi thanks for your reply.

My scale is set to 1, I mean does the scale look okay from your end? When I try to render it looks incredibly noisy.

I have done the remove doubles but cannot tell if it worked succesfully, as for modeling the thickness of the bottle I have no idea how to go about that… as well getting rid of the ‘triangle fans’.

I also have no idea why the UV mapping won’t work. This is so frustrating; it’s such a bloody simple shape!

I have done the UV mapping like I did before in this file, so hopefully you can easily spot where I’m going wrong…
untitledwithuvmapping?.blend (847 KB)

Thanks again for your help it’ll be such a relief to finally understand this simple thing.

Regarding UVs:

  • Your model has no UVs. I’ve tried to select some faces and apply a planar UV map (as I think you did on your other model), and it works.
  • None of your materials uses that texture, so I don’t see how it could appear.
  • In case you wanted to use Cylindrical or Spherical UV mapping, bear in mind that those mapping modes take the origin of the object as their center. Your object looks like it’s centered on [0,0,0], but it really is centered on [-1.5,0,4.1]. Unless you have a reason for that, it would be better to put its center on [0,0,0] (put your cursor at [0,0,0], then Object/Transform/Origin to 3D Cursor) or any of the other centers.

Other issues:

  • Your model has inconsistent normals. Most of that bottle (except the handle) is pointing inwards. Use Ctrl+N to normalize them.
  • Loose and duplicated vertices. Enter vertex mode to receive an unpleasant surprise about your handle… You’ve been given instructions about it so nothing more to say.
  • The Giant Bottom Triangle Fan: Delete its central vertex to delete it, then select the bottom edge loop. Press F. A wild N-Gon appears! Inset it. You won’t get rid of it but it will lessen its influence to the point you can ignore it exists.
  • Solidify bottle walls. Once you have corrected the normals, you can use the Solidify modifier.

Yes, scale for the bottle is reset to 1, not for a cork though. Bottle is around 4m tall (which is fine for modeling but needs to be rescaled later for the render).

What i did not mention in the previous list (which you did not follow leaving free floating vertices for the handle attempt) is that you have face normals mostly pointing inwards. Mostly, meaning there are issues how handle is modeled/attached. Side Ortho view and selected ring of vertices where handle will start; mouse rightclick will extrude geometry. 3 or 4 clicks, Bridge, some shaping and done.

To model closed glass walls volume switch off Subsurf mod visibility temporarily and start to extrude/move down and scale as needed upper vertex loop until you reach the bottom. To see whats going on set viewport to wireframe mode. Switch back visibility of Subsurf and check if you might need to add some loops or move some so that inner surface is not crossing outer.

Triangle fan on the bottom - delete central vertex. Select ring of vertices, Spacebar, write ‘grid’, select Grid Fill. Defaults should be fine.
If there are problems, Grid Fill does not do anything - see ring divisions, you have one extra vertical loop near the handle - select that and Delete - Edge Loop.

If your image has transparency and you unwrap selection of outer faces - this should be all what’s needed to assign modified material with image texture to the face selection.

http://www.pasteall.org/pic/show.php?id=92261

Edit: Solidify mod suggested could give problems on handle mesh if the thickness for walls does not ‘fit’ inside the handle.

Some visuals about the previously mentioned mesh fixes. Too many to screenshot so recorded the screen.

Looptools addon: circle was used and that is found in the special menu (W) after enabling it, so are many other functions used in the video. Grid fill is in faces menu (ctrl+F). Recalculate normals could be found on the tool shelf, hotkey ctrl+N.

Temporary material was used to easily select the inner part after solidify modifier was applied. Select similar (shift+G) -> material in face selection mode to make the selection.

Thanks for all the replies, eppo that looks beautiful!! that’s exactly what I want mine to look like just black glass. And thankyou so much JA12 for the video, couldn’t have helped better! I followed it and made the fixes, however the very last bit when you are editing the notes for the material, my whole bottle ends up purple, unlike yours, which has a cross on the bottle? What am I doing wrong here? Thanks again!! My hand ins on thursday and I am hopeful I will be done!

updated version attached
untitled.blend (771 KB)

The texture node has no texture assigned.

of course, thanks! Another stupid question, the model is transparent in edit mode, even on ‘solid’, so I can’t select a face for UV mapping because it keeps clicking all the faces behind… any idea why this is?

Thanks, managed to sort it out! I now have my front and back label on the bottle, but for some reason there is a line across the back label, can you guys see it?

Also, eppo, how did you make your render look so nice?! I need to render my final outcome but for some reason mine just looks awful and noisy even after an hour or two of rendering. Is this the problem with the scale? My updated file is below:
untitled.blend (901 KB)

Thanks again, you guys are lifesavers!

Update: I managed to finally finish the bottle and put the labels on, but I am now trying to make a simple box packaging with these images on (main design on front then 3 plain sides), so the box can fit nicely behind the bottle somewhere and then I can take a rendered photo and boom jobs done. Typically enough, I am finding the box hard. How do I set the box to accurate measurements so that my 4 sides can fit on perfectly? That’s all I need to do before tonight!! you guys are great thanks so much
untitled.blend (897 KB)


Here’s the modeling bit for a basic box. Didn’t start making a fancy one with more tweaks, this was slow enough already.

https://youtu.be/GeyaADugE6E

  • Import images as planes addon helps with this because that gives a proper aspect ratio for the plane
  • I used linked duplicates (alt+D) instead of mirror or array modifier to have the sides. That way it’s possible to edit one and all linked duplicates change. Did that for all sides at first, then made front and back single users (U) to drop the linking. Then edited the sides which were still linked
  • Snap menu (shift+S) was used quite often, object origin was set few times too (tool shelf under origin, or ctrl+alt+shift+C)
  • The rest was moving and extruding vertices.

bottle_box_ja12.blend (318 KB)