Hi there I would like some help to make the lighting of a short that I´m starting.
So, I´m using some external lights in the building, and the character is at the second layer so as the light that are making the illumination around the character (3 point light system).
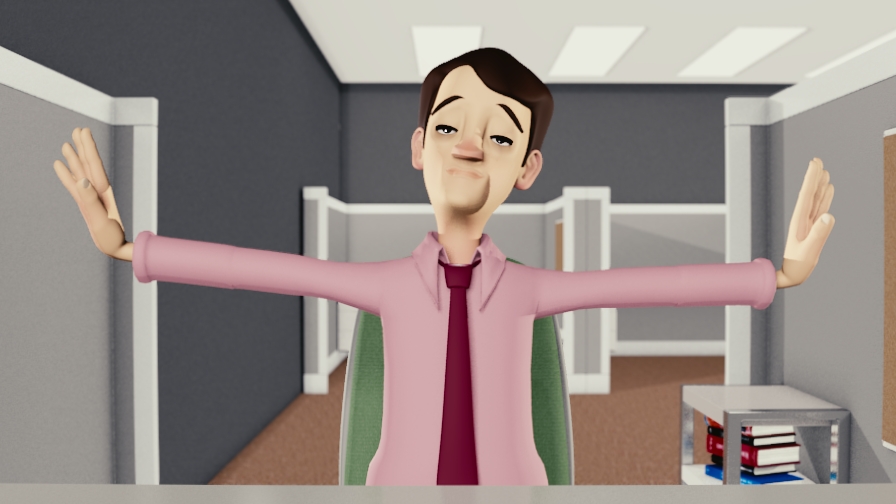
I would like some help and tips how to light, because if I move the character my light have a constraint to AutoTrack the bone head but the light´s dont move along with the bone so my result in another position render´s like this.
I´m going to try that, thank you for answering and give the idea. I would like to use GI or other approach but I have to render 10min of video and the specs that I have are poor.
Cool, that will be a lot of video. For the constraint on the empty I would add “Copy Transforms” that way you get rotation and scale too (so if the head turns the lights should rotate and keep his face illuminated). Good luck, keep us posted if it works out or not, we can brainstorm something else if needed.
Quandtum, I dont know if this is the best approach as I told before, the character have a good lighting over it but now the ambient, lost the illumination of course.
My render time using this kind of techinique it´s around 7 secs.
The results using the lights parented to the empty and constraint to the head bone.
If you are rendering in layers, you can duplicate the lights and move them to the layer (minus the new constraint). That will keep the environment light as it was before. If I recall correctly, the lights will only effect the render layer (I could be wrong though, it’s been a while since I have done anything like that).
In other words, one set to light the character on his layer, another set to illuminate the environment as desired.
Also, on the tip of my mind, you could render the environment once with Z-pass (or something) and just animate and render the character and composite it back together as opposed to rendering the environment on each pass.
Using the same technique I´m using three point lighting in the second layer where the character is, and the ambient lighting in the first layer.
My problem, using a fixed camera there´s no problem, any animation that I made will be render using the same composition for light, but if I move the camera it ruins the light rig.
Can someone give a tip, remember one thing, I have an low end processor to render 10.000 frames, that´s why I´m using this instead of using some fancy gi, or even cycles.
I suspect (although I’m not 100% sure) that you have your lights too close to the character in the scenes where you’re moving either him or the camera. Trying moving the lights further out. For instance, if you have a light two Blender units from the character, move it to ten or even 15 Blender units and crank up the Energy level of the light to make up for the distance. That way, the exposure should be more consistent.
Hi, thank you for the feed, as to the light, I was thinking, I could parent the light position (angle) to an empty and the camera to the empty, so if I move the camera the lights move around the character dont matter what is the position of the camera, rendering thatway always a three point light to the main character.
What you think? Each frame takes 8 sec only with AOC.