Hello to all. I have visited the site a lot of time and many times I have been able to find answers to my problems just by reading the different threads. But this time I really need help.
I’m working on an exterior scene, and I would really need help for the lighting. I have done exterior scenes before but nothing seems to work this time.
I am rendering with Cycles. I have placed a sun, using also the sky. The sky behind the scene is a plane with a texture. Whatever tweaking I do it not satisfactory. Either its over-expose or some details are too dark.
Could anyone suggest me a way to set my lights for a good result.
I have also tried with HDRI images, but the problem was the same, even worse as the windows had a lot of white dots. I have enabled AO, that help a little bit but, another prob arose from that as when using GPU it nearly always crashes with AO.
When I see some of your works guys the lighting is just great. I do think that I’m missing something here.
For the world I have set it as the sky available for background, yes AO is on. Yes have put the sky light to 1. Shape I’m not too sure what you mean. But I have made it able to cast shadow and put it to 0.150 for hard shadow. I had put a plane with a texture just behind the camera but for some reason it just do not reflect it, so the windows are now reflecting the default sky.
Hello and thanks for the replies. I wish I could Alain but the scene is not mine, I’m working in freelance for a company. Normally I’m not even allowed to post this image. But I do not have much choice.
I could have posted a screenshot of my scene but that will only be possible tonight. I need to give 2 renders tomorrow. I really need some advice.
Do you guys have a prefered way to tackle this situation or a link to a tutorial somewhere. To be frank I did not find any good tutorial on this subject, only for interior lighting for cycles.
I’m no expert at outdoor lighting but find that simple works ok sometimes
the plane that you want to reflect in the windows may need to be moved around depending on the angle of the camera… let me know if this is any use.
what extras does it have? (i haven’t looked yet) I would avoid it if you are in a hurry, sometimes new versions have areas that are incompatible with your current set up, you would need to correct ‘stuff’ before continuing.
If anyone else could give me some tips or point me in a certain direction to solve my problem I would be really grateful. I have only a few hours left to set up everything and start rendering.
My current scene is just a sun lamp set to power of 5, and the world is is just the background sky texture set to a power of .5 with the horizon pulled down about half way… Ill add clouds later.
The sun lamp is set to a slight orange color.
You could have a sky texture plane in front of the building for window reflections just make sure you uncheck everything in the Ray Visibility panel except glossy for that plane.
Also, turn AO off
I think the biggest problem is the shader the specular intense is to high and to hard… Move far a lamps to… When i will back to home i will create some setup.
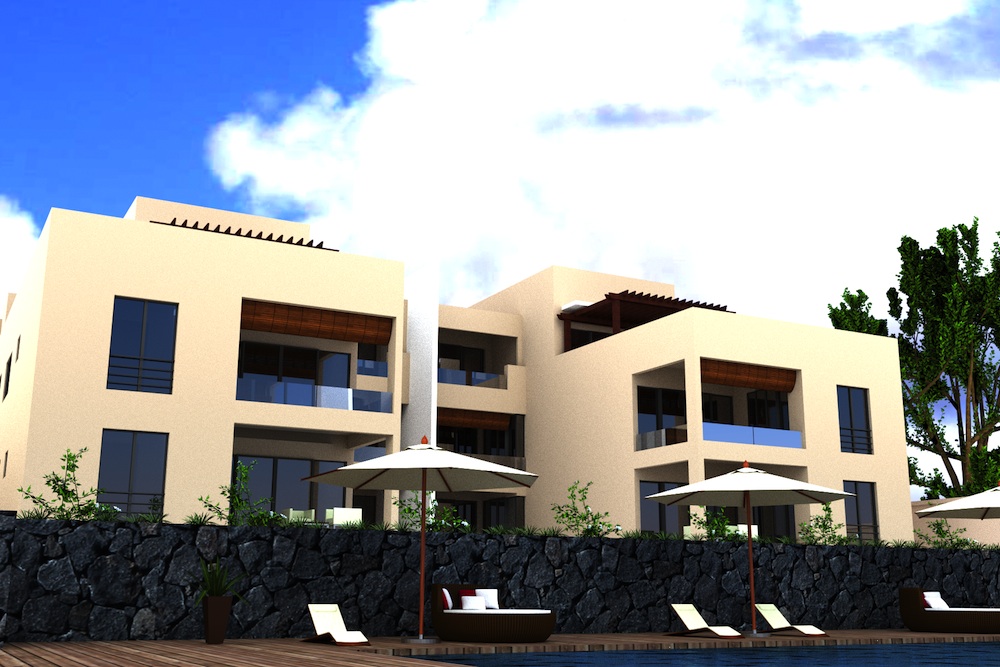
Hello to all. Firstly many thanks to Andy, Kramon, Rich and Alain for your help. So I did another render yesterday. I change mi lighting settings. So I used a Sun, 2 area lamps on both side and one spot on the tree. I have already sent to the client and he wants some changes but he is fine with the render quality. Tell me what you think of the lighting. Oh I had to edit it in gimp as it was a bit too dark, I’ll have to surely increase the lights power.
lookin good! is it still in cycles? If it is then you can increase the power of the light by scaling the emission object ie your sun, this gives an overall light increase instead of a torch effect.
Hello Andy. Yes its cycles. Oh I did not know that I could scale the sun like the other lights. So I just scale it as scaling an object and that shall give me a brighter scene?