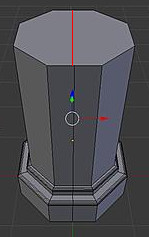
Hello, I’m very new to blender, and don’t even know all the hotkeys yet.
And I want to learn how to split this object here into two and have a flat surface on the middle parts. How do I do that? Thank you I look forward to learning this

Hello, I’m very new to blender, and don’t even know all the hotkeys yet.

First, you’ll need to cut the polygon on the top and bottom.
Switch to Edit mode (Tab) if you’re not already there.
Press K to bring up the Knife Tool. Cut the polygon as indicated by the red line. Do the same for the bottom.

Now switch to Face select mode (Ctrl-Tab), select half your object and push P and “selected” to separate the selected stuff to a new layer.
Select that new layer in the Outliner window, and press H to hide it.
Go back to the first half of the object. Go back into edit mode, and Vertex select (Ctrl-Tab) mode.
Fill in the empty side by selecting four vertices’s at a time and pressing F to make a new face.
Alternative Method: Booleans:
Create a new box. (Shift-A > Mesh > Cube)
Drag (G) and Scale (S) the box so it completely encases one half of your object.
Select your original object.
In the Properties window, click on the Modifiers button (looks like a wrench).
Click Add modifier, and select Boolean. Choose the Box object as the the boolean object. The Intersect or Difference will each give you a different half, so pick one.
Duplicate the object (Shift-D) and scale it along the X-axis by -1 (S then X then -1).
Tada, two solid halves.
Thanks for this! I have copied it down ![]() I’m going to warn everyone there will be many questions!
I’m going to warn everyone there will be many questions!
I have a new question: Now I’ve split this, thanks to your help  How do I stretch the shortened side back to its original size, the size of the other faces? I tried selecting the faces then scaling, translating, and extruding but got odd results with the first two and seemingly unselected underfaces with extrude :x
Sounds like you may have may have “Limit Selection to Visible” turned on. It’s to the right of the vertex/edge/face selection modes.
Turn it off.
You may also wish to switch to Wireframe mode to see stuff behind (Z).
Another thing to consider is: All transformations happen around a certain point, called the Pivot Point. You may wish to play with that if you’re get scaling in unexpected ways.
http://wiki.blender.org/index.php/Doc:2.6/Manual/3D_interaction/Transform_Control/Pivot_Point
http://wiki.blender.org/index.php/Doc:2.6/Manual/3D_interaction/Transform_Control/Pivot_Point/3D_Cursor
One last thing to possibly consider is to Remove Doubles (W key, then select Remove Doubles), if you get faces or vertices on top of each other, removing doubles will fix it. It’s probably the most important action whenever you’re modeling.