I need to model some hexagonal holes (not circles) and I’m wondering what the best topology will be for joining with the rest of the mesh.
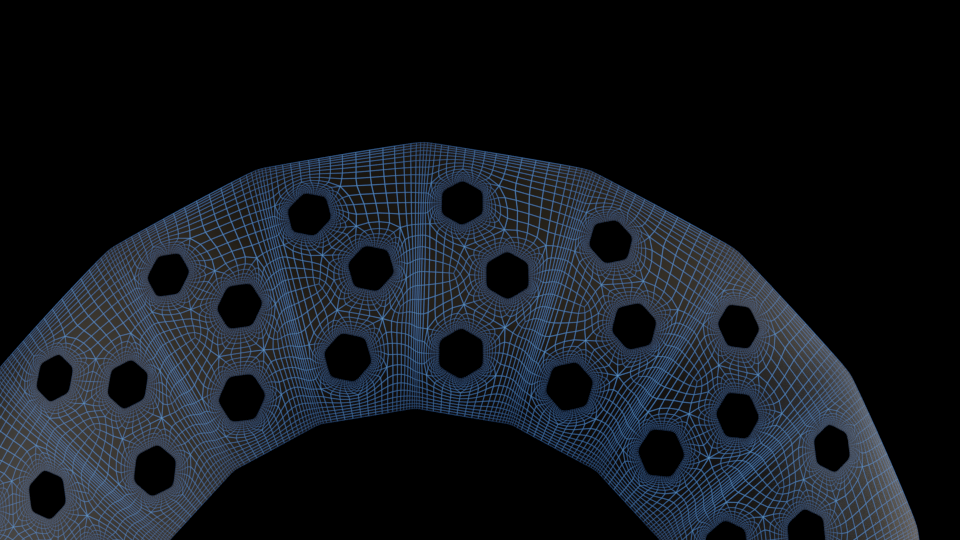
Here is what I have below. As you can see I basically do 2 holding edges around each of the 6 original edges to ensure the hexagon shape is maintained. I then merge back down into 6 to ease joining in with the outer mesh. This join back down to 6 doesn’t look correct though? The topology doesn’t look…“nice”.
What better way should this be done? Keep note of the overall, mirrored, shape section I’m working within (tapered rectangle).
I would use creasing and maybe bevel to soften them. Your geometry seems denser than it could be for the shape. Definitely try using creasing with subsurf. What is it that you are modelling?
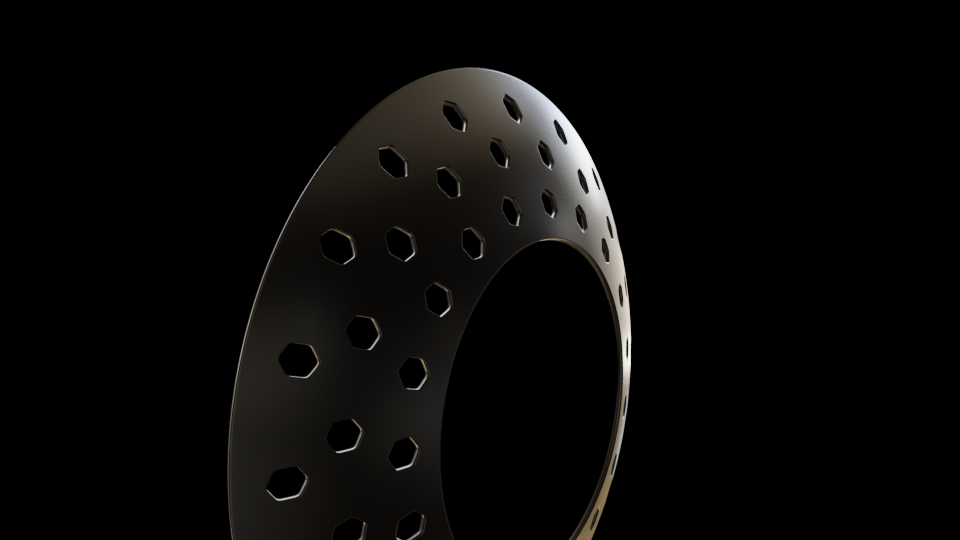
It’s a Black and Decker Orb2 vacuum (the thing is crazy; all 6 sides are different than the other, hardly any symmetry :)) You can see the part I’m attempting below (image search for other views of it)
For creasing, the edges of the hexagons looked really bad. Do you have an example as perhaps I’m creasing the wrong edges?
For Bevel, the final topology looked somewhat similar since I’m still applying sub-d on top of it (to help establish curvature for the circular/curve of the model). For my pictures above, the piece has already been curved into place but I have not regularized (circularized) the vertices yet to get a perfect circle on the top/bottom.
The proportions seem to be quite different than modeled. There is clear symmetry in the pattern. Closer observation should make things easier. Creasing will give better results than what you have now with loops. I would recommend redoing it a coulpe of times trying to build the form with as little geometry as it is possible untill you get it.
I was just prototyping the shape to see if I could get the curved hexagons right so wasn’t worried too much about proportions and placement. As for symmetry, the other sides of the ball are vastly different than this one is all I meant - which makes for good modeling practice.
I’m still having trouble getting creasing + solidify etc. to work in unison. Creasing doesn’t yield good hexagonal shapes for what I’ve tried. I’ll keep at it though.
In the worst case I’ll keep it as it since it seems fine once rendered:
You can start with simple Add -> Mesh -> Circle make it have 6 vertices, make 3 of them, position them accordingly, connect the edges with f and use mirror modifier on them, then make an array with locator as a control object rotating them around so whatever number you have makes a circle, you can project them onto a sphere using Shrinkwrap modifier. This way you have only a few points to work with and it is easy to get the shape right.
You can calculate exactly how much you need to rotate what easily if you wish it to be precise. After you have this you can add solidify modifier and select Crease Inner, Outer and Rim. Once you apply modifiers, you need to uncrease the most inner and outer edge rings or you can just crease the edges manually instead of using the creasing in solidify modifier - shift+g to select by length or face angles will be helpful then you can use subsurf. I would try to get away without using subsurf at all. Oh, Circle function might be useful if you have Loop tools addon enabled, or you could use To Sphere(just type Circle or To Sphere into the space menu) to make the circles round again.