Hey guys! Just started getting into Blender and found this community. Love 3D modeling and used to use 3DS MAX a long time ago. Decided to get back into it again and am finding Blender to be amazing.
My first foray back into modeling. Wife and I just bought a house and picked out all the outside colors. The issue we were having in the process is being able to actually visualize what it would look like. I thought to myself “I will try to model and render it!”
Going well so far. Went through some beginner tutorials on YT to get the basics of the tools. Finally ran into my first issue i cant seem to wrap my head around and am hoping someone here can shed some light. I imagine its something pretty basic I am missing.
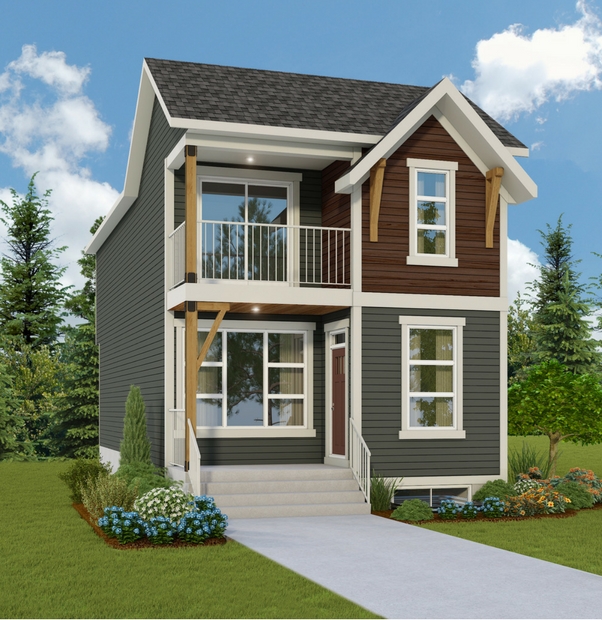
For reference, this is the house i am trying to replicate
I have gotten to the front right gable. Extruded the shape out, but now i need to “Extend it downwards” (as you can see in the photo, it goes down and beyond the front facing wall towards the balcony)
I understand i could move edges before extruding, or even extrude and then move the face down to try and match the angle. But i feel like i would be “Tweaking” it until it “Looked Right”. I was wondering if there is a more accurate way to extend it down while keeping it in line with the angle of the gable.
I hope that made sense, and i look forward to learning from, and contributing to this great community.
Select the faces you extruded from, edge slide (GG) and hold down alt to slide them further.
Don’t try to model everything from one connected geometry. Houses are built by attaching many objects, you should also model it that way. One way to start is to model a floor plan in 2D, then extrude up and make another extrusion at a level where there’s top or bottom of windows and doorways. There’s also addons in Blender that might help, like archipack and archimesh.
Also another way is when you first start to extrude it will give you the normal. Go with the flow and simply drag it out. Or commit - enter key or left or right click - and then set your transform orientation to Normal. Then simply move that face along the normal. I usually like to take my hand off the mouse and simply hit the enter key to be sure I have not moved it. Then move it manually along the normal.
EDIT: Ooops… sorry. I did not look at the image clearly…lol. Normal is facing global.
Another way in that case - if you will be doing this angle a lot - is to create a custom orientation for it.
And I second the notion of modeling in parts. Make it just like a real house with pieces of lumber.
Expand your reference selection to include architectural drawings of eves to see how they are constructed.
For example like this:
But at the same time don’t model things you will never see. So it is a balance between those extremes.
To extrude that face on the edge downwards, you could use an edge to define a custom transform axis. So you could make a custom transform by selecting an edge that has the angle of the peak and press ctrl-alt-space. Then it’s a matter of going to that face you were trying to extrude earlier, and during the extrude use YY. (However I’m finding custom transforms during extrude to be bugged and not working in the current version, so you may need to extrude by 0 and then just using move and YY to constrain to the transform axis.)