I’m working on a small shortfilm, in which a few shots will require expanses of clouds off in the horizon. I really love the look of those clouds in the background of the Peach project logo, and the ones used in The Incredibles. I am wondering how those might have been made. In some shots in The Incredibles, they look at least partially like some sort of particle effect or simulation, but most of the time they look like they were painted digitally (in Photoshop, for example) and have an alpha channel applied. I have seen the Cogfilms tutorial for Blender, and also a few for Terragen, but neither of those seem to produce similar results (Terragen is great but looks a little too realistic).
Ok. So, you get a lot of water, and you boil it. The steam you get is a cloud, albeit a small one.
Oh, you mean 3D? Snoop around the testing forums for that. I’ve seen some pretty good ones.
(laughs) Yeah, the title of this thread is kind of poorly worded. I tried to change it, but oh well. 
Well you see, when a boy cloud and a girl cloud fall in love, they form a special bond, and 9 months later…
No no no, do not listen to them. they come from eggs. You have to sit on them for a while, then when they hatch you have lovely white sky things that float around. Gosh, it is all so simple and natural.
I just use photos for clouds + sky.
@Mmph
Using a texture is great for creating horizons and such, but that wouldn’t quite work if he’d wanted the clouds to be extending to the foreground as well, like doing a flying through clouds scene.
Well. I found this http://www.ayatoweb.com/ae_tips_e/ae46_e.html . Check out Rustboy Making Of to see how to use layered clouds (http://www.rustboy.com/rustweb.htm).
I suppose you could use particals. Would be slow to render, but if done wel could look good
Note that you can fake particle halos with compositor. You just need to render a mask of some sort (needed to generate “halos”). An example setup: http://bebraw.googlepages.com/clouds.png (still needs refinement to make it really cloudy). Advantage of this solution is that you can use custom ramps for halos (http://bebraw.googlepages.com/ramphalosetup.png).
See also Perlin’s tests on this subject, http://mrl.nyu.edu/~perlin/experiments/puff/ .
sorry, wrong topic
They are also made when you eat zombies. Zombies let out clouds when eaten by normal people.
http://www.geneome.net/blender/videotutorials/CloudLayering-XviD.avi
http://www.cogfilms.com/CQTs-5.html
Thanks for the links! I’ve been messing around with halo particles almost all day, and I’ve come up with a couple satisfactory solutions.
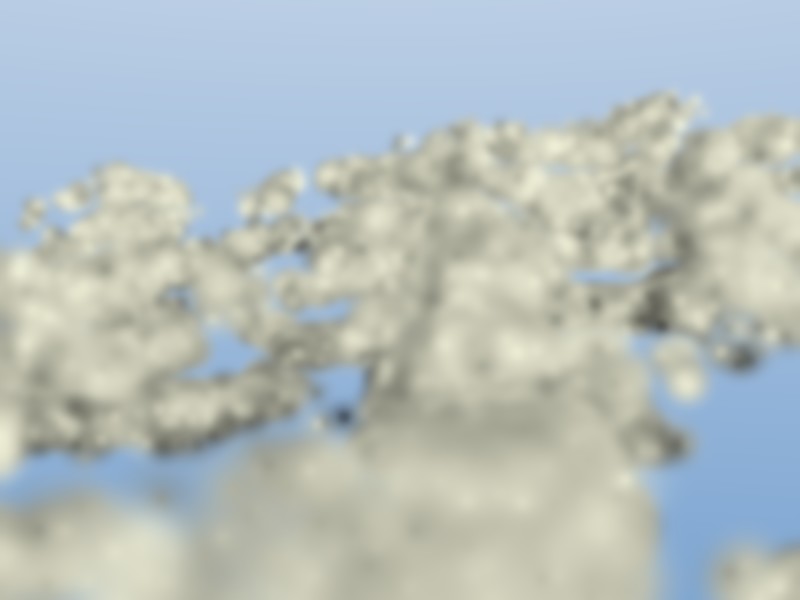
First is the cartoony one, the method for which I came up with myself. I made three layers out of three moderatley subdivided planes, each as its own object. I then chiseled a shape out of each so that together they form a sort of mountainous shape. The material is basically a white halo with alpha at 1, add at 0, hardness at something like 35, and I think the size was 1. Of course those would need to be adjusted relatively to the size of the emitter and final render. For all of the layers’ particles, the “random” velocity was turned up slightly (otherwise, the clouds don’t seem to react to light) I made the bottom layer the densest, with the most particles normal velocity at .025. The next layer had about half the particles and twice the normal velocity. The top layer again had about half the particles of the middle and twice the normal velocity. I added a sun lamp and altered the world horizon/zenith settings, and rendered. I had to reposition the lamp constantly to get it right though; the lighting seemed to behave inversely to how it would with a non-halo object.
Oh, I almost forgot: I also applied a slight blur to the image with compositor nodes to hide the halos that rendered like black dots.
This method only seems to look good with sparsely (and somewhat unrealistically) placed clouds. I modified the layers’ meshes so they formed a cloudscape and left everything else the same. It doesn’t look nearly as good, at least to me.
As long as that explanation was, this method is actually extremely simple and renders very quickly. I’m sure it could be modified to look much better, too.
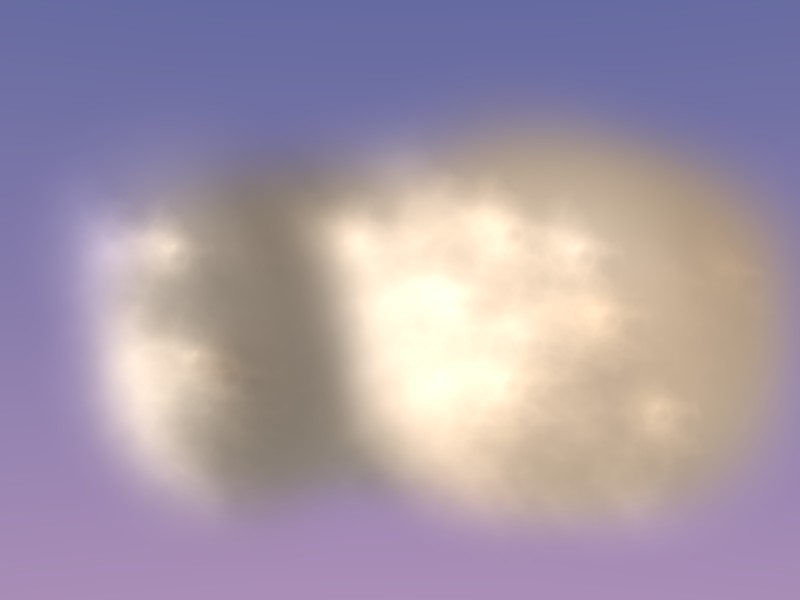
Next, I forced myself to copy every last setting visible in the cogfilms tutorial (hence the identical cloud right down to the texture). I only changed two things that I found make the cloud much more natural. I changed the halo size to 2 and the hardness to 50. This gets rid of those clearly visible circles. My render shown below isn’t very good, but I had made a thinner, less cube-like cloud that looked very good; unfortunately, it’s lost for now (I undid a whole bunch of times to get the scene back at the state shown, but after I rendered, I couldn’t redo).
Right now I’m about to watch that “cloud layering” tutorial and see what I can learn from that.
Yeargh! I feel like I have accomplished something today!:ba:
Attachments

in general, clouds in blender will be really tough, since blender lacks any kind of voxels system. The particle system is pretty subpar for clouds(and most such effects in general), but you seem to be making some good headway, keep it up!
Drew
Mind if I post?
Clouds in Blender can be done, did you know the SSS feature in Blender can be used with planes? Instead of using halos for clouds use planes parented to particle systems for clouds, set the alpha to 0 with z-transparency, give it a sphere blend texture set to stencil and another texture set to alpha. Make sure the planes are close to each other, then set the SSS settings to no back scattering, fair amount of forward scattering, and a very high scale, and tweak until it looks realistic. Also set it to Transhadow and set the transclusency to maximum.
Realistic clouds with realistic shading can be done, it just takes a lot of tweaking and work to get it right.
Yeah, I know about SSS, but the results, while good, arent that great, not to mention the insane amount of time they take to render(especially if your render involves AO, the times are exponential). It just isnt an effective way to do it.
If possible, I’d try to take fly-thru clouds out of the equation completely.
But his particles are looking pretty good, so trying that may be better.
You can use particles if you don’t want raytraced clouds without full realism in shading;)
“…you seem to be making some good headway, keep it up!”
“…his particles are looking pretty good”
Thanks!
“You can use particles if you don’t want raytraced clouds without full realism in shading;)”
Subsurface scattering takes way too long for me to really like it. For still renders it’s ok, but if I were to use it in animation, I’d be dead before anything significant would render (and my computer’s pretty powerful :))
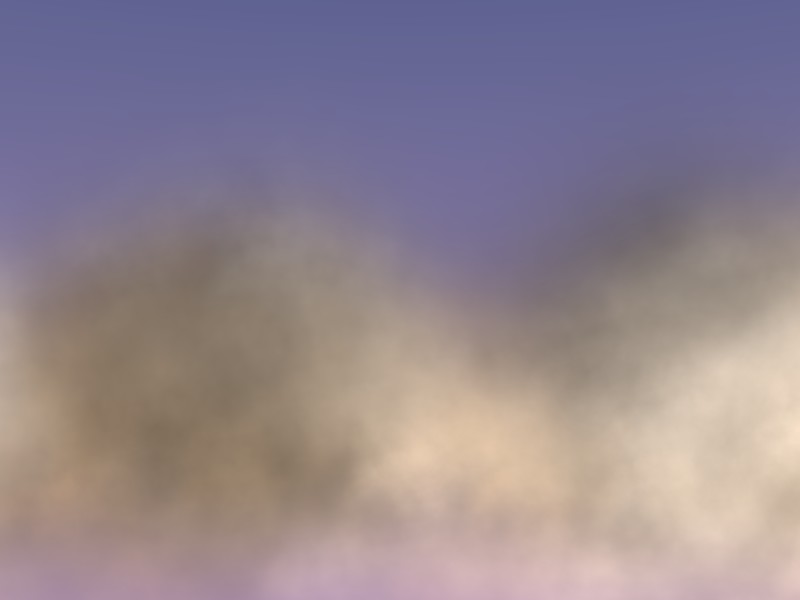
Here’s another render. It’s a combination of the my layering with the cogfilms method. I also applied two textures for more depth.
The Geneome cloud layers tutorial was pretty cool. That technique could be used for background clouds, but it sure wouldn’t look good in fly-thrus.
Attachments
There are really great ideas to be found here:
http://ofb.net/~eggplant/clouds/
In the video and “full paper” pdf file, they pretty much spell it out for you.
If those techniques can be used for realtime graphics in a flight simulator, why not in Blender for non-realtime imagery?