I’m trying to blend two images imported as planes in Blender exactly like i do it in Photoshop. I created a graphic explanation for you to see it clearly.
We have 3 layers in blender: the grey world background, one gradient image and the same gradient but scaled down on the Z or height axis.
The bigger gradient is put on a “color” blending option and the little gradient is put on a "luminosity blending option.
We align them and see the principal gradient in a front view as a result in the intersection of both.
We see both image plane objects in a interpretation of how it would look in a 3D camera view.
I found useful information that allows me to create with the shading nodes a material where i can use the blending options in a very similar way as Photoshop, altought i cannot have the “luminosity” one.
The thing is that this is option allows me to do this in the same material or object but i cannot find a way to do it between different objects as they would be layers in Photoshop.
I would appreciate a lot if you can help me with this!! Thanks!
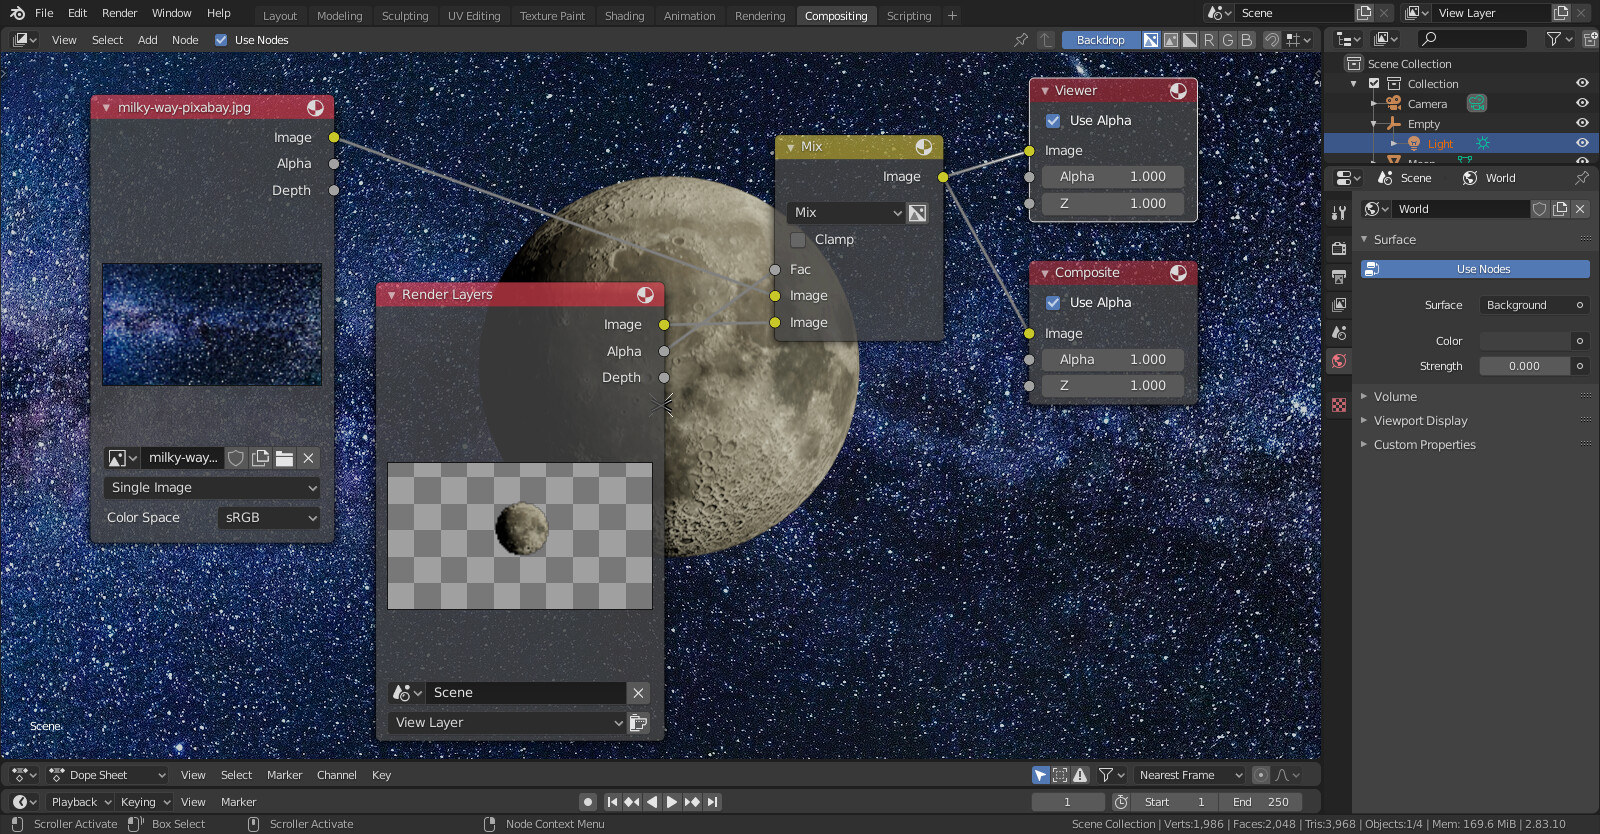
To achieve the same effect as blending layers in PS you have to create some additional view layers, one for each separate object/collection you want to blend, then mix them in the compositing tab.
In the picture I used two inputs, an external texture mixed with the rendered moon (with transparent background). The render result’s alpha is then used as a mask to avoid overlapping the two inputs. Of course, you can use any other effects there, screen, overlay etc. The output is also redirected to a Viewer node so I can see the result in real time.
I’ve been investigating and i think that compositing tab is for using a type of photoshop to create a picture. Actually I want to make this effect in the layout tab between objects and I think you explanation is aimed only for compositing. Maybe I’m wrong, please let me know.
Give it a render first to get all layers updated. Note there is a collection on each view layer, the collection that is not supposed to be visible in that layer is disabled. The final render is done in the compositor by blending the two view layers together. Change the mix to something else to see the effect.
Hum, you can’t ‘blend’ objects like in photoshop straight in blender. Because 3D doesn’t work like that …
you need to work in 2D for that , your options are either in a material, you mix / blend texture on a same object, or as Blutag pointed out, export different layers and composite them .
I think even if a bit tedious to setup compositing may be the more flexible approach and less prone to errors.
You shouldn’t expect the same results as in PS. I once screened two simple images in Blender and got gray spots (no clamping used) while the same operation was perfect in PS, so don’t expect miracles…
That may be related to blender working in linear, not sure about photoshop … Math behind the blend modes in theory should be the same… Anyway it may be hard to work around this issue if you send me the layers as png and the result in photoshop as png I can try quicky to see if that’s doable. Or maybe by doing some color correction before and/or after the blend modes you can get a result that is close if that’s enough.
You can almost exactly recreate this in the compositor. The only issue is with the luminance blend mode. I checked wikipedia. The luminance blend mode seems to use the Hue Chroma Luma color space, and the nodes in the compositor don’t support that. However blender does support Hue, Saturation, Value and those two while not the same seem to be similar:
So I decided to try using the hue and saturation of the bottom layer with the value of the top layer, but I also put the value through an rgb curves node to adjust the contrast: