in my case i want a globe i made to have the land lit with one HDRI and the ocean lit with another. the land and ocean are different materials on the same object.
i’m a complete beginner so please describe every step
in my case i want a globe i made to have the land lit with one HDRI and the ocean lit with another. the land and ocean are different materials on the same object.
i’m a complete beginner so please describe every step
Perhaps start by learning to do it proper. You light a scene with HDR, not an object or different parts of it, it doesn’t make sense especially at beginner level. Unless you can call yourself a master lighter in other software, there is no point in getting into really advanced tricks that require extensive knowledge about Blender, both its possibilities and limitations.
Are you sure you know what an HDRI is? It would be possible if you were willing to render your scene two or three times to create a matte and composite it, but it really defeats the point of using an HDRI at all.
i like the lighting effects HDRI give to the land and to the water, but i can’t make one HDRI make both the land and water look how i want them to at the same time. sometimes when the water is how i want it, the land is too dark, and visa versa.
can you explain the steps in detail for how to do that please?
Sure, but I’m about to go to sleep so I wont be providing tech support, so if you have issues just use google.
Render your first globe with HDRI, as an image sequence if thats what you need.
Render your second globe with HDRI, also as an image sequence if thats what you need.
Make a black and white mask. Set the background either to transparent, or pure white or pure black. The mask should be an emission texture, unless you want some bleed over between the two. (you can also save render time with an emission texture at low samples, or maybe even use eevee. it dont matter homeboy.)
doink everything together in the compositor.
In this case, the water has the stars HDRI effecting it.
And in this case the land has the stars effecting it.
edit, should mention my mask may not have had 255,255,255 on the whites, so the effect isnt as strong as it could be. This could still be fixed with a color ramp, or a mutliply node, or by raising the emission strength in the first place when making the mask.
thank you so much!!! it actually worked, but i think i messed up one step.
“Make a black and white mask. Set the background either to transparent, or pure white or pure black. The mask should be an emission texture”
how do i do this step exactly?
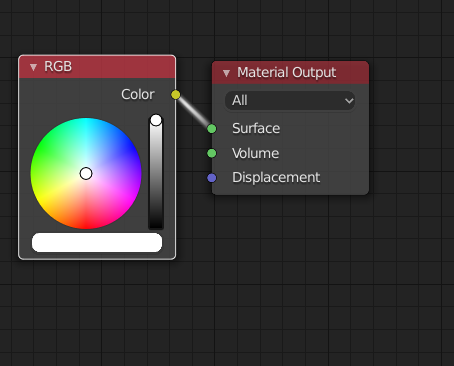
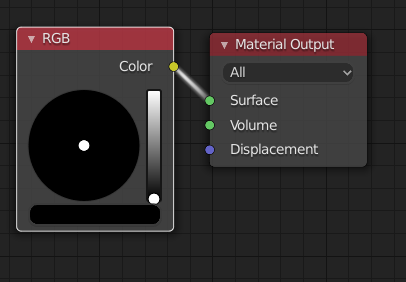
Well, in my case, Im an old bogey who still has specular maps sitting around, so I just plugged that straight into surface of the material output. However, you said in the original post that your land and ocean are already different materials, so add an RGB node thats white straight into the surface, and one thats black (or just none) into the surface of the other one.
For the background you go to the world tab, and just change it there, its the same place you would be plugging in your HDRI.
or if you prefer to make it transparent, go to render properties tab, open up the “Film” dropdown thingymabob, and check “transparent”
I didnt actually try using transparent on mine, but it would just give you more control over which HDRI you want to display in the background of the image, if thats even something visible in your scene.
i can’t thank you enough for all your help!
one last easy question, can i set my view as my camera view without the view shifting? whenever i hit ctrl alt 0 the camera view shifts a bit and messes up the lighting i got from my HDRI.
That is very peculiar and should not be happening at all. Do you have Lock Camera to View checked? (3d view N panel)
Edit: I should add one immediate solution would be to just not switch into your camera view. When you press render it will always render from the camera, so there is no need to set your view to camera once you’ve started this process.
that’s an awesome setting! thank you!
a minor issue came up though. the lighting given by the HDRI is different than it was before. any clue how to fix that?


