How can I use a Texture to drive a Shape Key (morph)? If you can picture a overweight person getting thinner from the feet toward the head over a few seconds. That’s kinda what I need to do. In Lightwave I used to be do this with a node setup and a null object with a black and white texture that told the morph target where to show up. Is such a thing possible in Blender? Thanks in advance!
You could just use a bone in your armature to drive your shape key using position in Z. I did something similar to drive a material shader color with a bone that allowed me to swap from yellow to blue.
1 Like
In order to make the shapekey progressively deform the mesh, you might want to try using a vertex group as the shape key mask, and then use the weight mix modifier to have that vertex group change dynamically with time, based on other vertex groups.
2 Likes
Thanks! My research has led me to using vertex groups and a vertex modifier. I started to play around with it earlier today. I was having a hard time getting my head wrapped around what had to happen. Quick question: Can vertex displacement be done through the node surfacing? Or is it strictly just color and bump maps? I saw in the Blender online manual the displacement input was blue and not gray meaning it was a vector not a grayscale input. I thought maybe it was an outdated image or something.
Did I just write “change dynamically”? Wow… I promise I wasn’t drunk.
And anyway, please forget what I said: shape keys won’t work.
After testing it, when you use a vertex group to mask a shape key, this masking is calculated before any modifiers take place. So if you use a Vertex Weight Mix modifier to change that vertex group in hopes that it will alter the masked shape key, what actually happens is that the changes in weights occur after the masked shape key is calculated, so it won’t react to those changes.
So you should really do what you are thinking of, using displacement.
That blue Displacement slot in the Material node looks like it’s from 2.80+ (see the Blender version on the top-left corner of the manual).
On the official stable release 2.79b that slot is still gray, making it a “bump map” type of effect with no changes to the form of the surface, just how the surface reacts to lighting.
If you’re on 2.79 you can try using the Displace modifier.
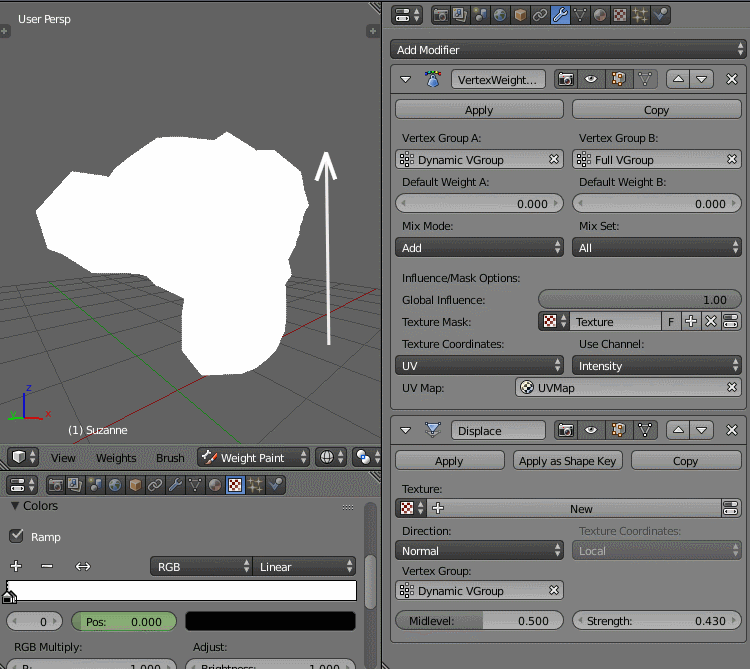
This here uses two vertex groups --an empty one that will be modified (“dynamic vgroup”) and a full one (“full vgroup”)-- and a Vertex Weight Mix modifier that adds the full vgroup to the empty vgroup while masked by a vertical Blend procedural texture with an animated color ramp:
This means that your displacements (your body fat) needs to be in the form of a grayscale texture or something like that.
3 Likes
Thanks so much, RNavega! I’m going to definitely going to try that! I also was experimenting with painting a vertex weight map for the displacement and then using a vertex proximity modifier and I think it was kind of working. I set it to geometry and slid up a stack of cubes so there’d be a lot of faces to work with. What you did there looks really good though. Thanks again!
Having “looked at your post visually” I am convinced both of us are on something… ![]()
Cheers, Clock.
PS. Nice solution you posted there Sir!
1 Like
Thanks clock!
I noticed the beginning of the deformation in that GIF happens faster than the rest of it.
I think this happens because the two stops of the gradient start at the same location. The solution to this is to have the ramp start the animation like this, with the stops already spaced out:

…but then you also need to scale down the object UVs until they sample only the pure white part of the ramp, so the animation can start with the object fully displaced and not with its bottom part already faded.
1 Like