This is embarrassing because I’m sure most of you find this very simple. Anyway, here’s my problem.
Here is a source image that I’m trying to recreate in Blender:
However, I got stumped on the very first step, creating the circle.
After creating the circle and rendering, the “sides” of the circle are visible:
If I select Subsurf I end up with a tube:
If after selecting subsurf, I then press “ctrl+e” then set edges to 1, the "sides are again visible.
However, if I disable subsurf, then select the outer vertices and “set smooth” then select the inner vertices and “set smooth” I get quite close but not exactly what I was looking for:
I know I can increase the number of vertices when creating the circle, but should I decide to scale-up then the “sides” will show up again.
So my question is, how do I create a circle with smooth sides AND sharp edges?
Any ideas? Or if not, can somebody please point me to a simple tutorial?
Add a low poly circle like the one in your first pic, then add subsurf to 2 or higher , then select one line of vertices in a time (like inner up circle of vertices) by holding alt and right clicking the line with mouse, and when vertices are active press shift+e (crease subsurf) and adjust the edge so that it becomes sharp.
Do this to all other edges too…
I hope you understand what i mean
I think that this or edge loops are the easiest way to do it, happy blending
-Deadend-
As you can see, yes the edges are sharp, but the perimeter is not very circle-like. If you have a look at my source image, you’ll see what I’m trying to acheive.
Thanks anyway
Hi DeaDEnD,
I’ve tried something similar and it didn’t work well. However I will try to do it your way to check the results.
For anything 2D like a logo I usually start with bezier curve. I can get the shape I want, setting the rez I want then I convert to mesh if I must model from there. In your case if you just want to extrude you logo afterward there is an extrude parameter in curve editbutton So you relly don’t need to touch a mesh when doing logo.
Hi, Kiran. Gabio’s way is the best way I think to do the entire logo.
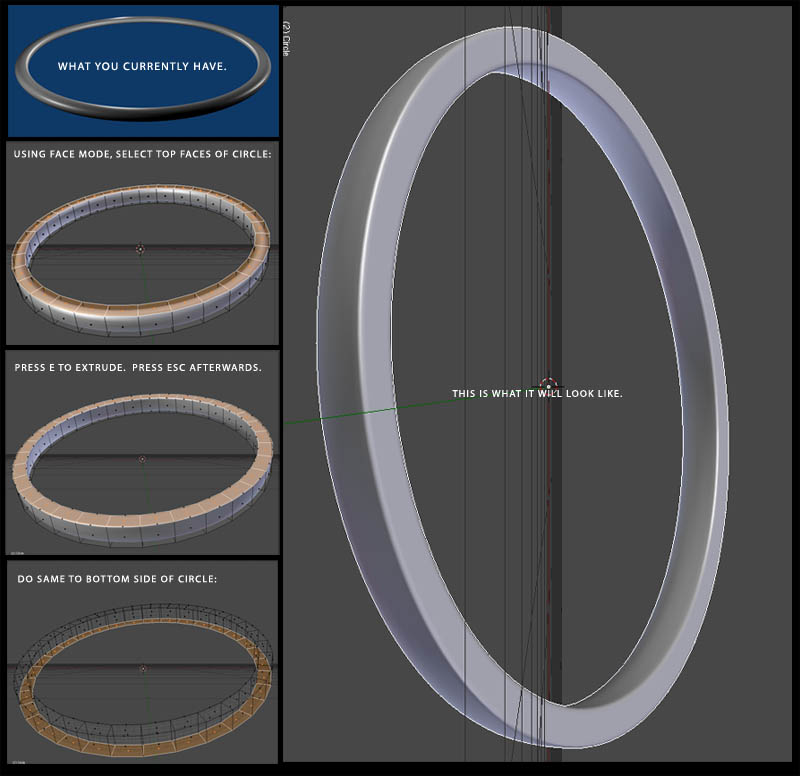
Concerning the circle, in terms of mesh, based on your first subsurf modified example, I’m just attaching an image below to this message showing how you can leave the object subsurfed so it is smooth yet attain sharp edges without creasing.
There are several ways to get the result you want, including edge loop cuts, spinning, or a bevelled bezier circle. Different techniques work best in various modeling situations, so just some things to think about the next time.
@ RobertT: Yes, that works like a charm!! I can’t believe I didn’t think of that! Thanks a million.
In any case, I’m still going to check out Bezier and NURBS. I think I’ve concentrated on Mesh a bit too much and might be missing out by not learning to use Bezier and NURBS.
I simply made a bezier circle, <shift><d>, <s> to make a duplicate then scale down a little, then in the curve and surface panel set DefResolU to 100, click the SET button, then Extrude 0.1., that gave me a perfectly smooth circle object with sharp edges. Time to completion = 20 seconds.
Had to do it, I am no pro so this took me 40 mins to get it done and get back here:
No need for the 3D button. Just bezier circle, duplicate, scale down, the ring inside will cause this shape to be filled between the two rings, but empty in the middle, then remember to set the resolution up high enough to suit your needs, I set it to 100, but that might be higher than needed.
Then I extruded .02 for the outer ring, .01 for the inner ring. for the other sections, I used bezier curve, trace the outlines for the 3 sections that are continuous.
Hazard-thanks for the .blend - 1 thing leads to another…it worked when I did the Shift-D and scale in Edit mode but that joins the 2 circles. How do you separate these to select individually for extrude. I selected yours and they looked joined as well.
The animation…this is great…looks like clockwork mechanism. This is the modeling section…but would be great to get the rundown on how you did this!! I only see the RotZ in the IPO screen.
The curvecircles are connected as one object, the extrusion is not done via <E> key, but by setting the extrusion value in the ButtonsWindow + <F9> for the editing buttons, then under the Curve and Surface tab you will see settings: Width, Extrude, Bevel Depth, BevResol, etc. You enter a number for Extrude, and both curvecircles will extrude together since they are one object.
The inner ring is done the same way, but you go into object mode and add another curvecircle to get that one started as a seperate object, the pronged section is outlined in 3 sections then extruded the same manner.
The interesting animation was an accident, I wanted the logo to rotate on the z-axis, and being lazy I only wanted to make one IPO so I animated the inner ring and parented the the rest to it.
For the example .blend, I duplicated the three objects, moved them aside and away from eachother then reset the extrusion to 0.
The duplicated objects retained the parent>child relationship, and the rotation of the inner ring, thus accidentally making that interesting animation.
HINT: anything you add while you have an object in edit mode becomes part of that object, crossing closed circles that are parts of the same object may give you unwanted results.
Hazard and all others - thanks again for taking the time to layout your solutions. Good example of why this forum works. I’ll step through the process and let you know how things turn out. I guarantee it will take me 40+min.
One thing I love about 3D modelling and animation is that there are so many solutions to most problems.
Right now I am spending some time in the forums reading other people’s problems, other’s solutions to those problems, and trying to come up with my own solutions to help, this helps me become better and enjoy 3D work much more.