I followed a beginner tutorial here: http://cgi.tutsplus.com/tutorials/create-an-animation-walk-cycle-in-blender-using-rigify--cg-17812 to make the walk cycle. I know I have to make another action and go into the NLA editor, but my walk cycle is choppy. I have done other tutorials that showed how to make a walk cycle. But they didn’t show how to smooth out the result. Someone said I have to use the graph editor. But when I looked at the f-curves in the graph editor, I didn’t see where the problem curve was, etc. Does anyone know a simple way to smooth out my character’s walk cycle? I’m talking about the legs. The arms move smoothly.
I don’t know if this is good news or bad news, but your character’s walk cycle is about as good as the walk cycle in the tutorial you are following.
And the animation of the legs is fairly smooth already. The only problem I see is that you’re “breaking the bone” in the knee from frame 18 to 23 and also on the opposite leg at the other part of the cycle. “Breaking the bone” refers to animation where a joint in your rig bends in such a way that would be impossible for an actual flesh and blood actor to bend. This is not necessarily a fault: animators break their characters bones all the time, to show anticipation of a movement, follow through, or emphasis. Normally, though, it doesn’t last for six frames, since it is, in fact, an impossible position for the character to be in, so if it’s on screen long enough for the viewer to notice, it looks awkward and off. I suspect this is what you’re seeing and interpreting it as ‘not smooth’.
I think the reason it’s happening is your character has short legs, and is taking very long steps. Shorten the length of his step some and I think the problem will go away.
One of the tools you can use to check the smoothness of your animations is Motion Paths, which will show you how the head or tail of a bone moves as it goes through the frames.
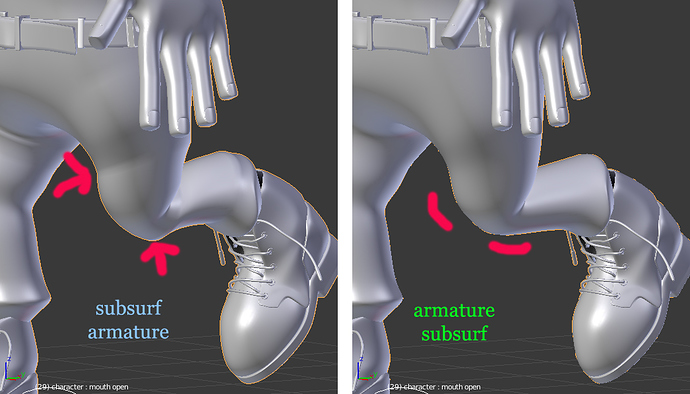
Looks pretty good to me. On another note, and it depends on the character, but many times it’s better to move the armature modifier above the subsurf in the stack. So the armature deforms the lower poly mesh and then the subsurf smooths out the deformation. IMO on this character it looks better that way. This may help out with jumps in funky shading (See image sbelow). Solid character, two thumbs up from me!
The main problem is that your footIK target is pulled too far forward when the leg is rotated forward. It is disconnecting from the rig too far. This causes the characters knee to pop in to straight locked position too long when stepping forward. The knee do go straight for an instant during forward step in the air. But not as exaggerated as yours. Look at this walk cycle video:
Note that as heel makes contact with the ground, knee is already starting to bend. This is to avoid heel contacting the ground with locked knee and so one can cushion the impact.
As for the foot, it should stay flat to the ground during the step duration. And at the end of step cycle toe and ankle flexes to push off forward with the foot. The ankle don’t bend like what you have.
The foot that swing forward in the air after toe push off, stays more or less in neutral position at 90 degrees to lower leg throughout the swing. Knee is bent during forward swing so that toe clears the ground and lower leg can be swung out forward for the next step.
Thanks for all three responses. I tried most of what you said. The parts I understood. I still don’t like it. But I thinks it’s better than it was.
