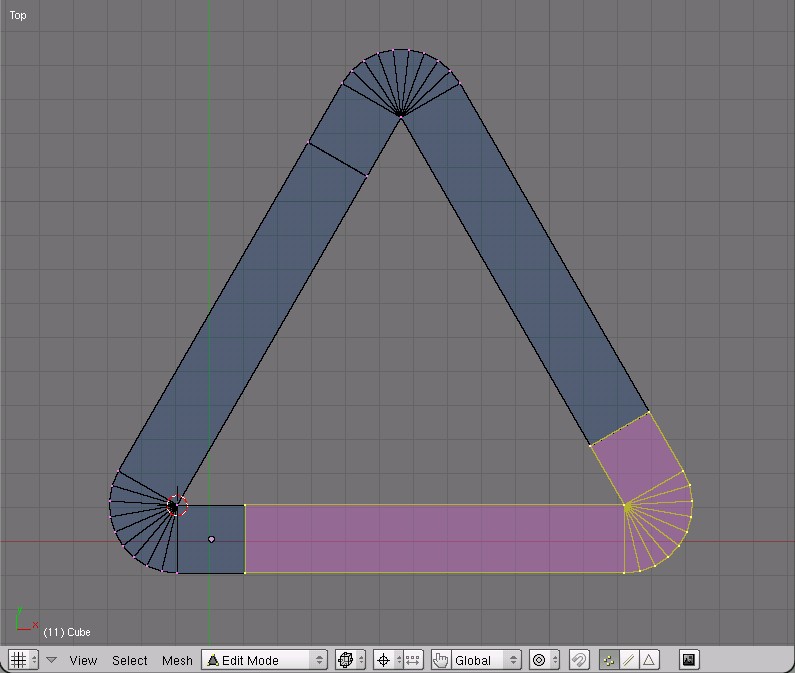
Hi 
Anyone here know how to make one in Blender?

Hi
Anyone here know how to make one in Blender?
Hi JDA
Fillets are covered in Part 6 of the 608 bearing tutorial. About half way down the page.
I checked out the Fillets - Reference Geometry Method
and I don’t get it at all. :spin:
Start with a cube. In top view, select a corner, and move the cursor there (Shift+s>>Cursor to selection.) Make the cursor the pivot point.
Select that whole side of the cube. Use the Spin dup tool, set to 120 degrees at whatever number of steps you like (the more steps, the smoother the corner transition) and spin dup the corner of the triangle.
Extrude the (still selected) face. It will extrude along the normal. Extrude it as far as you’d like the side of the triangle (less the length of one cube.)
Select the whole thing. Duplicate it and rotate it 120 degrees. Do this twice, to get three sides total.
Move the sides so the ends match up.
Remove doubles, and the interior faces at the joints.
Reading about fillet’s was interesting. Here is another method.
Start with a horizontal mesh line in the XY view
Select the right vertex, shift-s , Cursor->to selection to set the pivot
Spin 60-degrees clockwise with 1 step. This creates a face, leave it for now.
Select the top most vertex, set the pivot there.
Extrude vertically (Y) the desired width of your triangle
Select the pivot point and the vertex you just extruded and spin clockwise 60 degrees with as many steps as you need for resolution.
Extrude the final spun edge to the lower right triangle vertex.
The last requires placement by hand and a merge. After spinning and before extruding will require doubles to be removed. The remaining vertices are done in a similar manner.
Add a circle mesh with only 3 verticies, no fill.
Ctr E to extrude, and immediately hit the esc key.
Ctr S and size to thickness desired.
Add a subsurf modifier (set to 3)
Ctr R to add an edge loop to each side of each triangle corner. Position for the level of curvature you want.
Lynda
The fillet method allows you to place a radius of your choice between two edges, but you need one edge on either the X, Y or Z axis. It would work for the bottom two corners but you need to rotate the triangle 60 degrees to do the top corner then rotate it back. It would allow you to choose the corner radius rather than having a full radius from the inner angle.
Here are my 2 cents 
Thanks to everyone who replied!
Hi all
i was trying to create the triangle the way “Syziph” did it
but i have a problem on step 2
“2. Extrude all 3 sides away.”
how can i extrude all faces in the triangle equally
when i try to extrude
the right and left extruded edges are more far away from the triangle
and the bottom extruded edge i look more closer
on bottom face i extrude and move the edge for 0.2 at Z axis
for the right face i extrude and move the edge 0.2 for the Z axis and 0.2 for the X axis
its look weird
can someone help me how to extrude the edges equally
thank u
shacoshe:
I would:
I have another way… create the shape in corel draw or some other draw package capable of svg output.
Input it into blender and it is a curve. The set the depth in the panel
If you want details, I can add them
shacoshe, prior to extruding enter Normal Orientation mode, while extruding tap X (or Y or Z depending on the view) twice to enter extrude along normal mode. Then input the distance.
Note: After going through all steps, the width will slightly change. This is not a perfect way of doing this. But still it’s a good practice.
Now revising this thread I have invented a better way, I’ll try to explain it later.
hi thank u all for the tips
after setting to Normal Orientation mode
i was able to do so easily
thanks allot all
it took me time to answer
cause i had trouble finding my activities
i also program in java ,
and by habit i was looking for a “watch list” (they have one on java.sun forum) ,
it will be nice to have one here also
also allot of answers so quickly
i like this community
you can choose to be notified of replies if you subscribe to the thread. When you post, select Thread Subscription > instant email
Here is the new and improved technique for creating round cornes:
I hope it’s understandable
Thanks, Sziph, much appreciated! Very clear and good techniques. Also, great use of Wink!
Thanks, Sziph,
i like this technique
also the tutorial is very clear
This is only for fun
A triangle with scalable corners,
not finished ( like every aspect of my life)
bye
variable corners.blend (128 KB)
ok, i just cannot resist these “competitions”. Add a bezier curve circle. In edit mode. delete one of the points, and blender will reconnect it into three. move the handles to make a triangle shape, and the either bevel or extrude.