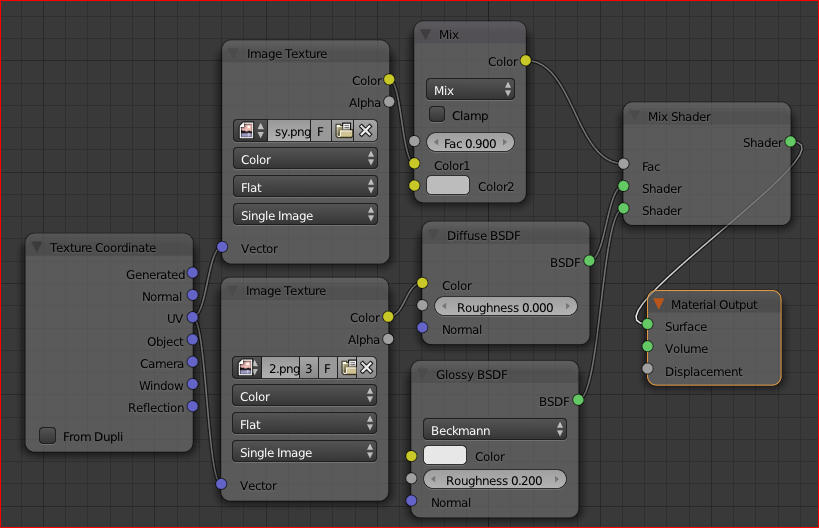
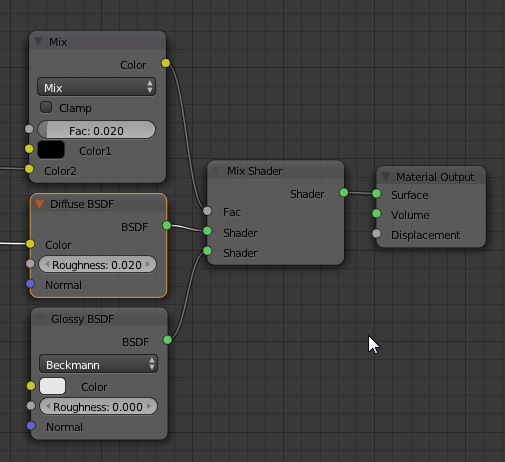
Please see the Nodes setup below. As you can see by looking at the render, the Glossy Node is affecting the whole tree, as oppose to using the specular map and affect only what’s found in the specular map.
Hi, this is the node setup for my use of a specularity map. I took quite a lot of knowledge about that from a tutorial about realistic texturing with cycles, made by Andrew Price on blenderguru.com.
Input for the mix node is coming from the specularity map. Input for the diffuse node is coming from the diffuse map. Difference to your’s is, that I use black as second color - the reverse allocation of the connectors is just a matter of the chosen factor.
I was able to see it by right-clicking on it and openning it on a new tab/window. Then it’ll be against white, then you can see it.
Are you saying that the only diff between your setup and mine is that yours uses the Mix Node with Black? I did try it, and all the glossy disappeared.
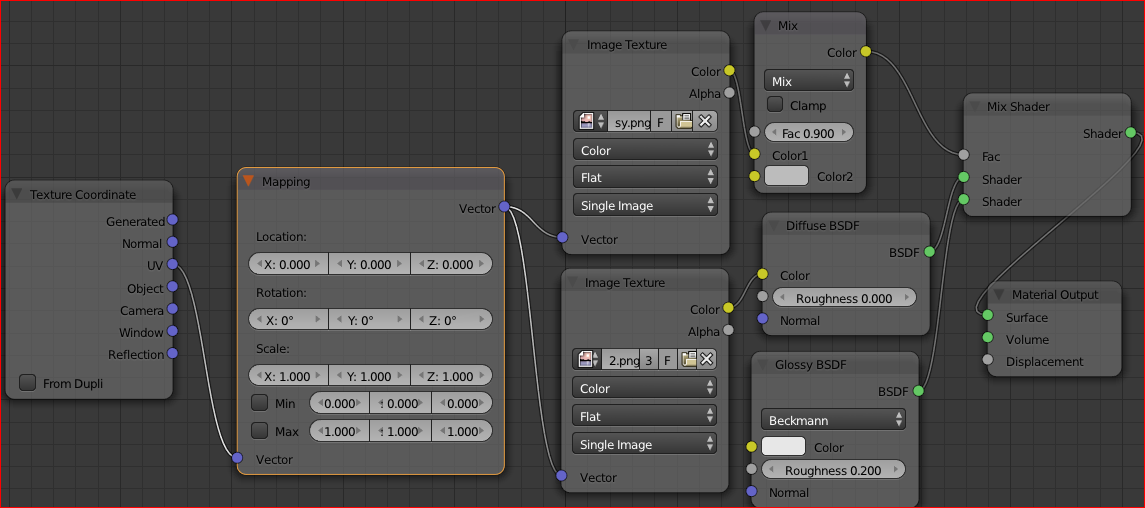
Btw, I am following a tutorial from Andrew Price, The Secrets of Realistic Texturing. The thing with his example, is he’s using a diff type of unwrapping: Project from view (Bounds). I guess this is the reason he doesn’t need to specify the type of Mapping, like in my case I need to use UV Mapping so that the images will match the UVs. Or would you say this difference has nothing to do with my results?
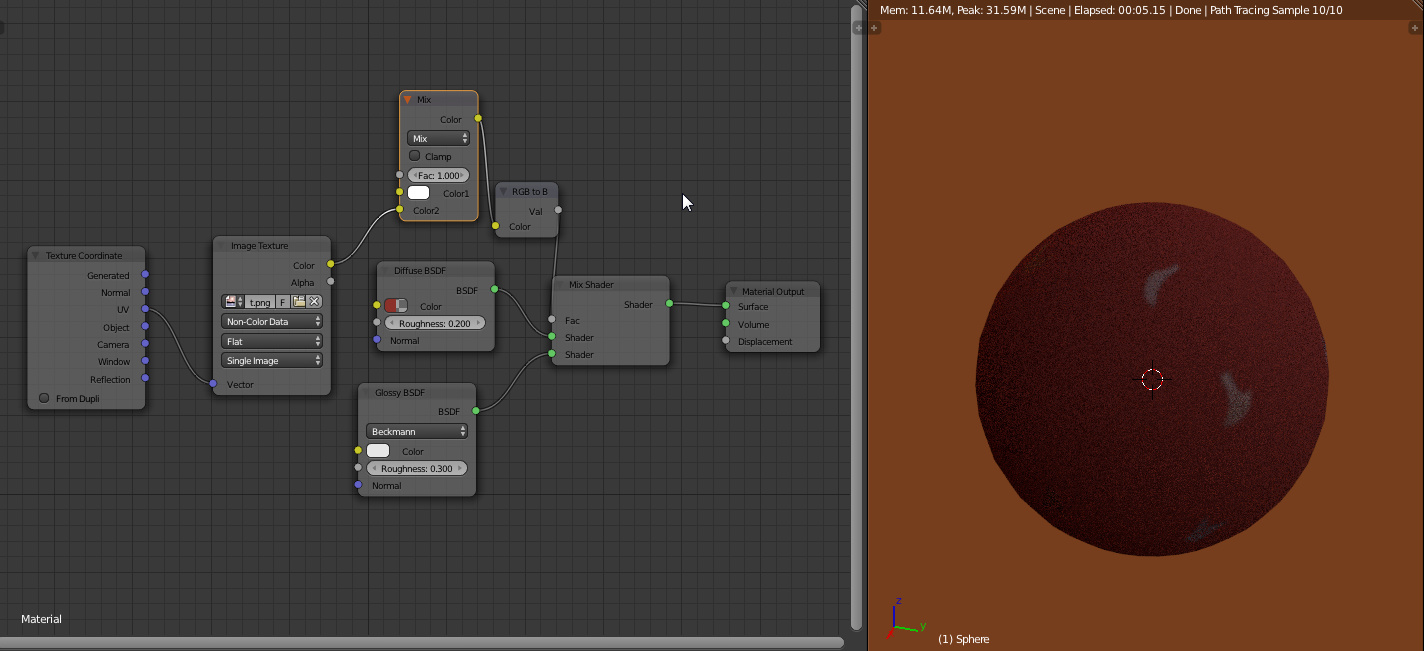
No, fetched your “hidden” spec map and plugged something together. There is a problem with your specularity map. A map of mine works perfect with the setup node setup, but your one not. I’ll try something.
I guess this is the reason he doesn’t need to specify the type of Mapping, like in my case I need to use UV Mapping so that the images will match the UVs. Or would you say this difference has nothing to do with my results?
No, UV is the default for texture coordinates - as I learned in this forums
I added the “RGB to BW” node, as I see in your setup. And I’m not getting the same results
Then should I infer that the problem doesn’t lie on the nodes setup?
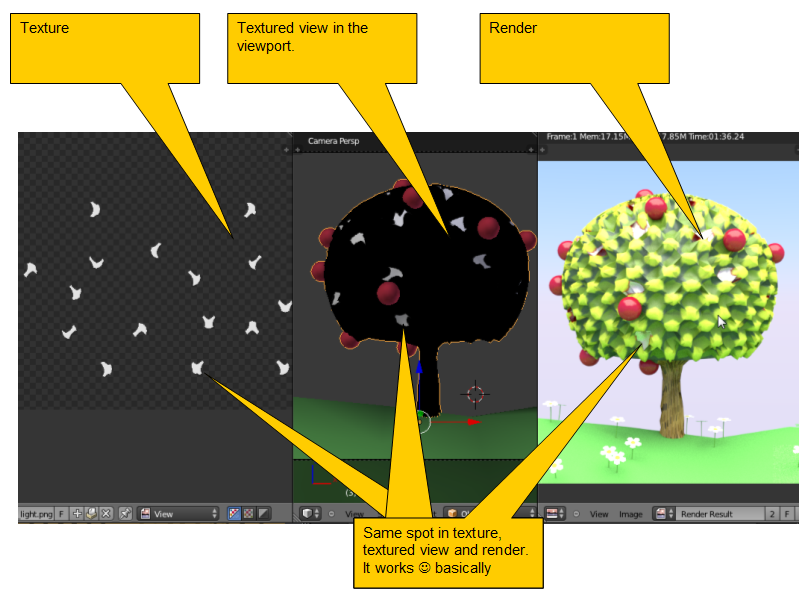
In fact, now my image looks like this (before I added the RGG to BW node though).
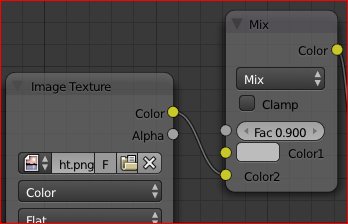
Mmm, somehow the little rectangle showing the color in the Mix Node, moved from Color1 to Color2. I moved the Image Texture plug back to the Color2, and now the results are back to where I was: Unisolated specularity Just as in the image on my first post above.
I know, I’ll just upload my .blend file, I hope you don’t mind inspecting it.
The RGB to BW node is only there to convert the yellow color output to the grey data input of the next node. You should never plug different colors together. That may works now - but cycles is under development …
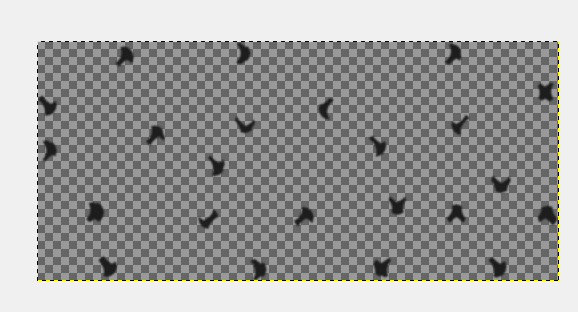
But the main trick was to remove the alpha channel of your specularity map. This is how it looks in The Gimp after downloading.
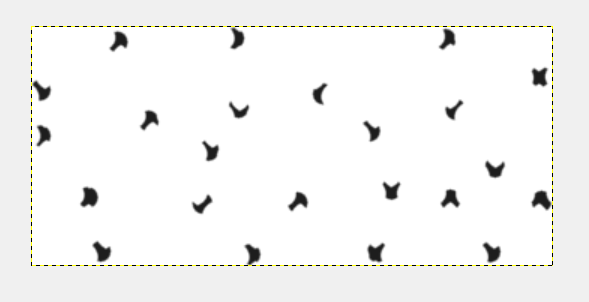
And after I removed the alpha channel.
With this map (the one without the alpha channel) it worked like a charm. Here is the original map without the alpha channel for you.
BTW: If you are following the tutorial of Andrew Price, you know that he uses a software called crazybump. This is a good software and it produces fast results. But it was too expensive for me. So I gave “njob” a try. It produces also good maps (height map, ambient occlusion, normal) but not the specularity map. But the specularity map can be done in GIMP or another image tool. This way I have comparable results to crazybump.
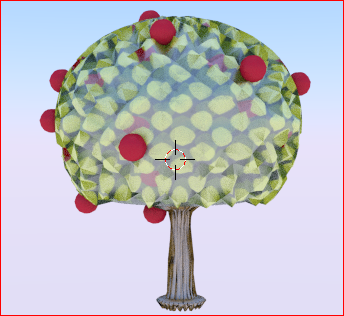
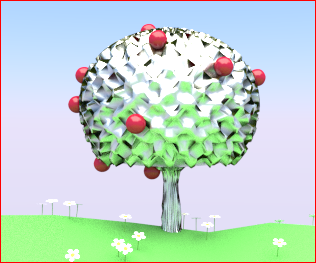
Thanks for trying the file RB. The white is supposed to be transparent, and the black is to define the specular areas on the tree. I cannot say whether the fact that the transparent area is white now matters or not. But yeah, the whole idea is to figure out how to make only those black spots to receive/show specular.
Hi javierdl, the .blend you uploaded has no images and textures. You can pack them into the .blend with File -> External data -> Pack into .blend file.
minoribus, somehow I had not seen your post #11, where you explain about the importance of not having transparency in the Spec map. I’m so glad you clarified that.
And thanks a lot for sharing/suggesting njob.
Sorry I didn’t include the image files. Thanks for explaining how to include them, I will as soon as I’m home this evening.
lon8, thanks a bunch for suggesting InsaneBump. I’ll give it a try for sure
Ok, so here is the new .blend file with the image files packed.
In the meantime I’ll try to append the tree to a new file and take it from there, in case something in the main file got corrupted.
Btw, I did get rid of the alpha from the specular map, and nothing changed
Also I did append the tree into another file, but again, same results. Shouldn’t this say that the problem lies in the nodes setup?
I would recommend to separate the apples from the tree (select them in edit mode, hit “P”, and choose “By loose parts” in the upcoming menu). After that you can UV unwrap your apples and apply the specularity texture solely to them.
Best regards and - yes, a really nice scene, I like it
minoribus, thanks a million for taking the time to check my file and moreover solving the mystery complete with illustrated
images in comics-style!
Thanks for the compliment on the scene, glad you like it. I intend to put a few more things around, like bushes, other type/s
of trees, maybe a well. Nelly is the name of my 2 year old daughter. I want to use the final image as a splash image for my
next DVD filled with photos & videos of her.
About the part where you explain the solution to my “specularity-isolation-via-a-spec-map” problem, unfortunately I failed to
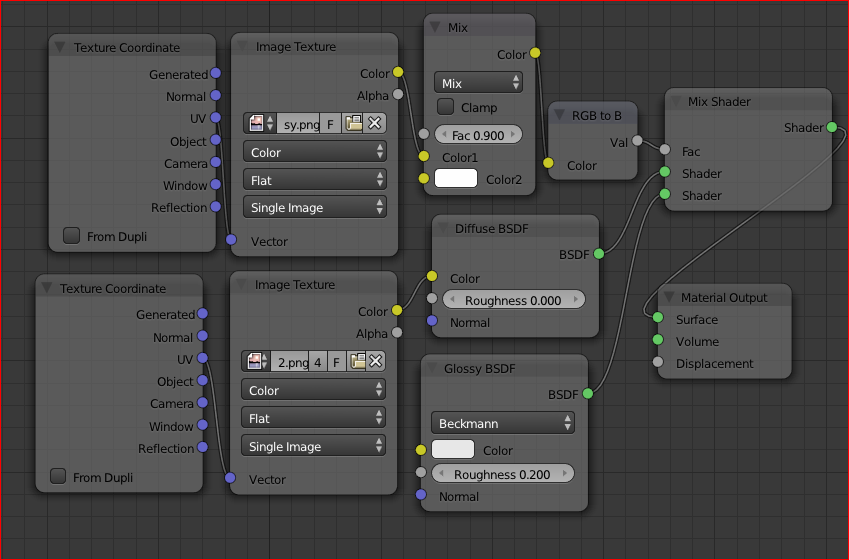
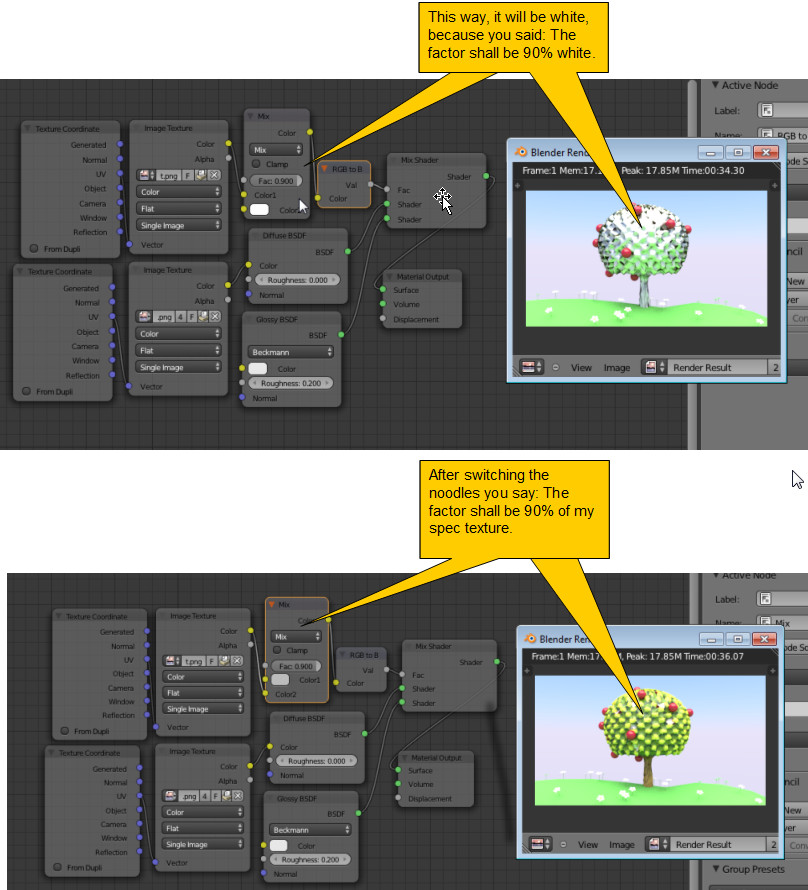
understand it/spot it. I had a close look at each of the screenshots, namely the “Mix node values”, and aside of the fact
that the little color-rectangle at the bottom of that node appears first next to “Color 2” then next to “Color 1”, I didn’t
see any other difference. Unless I need new glasses, it seems to me the “Fac value” is the same: “0.900”.
It seems to me you were explaining what I had done so far (illustrating about my switching the nodes around with their
respective fac 0.900 values). Then you move on to the second issue (apples, mesh is separated from the tree mesh). but I
never saw the actual solution for the first issue. Unless I should infer that the solution is to separate the apples from the
tree.
Then again, you said my main problem is my Node setup. Which I had been suspecting too.
Bottom line, I still don’t know how to make my spec map work
I played around with the Fac values and noticed lower values yield better results, clearly 0.900 was way too high.
As for the apples, I never thought keeping them together with the tree without being part of the same topology would be a
problem. I figured that as long as the materials/textures are working all is ok. But hey! if all it takes to fix my problem
is to separate those apples, that would be simple enough! And I’ll be a happy camper!
Doouh! I didn’t realize my reply was appearing on the 2nd page
I failed to mention that for the separated apples I have another material, but I didn’t need to unwrap’em, so it’s just a regular material without a texture. Just a diffuse + a gloss. Since I’m not going for a realistic look, and these apples will be far enough from the camera, this would do.