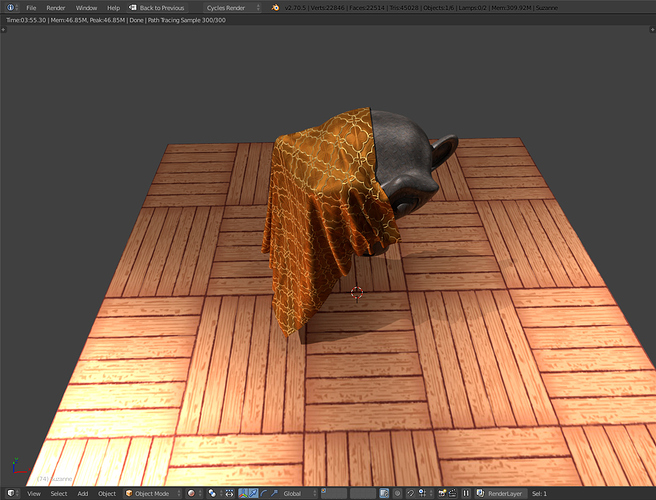
I open this thread for people to share his workflow and technique to correctly work with blender cloth sim for static and character animation workflow
Yeah we can get this thing going here. A little bit busy now… but I am going to get to it very soon.
I’ll look forward to learning more on the cloth sim from this thread. Hoping more experienced animators will get involved. I’ve got the basics down, but would welcome others ideas and worklows particularly in clothing on animated characters.
Till Richard has written up his workflow, let’s discuss some milder bits:
I think we all agree that it’s best to let cloth settle in before you start the animation. Especially with skirts and other hanging flowing cloths this is a good idea, and it makes even more sense in combination with the sewing patch.
However, how long would you go for it? I have noticed before that skipping into animation to quickly may still have the cloth move around rather violently. What is everyone else’s experience?
Another one:
When dressing up a character, do you think it makes more sense to have the cloth settle via a sim, apply the modifier, and then another sim when animating, or do you think trying to use one sim for both settling and animation makes more sense?Or is more accurate)
Just to try and get this started, I guess.
By the way I am also hoping to learn some stuff here too as well as discover some new techniques with some testing I am doing.
In general though, yes settling is a good idea I will use from 30 to 120 frames. I think there is a preroll setting in Blender as well for cloth.
Also I always make a smooth transition from my rest pose to the first frame of animation.
Also applying is a great way to work as well.
Another thing to consider is using the sim to create your initial cloth shapes.
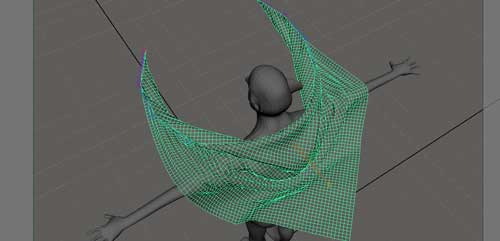
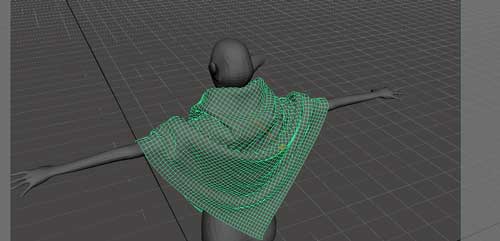
For example on a shall rather than having to figure out how to model the thing and keep all of the folds in a natural position wrapped around the character for the starting shape, I first made a sim that replicated what happens in the real world. I grabbed the edges of the shall with some bones, animated that to wrap around the front and then let it drop over the body. I froze that then did another sim to let it rest over the body and froze that.
You can actually do a lot with this basic concept. I did something simular to crate the colar on a shirt. rather than model it, I modeled the shirt as it would have been and then let it dop and fold over by painting weights on it to old the neck in place.
Once I had that set, I froze it.
It looks something like this on the set up:
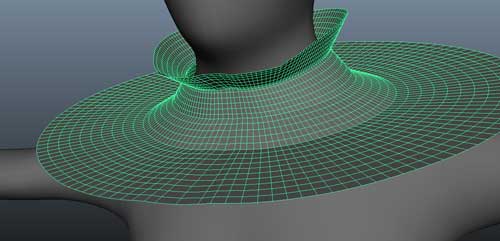
This is the cloth object I modeled that would later drive the final render cloth object.
I put weights to hold it in place around the neck then let it fall like so:
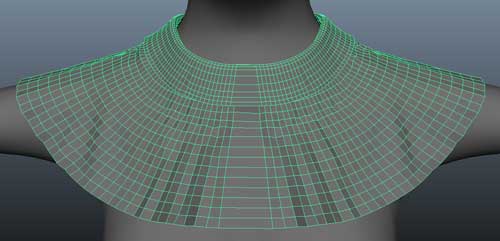
This cloth object would then drive the actual object which was in this case constrained by a “mesh deform” type Modifier in Maya called a “Wrap Deformer”. LightWave has a similar thing called Meta Link.
The render version of the cloth looks like this Pre sim and post sim:
The render version has the seems (and later butt0ns and other detail)
Granted, yes. All of these screen caps are Maya.
But the basic worklflow also works in Blender.
The one thing I think I was a little foggy on with Blender was how to drive the rendered cloth object with a modifiier. I could swear I did that in Blender as well. Though I know I did it in LightWave with the Meta Link deformer.
In Blender there is the mesh deform which works in theory like a wrap deformer.
However I do believe it requires a cage type of object to work which makes it fairly uselss in this case.
But Blender has other advantages in the modifier stack. Which is a very unique and powerful feature.
And though much more limiting than just being able to make two objects, it does offer some simplicity and some features you can take advantage of.
For instance I set up a modifier stack for s sculpted head mesh. Simple set up with a miltires modifier. The thing is that this modifier can sit on top of the Amarture modifier. And when you make shape keys those drive the base mesh. So as an experiment I had this sculpted mesh set to only render at high resolution yet I could animate it quickly with shape keys with display set to 0. So I never had to look at the sculpt when animating. I thought that this was a cool alternative to baking a map an applying it then doing a deform modifier which in essence gives you the same thing. A simple mesh to animate and the details on the render.
So a very similar set up can work for cloth.
The basic idea is you have to have a stack of sorts no matter what you do.
At the bottom of the stack is the Armature modifier that drives the cloth. The cloth has weights to whatever bone you want to use to hold the cloth, say the hip.
Then you have your cloth modifier with a pin vertex group.
And this is all driving only the cloth.
And there are a whole lot of tips just to get a good sim on that cloth.
And above that you have any way you can link a higher detailed mesh which is the mesh you will render. It needs to be driven by the cloth object.
A very simple set up would give you a cloth object with a solidify modifier above it. Once you get a simulation you can bake it. Then you are free to adjust the solidify modifier to add thickess to the cloth.
From there you could do displacement to get more detail in the cloth with a texture or do sculpting on the cloth object (also above the cloth modifier)
For buttons attach those with vertex parenting and you can start to build a more complex cloth object that has its origin as a simple flat grid of polygons that simulate well and collide properly.
These are just quick off the top ideas that need more refinement.
But it should get the ideas flowing.
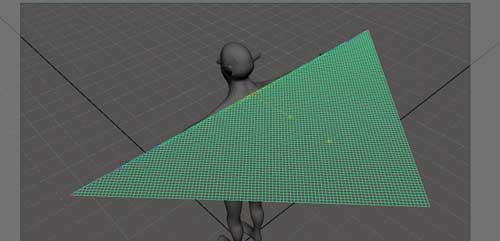
Here are those shots of the shall in phases as it is wrapped around the body with a chain of bones bound to the front edge.
Basically as if the character had wrapped it around and let it fall. That was the idea in the deign of that part of the sim which was only to create the initial shape and get the shall into position.
Richard, I reserve to read and follow your teaching with more attention, though at a first impression, I think that your referring to Maya workflow is not of much help; actually in blender you don’t have tools such as Warp in blender, and what you suggest is not good to dress a character, because a low detailed mesh would never be able to fit properly around knees, elbows and arm pits.
Thank you anyway
paolo
@Richard
it suppose to be in blender not maya anyway i will share what i have learn for know and how i use same marvelous method in blender the show stopper her is performance
told you he is just making excuse for blender cloth…he is talking about cloth which is ddriven by armature which are not the topic because we are talking about blender cloth simulation in physics not armature and everybody knew this workflow.
…next time you volunter make sure you back it up and next time you show us workflow do not use MAYA screenshot use BLENDER screenshot.
Ah… no. There in that thread you were talking about cloth particles. Here we are talking about workflow for cloth in Blender as I already stated. Which not only includes the cloth modifier - and limitations - but all of the tools.
Shall we move along then?
Perhaps it was not clear in the first post. I used the Maya screen grabs to give a quick answer the above question with a project I had to hand which showed this technique clearly. I don’t have a ton of time on my hands these days so I used the quickest best looking finished example I had which happened to be in Maya.
It is a great illustration and I suggest looking past the horrible Maya interface… lol
This is about shariing ideas and the workflow in Cloth in general. And you can learn things from all platforms and artists.
In Cloth here we are talking about the entire workflow for characters. There are a lot of things to consider. And a lot of things need to be working together.
There is an important link to this workflow that is missing in Blender. And it is not in the cloth modifier itself. It is in the limitation of the mesh deform modifier which is more like a custom lattice deform modifier. And missing the features of both the meta link in LightWave and the wrap deformer in Maya as ell as a similar workaround in Softimage ICE (Syflex) that I have not tried but looked like it was problematic.
This would be a request worth asking for in Blender because this is a fairly standard workflow as far as I know. And I have seen this come up countless times in forums of other software.
As I mentioned I am going to be working on a job for a client and I have been testing some ideas to get around this limitation and come up with a better workflow in Blender than I even had before.
Also there are some key things I have learned just using the cloth modifier that I have not even gotten into yet.
Please try some of these ideas I have shared so far and see what you can come up with and problems you might be having and show some examples here so people can help.
I am gonna dig up that old file with the face animation I was talking about.
It is all Blender screenshots :yes: and illustrates the basis for some of my ideas for Blender cloth.
Well please actually read my post and see what I am talking about.
I did not have the time to do up the Blender version. And most of what I talked about are the workflows in general that work in both apps and the drawbacks and limitations within Blender and possible workarounds and even solutions to those limitations.]
The fact of the matter is there are a lot of people using Maya and Blender. And there is a world of artists outside of Blender who have been using other apps for years. We can learn as much from these people as we can from Blender-centric information.
Lots of workflows transfer across. And a good deal of the concepts deal precisely with the fact that performance is an issue.
And these are things I will get into as well.
Well probably there is some fault on my part for mixing some words up the wrong way.
I said, High Detail, and also mentioned High Polygon.
Lets clarify for now so it is clear.
Hi Polygon is the polygon count referring to the cloth object and the collision object.
They can be high polygon but should not be high detail.
Detail is:
Buttons, pockets, folds, modeled seams, etc.
For the collision object it is:
Facial features, fingers, toes, muscle patterns etc.
Don’t have detail on the collision object unless you want it in the simulation. For example certain features you want the cloth to show. Otherwise the collision object can be very simple. And I usually subdivide it or use a Subdivision Surface Modifier for smooth results. Which takes more time but looks better and does not catch the cloth as much.
Using hooks on pinned vertices give quite a bit of control if needed. Since a lot of things can be done with hidden objects in terms of collision or other physics sim interactions, it might have some potential to get cloth sim objects to behave in ways they wouldn’t otherwise. (Shift weight around, add springiness, pad collisions, etc.) Of course this takes a bit of experimentation to find out what’s possible.
Don’t ask me for much in the way of specifics though, fanciest thing I’ve done where it’s worked well is attaching a flag to a flagpole and having it wave around in an animation without the cloth popping off.
What I noticed in my attempts is that many defects arise when we expect that not properly cut dresses are capable to adapt to the body in the simulation.
If we are able to give them a proper cut, just like a tailor would do, and possibly separating the pieces and sew them together with the method of Sewing Clothes, then the result can be quite convincing, just like with Marvelous Designer, at the cost of sufficient quality and thus a high computing time.
The idea that, for example, one can simply duplicate parts of the geometry of the body to make clothes, and that the deformation due to the simulation can fix things, is simply an illusion.
My 2 cents.
paolo
I have never been able to find, outside of a cloth dropping over a sphere, a high quality cloth sim in blender as you would find in pixar. Does anyone know of a great cloth sim that looks real. Oh and not sintel, to me it looked like they struggled with that.
Pixar is a little vague. How about a link to a video showing a cloth sim that you would like to see. Pixar film, anything.
Keep in mind that none of these places use Blender for cloth. Why would they? But if you have an example it is worth it for someone to try going for a particular look.
Thanks for those insights, Richard. The cloth simulation has been a real challenge to me. What I discovered is that it is better, for me, to “apply” the cloth modifier at a frame that best represents what should be the default drape, in the case of clothing or curtain-like objects. You can then save that model with its applied form for later use. To get the mesh back into cloth mode, just apply the cloth physics again and animate from there. Unless there is a need for pre-roll (I’m sure there are circumstances where that is better), using “apply” can save a lot of time and frustration for me. The added benefit is you can set parameters slightly different in the post-apply model (I usually try to avoid this but it has yielded some interesting results that sped up the workflow). I am getting better with the cloth sim but it is still very tricky at times and a resource hog, as everyone already knows.
Hya>
New Blender user here.<br><br>
I work in Carrara and have had good success with Blender cloth sim (well better than poser cloth room) bringing human characters over from Carrara.i
Workflow: export character from Carrara in the t pose as obj file.
Then pose the human rigged character in Carrara and exporting that as an obj file to use as my morph target in Blender.
Then adding a cloth object in Blender and running the sim.
< br> It’s very fast this way and the results are good for a still image, and no need to worry about re rigging the character.<br><br>
The only thing I haven’t figured out is how to stop hanging polys (ie those not properly attached to the mesh - eg buttons etc) from sliding off the clothing mesh. Of course I can attach them to the mesh but hopefully there is another way.
Pinning them just means that they don’t move - while the rest of the clothing mesh follows the collision object.
Any comments on my work flow welcome
cheers
headwax 
