Hi, everyone.
Is there some ways (or a tool in blender) to distribute faces evenly over a (finished) model, without changing the original shape? If there is no such tool, does anyone knows some work around? Using other softwares maybe? Thanks for any help.
You can try playing around with the remesh modifier, but it may make things worse depending on the model. Give it a try – you can always just get rid of it.
I don’t think there’s a tool for that, but some kind of work around could involve the Space function of the “LoopTools” addon ( if you have not enabled File -> User Preferences -> Addon , and in the Mesh category enable it) that can make even space between selected vertices.
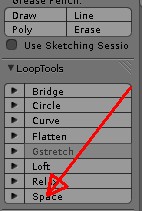
By fiddling with it, selecting whole loops , you may then be able to even the distance between vertices of the selected loop, leading the face they’re composing being more even.
But can be very tedious on large models with lots of faces.
Another method would be to try the Smooth and Shrinkwrap Modifier this way :
Go to Object mode and duplicate your original model (SHIFT+D)
Select the Original model (both should be on top of each other, so look at the name of the object selected , or select it in the outliner) and press H to hide it.
Now select the duplicate and add a Smooth modifier to it, then add a Shrinkwrap modifier after it, in the Shrinkwrap modifier, at the target line select the name of the original model.
Go into Edit Mode
Enable those buttons
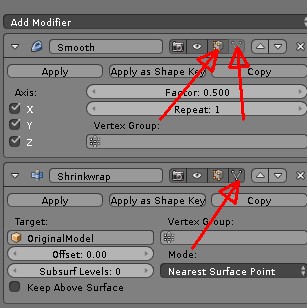
Now in the Smooth modifier, start increasing the factor while looking at what it does in Edit Mode to avoid horrible topology being created.
Don’t hesitate to add a loop (CTRL+R) if the shrinkwrap miss a corner somewhere while increasing the smooth factor.
But don’t goo too high in the smooth factor, can lead into bad result.
Once you’re done, you must 1st apply the Smooth modifier and in 2nd apply the shrinkwrap, do it in the opposite order and you’ll see what it does.
By example, using this method on a character model of mine, the original to the left and the result of the smooth+shrinkwrap to the right :

As you see i was forced to add some loopcuts near the feet to help the shrinkwrap to preserve the shape.
It’s much less tedious than the loop tool Space method, but lack the precision and control of it of course.
Now if you don’t care of the resulting topology or don’t care in preserving your self made topology, and don’t care if the polycount increase (a lot) , you can try the Remesh modifier (with mode set to Smooth if your model is not angular).
Unfortunately it does a bad job in term of topology with a really weird method , but each quads it generate are roughly equal in surface.
It does a bad job too in polycount, as to capture the details you’ll see that it needs the “octree” to be increased a lot .
But try it to see if you obtain something good, though the Remesh does such a bad job in my opinion (it really could use a rework for the topology it creates) that i doubt it will be satisfying to you.
(edit : beat to the remesh suggestion by Safetyman 
edit 2 : retopo is a good suggestion, as you’re not forced to retopo the whole model but just retopo the locations you find bad.
Wow, many thanks for your help, guys!
And thanks alot for your mini tutorial, Sanctuary! Never tried that smooth modifier before. It’s really good to know.
I learned alot from this thread.
Fortunately my model is not a sculpted one, so i don’t need to retopo it from scratch. Using small part of your tutorial, i’ll just duplicate it, add some loop onto it, and do the retopo.
Thanks again for your help everyone, and happy blending!