How to do disk mapping in Blender?

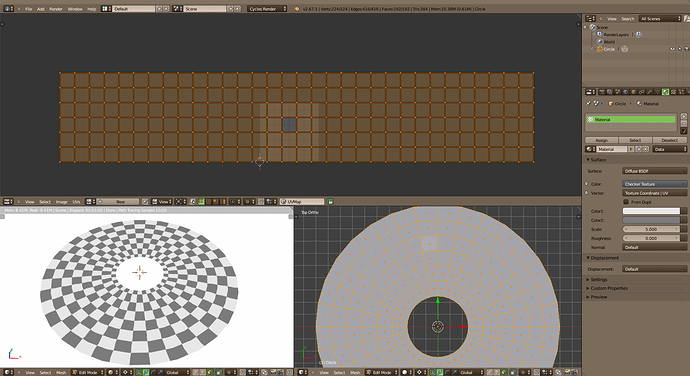
Ref this image: http://i281.photobucket.com/albums/kk234/Dee390/CheckDisc.jpg
However the underlying geometry could be a simple plane, but the projected UV orientation is what would create disk mapping.

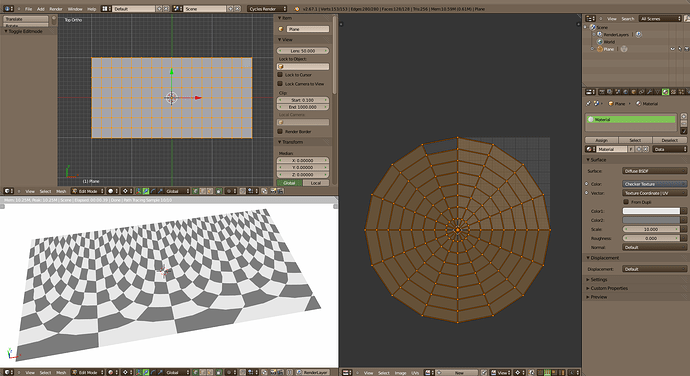
Basically, how the heck do I get the circular appearance mapped onto a rectangle? I tried reorienting the UVs so it looked like a spider web, but the result wasn’t really what I expected.

Use “Follow Active Quad” to unwrap. Select one face, average size, rather square, then all the rest. Unwrap!


No need for seam. In my example which is a rather evenly divided disc, all unwrap options (Average length, etc) produce the same result. YMMV. :wink:

EDIT:
I forgot to say that the UV map created with “Follow Active Quad” will be huge. For my example, I rescaled it by 0.25.

That’s sort of the opposite of what I want to achieve though. I want a rectangle object mapped by disk mapped “texture space”, if that makes sense. Regular texture space has X=right and Y=up, whereas in disk mapping this space would be defined as X=radius and Y=angle. We have the option to create UV spaces based on cylinder and spherical projection, but not disk mapping. “Texture space” also only exists as the regular box afaik.

Your image was misleading. I did what I saw.

Now, to do the opposite as you say, well, that’s possible… Tedious… And for a poor result… Unless you’re affected by an OCD. :wink:


There’s no “one-button” solution for this kind of twisted UV map but with a bit of patience, you can do it by hand.

First, a bit of math. There are 16 edges across the total width of the plane. 360/16 = 22.5°

Unwrap the plane with “Project from View (bounds)”. Set the pivot point to the 2D cursor and double the width of the whole UV map. [S], , 2, [ENTER]

In Edge mode, select the line of edges above the 2D cursor. [ALT Click]

Rotate the line: [R], -22.5, [ENTER] Inverse the selection. [I] Bring the whole to the left so that there is a new line of edges just above the 2D cursor. You have to be super-precise! (The result is already bad, imprecision will make it even worse.) In my case, I was lucky, all I had to do was [G], , [CTRL drag].

(Loop) Inverse the selection. [I]
Add the line of edges above the 2D cursor to the selection. [SHIFT ALT click].
[R], -22.5, [ENTER]
[I]
[G], , [CTRL drag]
Go to Loop until nauseam…

That’s doable. :yes: But after having seen the result, I’d say it’s not advisable. :no: To get anything good, you’d need an insane number of “rays” and some really catchy music to keep you going and not to hang yourself to an UV edge. :eyebrowlift2:

Now, excuse me, I’m going to do a fluid sim to wash my brain… :smiley:

ROFL on the applied humor :slight_smile: And appears you’re sharing the same frustrations I had. As I said in #1, the spider web approach was already tried out, and I got the nearly exact results as you (but much less straight and perfect). So it’s still not there. See the image I have in #1 - that’s basically the rendered result I’m looking for when I have a simple 4 vertex plane (no subdivs). The subdivision was only to try to see if I could arrange UVs correctly, in order to “visualize the maths”, but even that didn’t turn out right :smiley:

However, for the maths approach which was what I was actually going for, I don’t seem to have access to any of the tools required. How do I “tile an UV map” using nodes? Where is fairly basic math functions such as abs, floor, ceil, integer and floating modulo, polar, even sign could be useful? Maybe possible to calculate using regular math nodes, but I’m not capable of doing it. Is there some kind of library I can add that gives me access to math functions to use in Cycles materials?

Thanks for major effort in attempting to help me out though :slight_smile:

Why not make a disc with the same amount of faces as your plane, unwrap it using ‘Project from View’, then transfer it’s UV layout onto the plane (select the plane, select the disc, Ctrl+L -> Transfer UV Layouts)?

I totally missed the part about the spider web in post #1… :eek:

Now, I understand what you want to do. You want to wrap a whole texture inside a single face and tile it across all the faces. I can do that. :eyebrowlift: (I don’t know why but I pick up the glove and I’m gonna slap your UV face with it…) :wink:

Catchy music on… Coffee on its way… Let’s have fun! :smiley:

To be continued…

do you need exacct sqyare in a spiral like in first post
or an approximation could do ?
this can be done with array and square

salutations

In the end, what I am trying to achieve is animated seamless radial noise with seamless time repeat, on any kind of object, using “disk mapping”. This is the first step. I’ll also need 4D noise where I can modulate the 4th dimension as I wish.

Exact square in a spiral? Actually, a perfect circle would be preferable - two edges of the checker pattern should be part of a circle rather than straight edges on an UV map. Note that this is of no real importance, I just want to accomplish something I’ve done in the past in other software.

Finally, I had to go to bed after my head exploded… :wink: I’m not giving up. I saw some really interesting stuff during my experiments.

Still, could you show us some video of the effect you’re trying to accomplish? Maybe we’re not on the right track.

Much later… Eureka! :smiley:

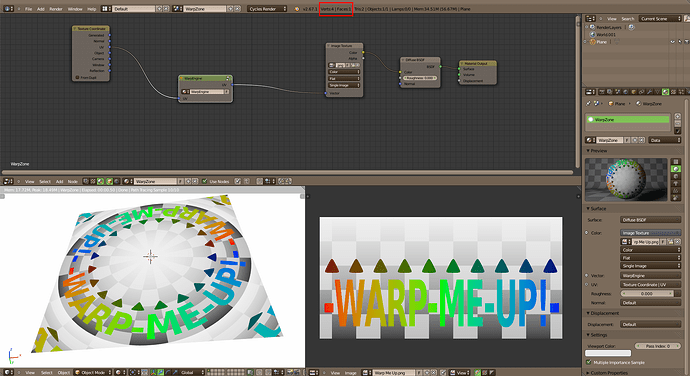
I don’t know if that’s what you wanted but I made something.


Please, every time you see “warp”, read “wrap”. Too much Star Trek, I guess… :wink:

Now, what? How much are you ready to pay to see what’s in the Warp Engine? :evilgrin:

is the text part of the image or other object wrap around a circle?

and how did you do the saquare on image is this the checkerboard UV image ?

does not look like spiral squares like in first pic

cannot really read the nodes set up!

happy cycles

What you see in the UV/Image Editor is the image used in the material, with the fading checkerboard, the text and the little arrows. (I made it with Blender too but that’s irrelevant.)

Now, that I look again at the result, I see a deformation along the radius. The image is stretched toward the center, squeezed toward the edge. I must fix that… and I’ll remove the fading on the checkerboard; it hides the details in the center.

As for the details of the node group, I withhold them until the OP comes back or somebody else insists. (Besides, it will give me some time to fix the deformation and to try to understand another glitch that I fixed with a roll of duct tape.) :wink:

so you made a UV image plus anther one for the radial checkboard image to get this final image

but in first image the pattern has the shape of a spiral!

not certan but it might be possible in GIMP to get the spiral shape for a checkerboard
but don’t know enought to do that

i think it might be possible to make a spiral square with array + empty and square
then render this as an image and re use it !

happy cycles

In GIMP in the Filters->Distorts->Polar Coordinates you can switch between the 2 types!

No, no, no! I made a very normal image of a checkerboard with some text over it. (Straight black and white squares with rainbowy stuff over it.) Then I manipulate the UV coordinates in the node tree to project the image in a circle.


Here is another example (with another bad deformation). The image is made with Blender as I said but that’s the one you see in the UV/Image Editor on the right of the viewport. The grid of squares is part of it. No spiral or circle. It’s what’s inside node group “Warp Engine” which does everything.

it does creates a lot of radial distortion !
Changing UV i thnk will always create distortion like that!

happy cycles