I’m looking for tutorials concerning garments with Blender. I’ve found some videos on Youtube, but most of them are more about drapery, or curtains. I’ve searched in the forum, and I’ve found something about garments, but the message was from 2009, so I guess things has changed since then. I’ve also seen this patch :
You could try and ask there, though I doubt you’ll have any exhaustive answer.
The patch (by thesleepless) is in the repository since 2012-05, but nobody looks interested to merge it, sadly.
It can be done but it is going to be approximate and tedious. On the other hand, garment pattern is approximate anyway, meaning, using flat pattern to form complex envelop around the body. Flat fabric can bend and stretch to fit the form anyway. You just don’t want to be too far off.
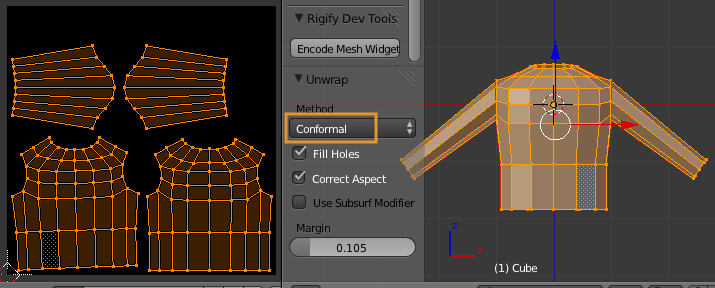
Blender can create flat pattern using UV unwrap. A basic step is as follows. First create basic garment form out of simple shape with minimum polygons. Mark the seam and UV unwrap. Set method to Conformal to keep mesh as rectangular as possible.
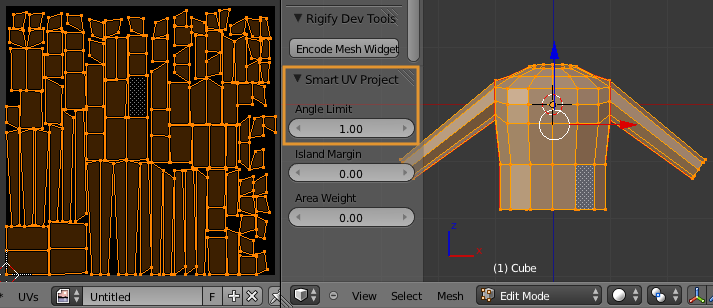
Un fortunately with this standard method Blender will try to stretch non-flat portion out to make it flat. The unwrapped mesh has lots of stretches in it. It’s not geometrically correct. To unwrap with minimum distortion, you need to use Smart UV Project. And Angle limit set to 1. This will project all mesh face flat on to the UV map. Unfortunately most all faces get separated. To get the true pattern you need to rearrange all that peaces together!
Just select each face one at a time in Edit window. Corresponding face will light up in UV window. Grab it, pull it aside, arrange it with and do the best to stitch them together. Problem is that some faces are rotated and even flipped! Oh well play with it.
What do you mean with ‘do not know how to use patches’?
Is it that you don’t know how to build your own patched blender, or that you don’t know how to use it to make garments?