How to make good fur?

The question is not how to make fur. The question is how to make GOOD fur?

Assuming one has reasonable grasp of Blender 2.6, knows how to make a basic material and how to operate the texture & strand controls, what does a person need to know to turn so-so fur into nice looking fur?

It is my understanding that lighting and strand texturing are key to making good fur but what about them is important? Are there rendering settings to look out for? Are there settings in the fur controls that can trip you up?

I like to make things like Teddy Bears and fur coats. Although I have been able to get “okay” looking models with fur, I just haven’t hit “Sully fur” yet. (Is Sully from Monsters Inc. still the gold standard for rendered fur? :wink: )

I’ve seen a lot of tutorial videos on making fur but I haven’t seen one that covers the finer points of the subject. Mostly they cover the basics of making and that’s where they leave off.

I tried downloading the Big Buck Bunny blend file but I haven’t been able to make much sens of that file, so far.

What wisdom can you impart to help somebody get from making “okay” fur to making “Sully fur?”

Blender cookie’s Susanne whit fur looks good to me but i am not an artist

Well, I have been making some progress on my own. I downloaded the .blend files for Big Buck Bunny and I have finally been making some headway.

I didn’t realize that there were texture files that needed to be downloaded as separate files. I have those files and I have been able to make some successful renders of the rabbit, the squirrel and the chinchilla. Now I am taking what I see in those files and trying to apply it to my own models.

The problem with tutorial videos at Blender Cookie is that they very rarely cover the topics that I want to know about. The mostly cover the basics of making fur but don’t cover the fine points that I really want to know about.

I know how to set up a particle system but I want to know about the finer points. How many hairs do you use for best effect? How many children? Do you use randomness, roughness and Brownian settings? How much? What’s the scale on those settings?

I know how to set up strand rendering in the materials panels but I want to know how wide you make your particles. How do you set the taper? Do you use tangent shading or other things? What ranges of settings do you like best?

I know how to use textures to color the fur but what do you use? Do you use color ramps on the strands? What color ranges? What blend settings? Do you use strand alpha? What settings do you use?

I know how to use UV textures to make patterns in the fur. I often make them with Photoshop/GIMP. I usually make them as .PNG.
How do you make them? How do you color them? Do you use separate textures for color, alpha and specular? What are your favorite techniques and settings?

What about lights? Do you use all diffuse lights like point lights or do you use specular lights like spots? Do you use a mixture? How do you position them? Key, back and fill? How?

Again, I know how to do the basics. I read Blender Wiki. I have watched lots of tutorial videos.
I don’t want somebody to say, “Click this button in the particles panel.” I want people to talk about what they do to get their best results. What works for you. What doesn’t work for you?

These are the things I want to know. Let’s raise the collective wisdom. :wink:

http://www.cmivfx.com/tutorials/view/209/Blender+Shading+and+Fur
http://www.cmivfx.com/tutorials/view/306/Blender+Mammoth+2.49+To+2.5+Migration+Guide

Attachments


the cmivfx tutorials richard marklew posted look really good, and i’ve always had the itch to see what methods are covered, but they’re ridiculously expensive for tutorials (at least, that is, if you’re anything like me and you’re using blender because you can’t afford the absurd prices of industry-standard tools).

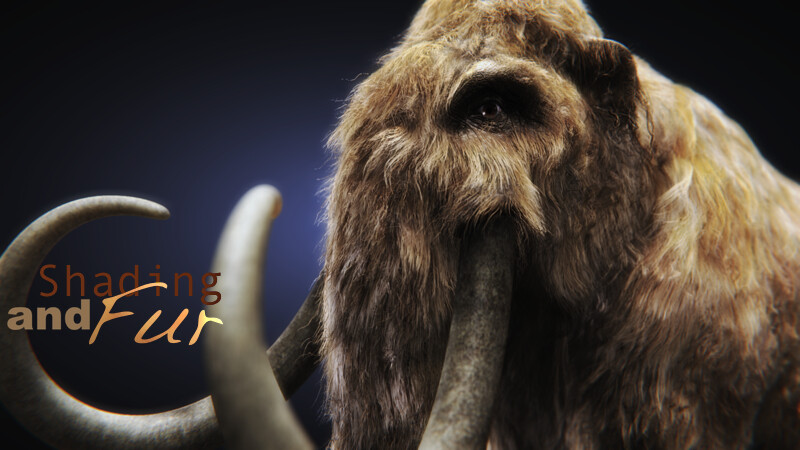
i’ve found that if you’re making an animal, using UV-mapped image textures on the hair material goes a really long way in getting realistic color variation, it’s essential. that can apply to human hair too, since most people have subtle highlights between one part of their scalp and another.

i’m pretty generic with my settings, and i use similar particle system settings for pretty much everything. on fur and grass, i always increase the ‘brownian’ motion value at least a smidge if not quite a bit in some cases, to get some random bending and direction of the strands. i also almost always use some endpoint roughness and random roughness for fuzziness.

on the hair material, i usually set the strand start size to something like 2 - 3 px, end size to something < 1, width fade to ~ 1, and i prefer the way tangent shading looks. i know it’s not very physically accurate, but if i’m using color hair/fur, i like to set a specular color on colored hair to something other than white, because sometimes a white highlight can completely wash the color out.

i use z-transparency on hair materials and set the alpha and alpha specular to 0. my texture channels on the hair material are usually a B&W color ramp mapped to the strand/particle coordinates, influencing alpha, set to mix mode, with “RGB to Intensity” checked. this one’s to map transparency along the length of the strand. my color ramp is black / white / black, with the first two positioned really close to the left side of the color ramp.

then i use a UV-mapped image influencing color (or just use another color ramp mapped to strand/particle to color the hair along the length of the strand). and lastly i use another color ramp with a dark color on the left and white on the right, mapped to strand/particle, influencing color and set to multiply, just to darken the roots.

just my two cents. but i hope this helps!

edit: lol i just realized i didn’t give an answer to most of your questions. you really have to play with stuff like the “amount” of children, brownian motion, endpoint and random roughness, and with respect to specular maps, lights and such, it depends on what you’re doing. make a specular map if you need one - i wouldn’t think most ‘fur’ would need one. after all, how often is one part of a coat of fur shinier than another? use rims or kickers if you need to visually separate the object from the background (that’s not so much a ‘fur’ detail, but a composition detail). also, if it’s just a head of hair or coat of fur, i leave the material traceable if i’m using raytraced AO. AO on fur or hair just looks really nice, IMHO.

lol i just realized i didn’t give an answer to most of your questions.
It wasn’t my intention to get the answer to everything in one fell swoop. My questions were only examples.

Yes, those tutorials look really good but, like you, I don’t have a lot of money to spend on things like that. Maybe some day…

I use UV image mapping a lot. I like fur with stripes and spots and stuff. Some times it’s a bold pattern like tiger stripes. Others, it’s a subtle color gradation. Like you say, UV gives you a lot of power. You can even use a UV map to control the length of fur. It sort of works for me but I have yet to get that to work just the way I want it to. I’ll need to do more studying.

I like to play with Brownian motion, roughness and endpoint roughness but I find it hard to get a good look with them. It’s hit and miss for me. It has a lot to do with the fact that I don’t understand the scale of the settings. In some of those settings a change of 0.01 can mean the difference between looking good and looking like crap.

Z-transparency of the strands and setting the ramps correctly has been a bugger for me. Again, a little change in the settings can mean a big change in the result and that result isn’t always good.

Yes, ambient occlusion is a must! :slight_smile: I set it for “Multiply” at about 0.5 for starters then adjust from there.

One thing that I do is use a “Wind” force field to blow the fur in the direction I want it to go. It’s not as precise as combing the fur but it’s a lot faster and easier to do once you get the scale of the settings. Again, this is one of those things where a change of 0.1 can make a big difference. Keep the wind force field settings very low or else your fur will get blown, practically, right off the surface.

My problem is that rendering fur just takes a lot of computes. Even with an 8-core 2.4 Ghz Mac Pro with 64-bit OS, it still takes a lot of time. This is where it gets frustrating. I spend a lot of time making test renders, changing one setting and making another test. You can spend a lot of time just doing that. I’ve been trying to build a library of my best furs to use on different projects but the problem with that is that one fur doesn’t fit all situations. A fur that looks good on one model looks like crap on the next.

I’m trying to figure out what I’m doing right and what I’m doing wrong. I’m hoping that I can streamline the fur-making process.

Again, I’m not looking for a pat answer. It seems like making fur and similar particle-based materials is a popular thing to do in Blender. A lot of people want to do it but seemingly few people do it really well. There are many people who explain the basic particle systems and how to but a basic fur on an object or character but there are few who explain the things needed to do to go from crappy, ratting looking fur to a nice fur on a Teddy Bear that you just want to reach out and touch.

I want to know what other people do and how they work so that everybody can benefit.

could you perhaps upload a .blend example, maybe a sample of something you’re having trouble getting the ‘look’ right with? i’d be interested in comparing renders and settings, exchanging ideas.

yeah, sorry if that sounded like it was supposed to be a “pat answer” kind of answer; i think it’s a pat answer for me anyway, since i essentially just tweak the same parameters every time i’m making hair or fur, even though the values themselves vary from particle system to system. that’s just my workflow, and i don’t usually veer far from it. though if someone showed me better techniques, i’d definitely adopt them!!

the reason for that is probably that i’ve never made a character with an afro or perm, or what-have-you. i’d be especially interested to see what people are doing to get good-looking, more eclectic styles like that.

also, you mentioned using a UV map to influence the length of the fur. i’ve seen other people say that too, but have never seen an example of it. how exactly does one do that?

Add a particle system, you’ll then have an additional option in the texture panel to add a particle texture which you can set to influence various particle properties (length/density etc)

aHA! thank you.

Tried three times to get a .blend file to attach to a forum post without success. It’s on my share instead: https://files.me.com/randystankey/5fyh7p

Here’s a pic.


See… It’s okay but it doesn’t want to make you reach out and pet the monkey.

thanks! i just took a look at it. well, i think there are some things going on here that are contributing to longer render times and strange coloration. i made some changes to the scene. also wrote out kind of a long-ish diatribe detailing some of the changes i thought i’d make and why, but i figured it wasn’t necessary to post about all the changes i did to the scene. best just to post a .blend file of it. here’s a render –

[ATTACH=CONFIG]162656[/ATTACH]

obviously i didn’t do the best job combing, and i didn’t spend a ton of time setting up vertex groups for length and density (i guess i need to experiment more with influencing length with textures!).

here’s the blend file: http://www.pasteall.org/blend/10114

i had a couple thoughts: the lighting was very even, especially with environment lighting on. the fur was being sort of ‘flattened out’.
also, i didn’t quite understand what you were attempting with a few the textures, or their sequence. can you explain them to me? what i mean is, for instance, the image texture set to mix/influence=1 came after a strand color ramp set to mix/influence=1, so the color ramp was being overridden by the image texture.
the number of parent strands was pretty high, and that affects render times. i dropped it back down to the default 1000 and relied on children to fill the gaps.
segments also affects render times. i personally find that for fur, 3 is sufficient, and for longer hair, the default 5 is usually fine. if you use b-spline interpolation and set it to 4 or 5 with longer hair, you can get a good-looking curve with a fewer number of segments.

I’m interested in making fur like in live-action movies of Angry Birds,Ratchet(especially this feline-like lombax creature) and Clank,Crash Bandicoot,Sly Cooper(by Rainmaker redesign),Tawna Bandicoot,Prinstripe Potoroo,Dingodile,Koala Kong from Crash Bandicoot N. Sane Trilogy,Hunter,Bianca,Moneybags from Spyro Reingited Trilogy,all characters from Zootopia.