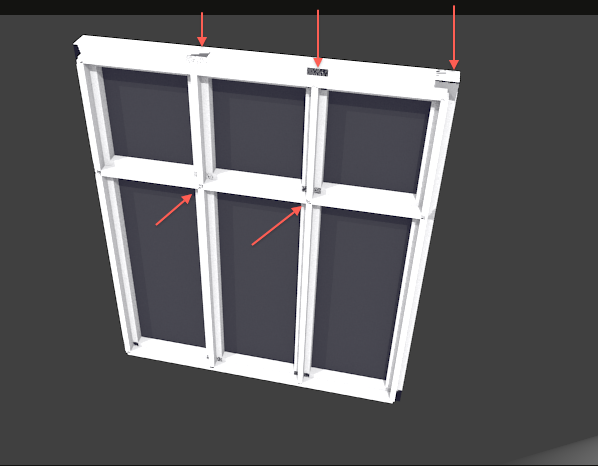
This window frame (see example) has has been constructed with cubes. Perhaps not the most elegant procedure but as an example OK anyway: is there any simple process to merge several meshes in Blender? I want to collapse the window frame into one united mesh without hidden edges thus avoiding rendered artefacts (se example) where the faces overlaps.
Alternatively one could add them together one by one as boleans (separated) but this might be a bit laborious? What do you think?
Hi, it might work by simply selecting it all and doing remove doubles if all the edges are on loop cuts. Or possibly the remesh modifier could work here with a high enough octree depth. And having it on blocks should help it keep it’s shape. Hope this helps
(1) There’s no loopcut at all, thus removing doubles won’t do here (this command only applies to vertices as far as I know)
(2) Remesh modifier: Good idea. Hadn’t tried it out, but it didn’t seem to work OK in this context. The results looks too messy and quite “over meshed”.
Hmmm… I don’t see much solution besides adding some loop cuts and using “Remove Doubles”.
However, you can make things easier for you. Your mesh is symmetrical on the 3 axes (if you ignore the fact that the lower panes are taller). My first step would be to add some loops cuts and to delete vertices to be able to use a Mirror modifier. That will divide your workload by 8.
Next step is to resize your boxes so that they overlap only on edges, i.e. so that no vertex is a middle of a face of another box. Then you create enough loop cuts to have vertices at every corner of the overlapping parts. After all this, you can to use “Remove Doubles”.
But your work isn’t over yet. You must then disable the Mirror modifier (and hide the glass) to delete all the useless faces inside your mesh.
The next step is to merge the useless vertices in the corners. Then you apply the mirror modifier and delete the loop cuts on the 3 axes. And finally, you can pull all the bottom vertices in one move to resize the bottom panes.
I’m a little worried tho when I see your grid floor in the background and the directions pointed by the arrows of the 3D manipulator. Did you work in local coordinates at a random angle? In that case, there is only one magic formula: Head, wall, bang!.. Restart.
One final word: Inflatable. If your mesh doesn’t look like an inflatable… structure (No, no, I won’t say inflatable doll!) then it’s wrong. Loops cuts, insets and extrusions! That’s the way of the mesh, Little Grasshopper.
Not meaning to steal any of Kaluura’s thunder or anything, just I forgot to mention that after the remesh modifier(set to whatever you used to get that last picture), you use a decimate modifier set to planar, then because all the angles are at 90 degrees, if you just set the angle limit to anything below 90 it should remove everything bar like one edge that you can delete yourself. It can leave a couple of loose vertices behind, but if you just set the snap vertices thingy on, then drag each one to the nearest corner on that edge then do remove doubles, it should all be good. If you want I can knock together a little video on how to do it for my youtube channel.
Good Luck
Great answers! I guess I’m fiddling around with my own 2D vector drawing practices, which is hard to apply in a 3D world why I’m very thankful for your inspiring help. I believe I must take more time reviewing your instructions.
Kaluura: Yes, I know about the grid thing. The window as been rotated/raised with “grid-magnet” on, so its easy to adjust back. I think you have an important point concerning the “inflated” approach. I guess I very soon loose control of the mesh else wise. Though still trying to find a transparent (to 2D-me;) procedure to distribute the window frame collumns. I must “inflate” more and use the grid more extensively.
Enigma: The Decimate Modifier was unknown to me. Thanks, I can use this introduction to DM for other purposes. But still I can’t control the overlapping meshes (probably I’m not grasping the correct numbers set in the parameters). Planar, as you write, what number (ratio) is that? One cannot set the degree only the ratio, but I might have got it wrong …
Tried to add the Decimate on top of the Remesh Modifier but – but as mentioned before – still with a bit arbitrary result. I think I’ll go on investigating the parameters further. Thanks for your great suggestion offering a YT-video on the issue. I guess I’m not the only 2D draughtsman concerned about this. I would be indeed be very delighted. I’ve bookmarked the other nice videos you’ve created. Please let me know if you publish one such.
Hmm, are you sure you have the latest Blender build from blender.org? The decimate modifier now has three different settings available, one of which is planar. And apologies I tested this method last night before posting to check I wasn’t talking rubbish and it worked fine. But after recreating it a second time for a video it simply won’t work, so either my fix is VERY finicky, or I did something wrong last night, so my greatest apologies but it would appear my “helpful” tips are actually complete hogwash Hopefully Kaluura’s solution works for you however.
Good Luck (Any other requests for tutorials feel free to send me a pm and I’ll try my best not to mess it up this time)
Hi Enigma
Latest build? … auch! No, its a transition between 2.63 and 2.64 from august 2012. It works fine, so I havent been (much enough) inclined to update it. Better have to – I understand. Thanks for the tip. I will enjoy to check out the new Decimate thing.
No, you certainly don’t have to apologise. Especially because I’ve got alot wiser during your responses The feedback has been most inspiring and helpful and I’m looking forward watching your current Enigmatoots when I feel I’m through with this window-frame stuff.
I presume for my part – for the window frame and until I’ve got more accustomed to the Decimate and Remesh modifiers. – its more transparent for me finding at suitable grid/object size, using loop cuts/extrudes (The “Inflated” Approach” as Kaluura proposed ) and then scale the entire window frame down to the overall size wanted. Then I don’t even have to involve – as earlier suggested – the Mirror modifier I guess.
Yet:
(1) Installed the add on - check
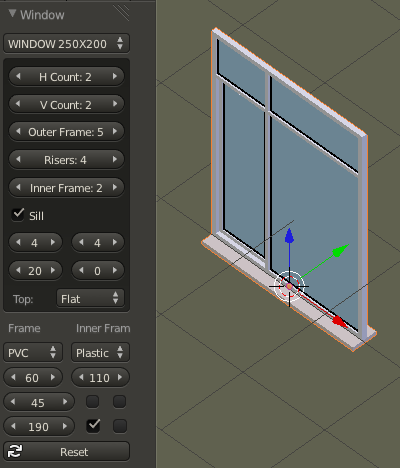
(2) Retrieved a basic window mesh from Mesh/Window Generator menu - check
(3) But can’t find the “Window” properties. Tried both “N”- and “T”-shelves but no show
I know it sounds a bit noobish but others (like for my part) might need to remember this:
When checking the tool out I messed up the difference between Add Ons and Modifiers, where the latter can be manipulated until “Apply”-command.
This doesnt go for the Mesh/Add Window (like ie. UV Sphere), which must be defined instantly in settings when loaded.
Everything ok. I’m thankful for the hint about the Add-Window-tool provided by TynkaTopi


 then it’s wrong. Loops cuts, insets and extrusions! That’s the way of the mesh, Little Grasshopper.
 Hopefully Kaluura’s solution works for you however.