I am using cycles, How to do this with mapping nodes?
PS. Is it possible to do this Dynamically/ real-Time like as I scale up it happens automatically.
If it is Hard to explain, then it’d great if you could do me a favor and post image or Blend file …with that node setup.
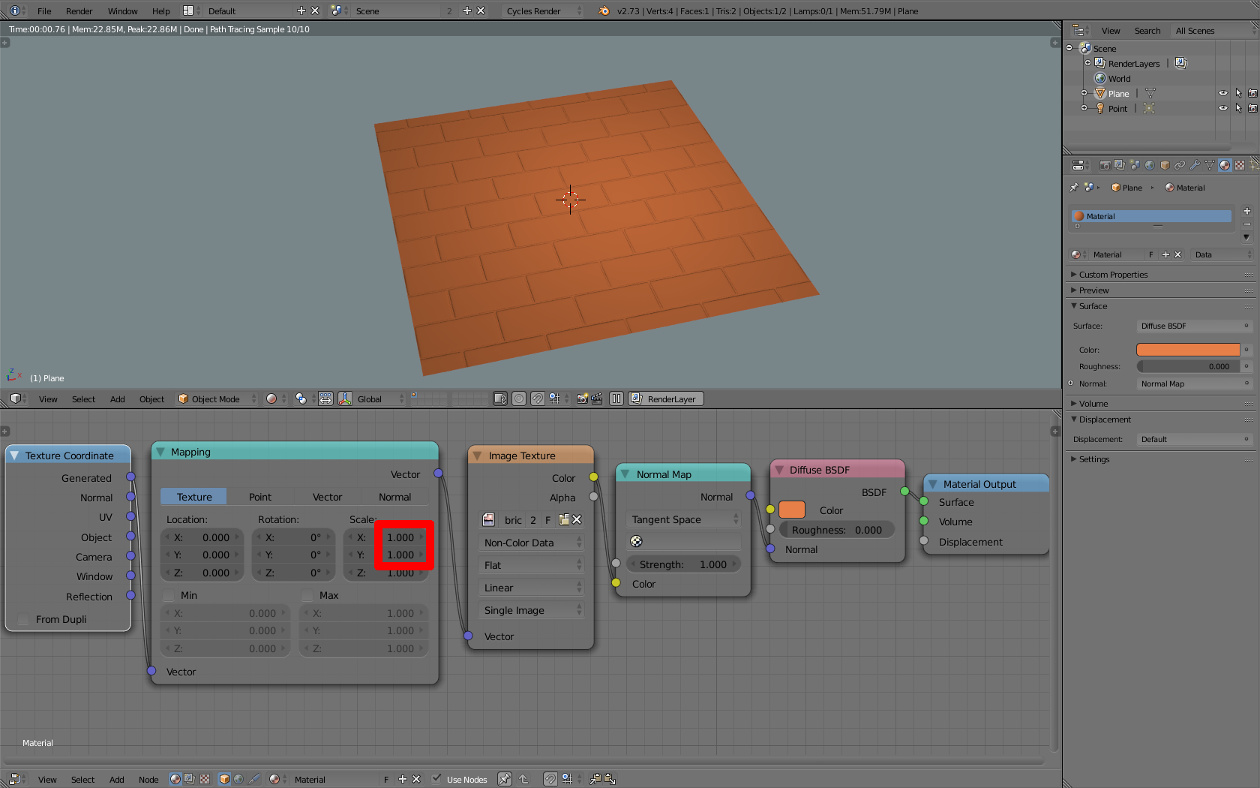
Texture coordinate node = UV --> mapping (under vector menu) --> color input BSDF (or any other idea you may have)
Play with scale coordinates. In view port render preview mode, it happens dynamically.
However, using some prebaked normal maps it may not. Depends on the coordinates of these n-maps (tangent)
To use tangent n-maps generally is not quite right. For instance, if these maps will be used on a corridor (around), a cylinder like tunnel, it will work. If on an unwrapped simple cube, it won’t. We have to understand what the principles of tangent coordinates are.
Have watched many false tutorials on this matter. I wonder how it still happening around.
@michalis: can you point out a tutorial where someone used planar normal map with a UV-unwrapped non-planar object? Just to know what to warn people against.
As for real time feedback on the scale, you can just leave the viewport rendering and adjust the scales in the mapping node. Last time I checked mapping scales will not show correctly in the viewport textured or material, only rendered.
You can go into the uv editor and scale your uvs larger (and get rid of the mapping node) thus making the texture tile and appear smaller. But usually this isn’t the best idea as it will effect all your textures. But you can see the change in textured or material mode in real time.
You can go into the uv editor and scale your uvs larger (and get rid of the mapping node)
Normally, this is my workflow. For a single object. However, you’re right. Not the best idea for a shader used on multiple objects.
can you point out a tutorial where someone used planar normal map with a UV-unwrapped non-planar object? Just to know what to warn people against.
Not really. My point is: tangent normal maps are depended on a X and Y coordinates. X is left to right, Y is top and bottom, as seen in a UV editor. Z is for depth. Meaning, we can’t rotate a UV island by 90º or 180º or -90º in the UV editor. If we do this, only wrong results expected. An unwrapped cube is a good example. I’m talking about pre-baked tangent space normal maps.
I know, Stan. Not arguing with you, of course not. I just had to remind it. I watched so many wrong tutorials on this matter, around. I really don’t quite understand why so wrong tutorials exist. Sometimes coming from “blender experts”. Tangent space normal maps.
But nearly 90%+ people I’ve came across mention and use Tangent maps. I was watching Unreal Engine 4 Official Twitch broadcast Episode (Blender workflow), while he was about bake Normal maps, in Properties panel and was adjusting the settings…he giggled and said “I find no reason to change this to any space other than Tangent”. (I can even link the video but that’s 1 hour long)
So it’d be great if you guys could comment on his statement.
@Neek
Tangent maps are more than just fine. The right way to go.
However, pre-baked tangent maps, some patterns, well, you may be in trouble using them on certain cases. (like on an unwrapped simple cube, please be my guest)
Already explained why. If you rotate a face-UV island (it will happen anyway when unwrapping a cube), results to wrong shading.
Supposing you use nice pre baked 32 or 16 bit depth (B&W bump) maps. Ok then. Place islands, rotate them etc as you like. (on a cube).
Ask blender (internal) to bake tangent maps from this source. (Just uncheck everything like “from multires” or “to active”). You gonna have a conversion of these depthmaps to tangent space normal maps on this cube. The right tangent space.