Since I’m a beginner in Blender, I may ask a stupid question but still here we go.
Here is my problem:
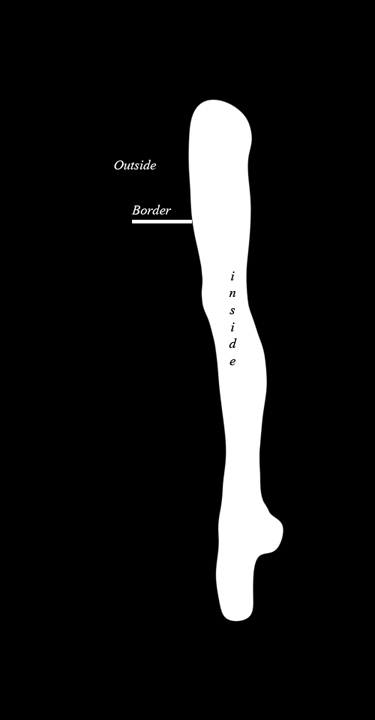
I notice that there are basically 3 zones in any rendering of an human model.
The field textures like the skin on the thigh or the back or the cheek. They cover an area that is grossly the same.
The transition textures. They are the textures used where a bulging muscle blend into a surface like the biceps into the shoulder or the calves…
The border textures. This is where the model meets the background. They are on the border, a bit inside and a bit outside the model on a plane parallel to the camera sensor.
I have all the textures I need. I have no problem with the first and second ones.
I have a problem with the 3rd. It should appear only on the outline of the model.
How would you do that?
I’ll send pictures if needed.
Are you sure those things are in any rendering of a human model? I mean I rendered many human models in the past and never seen anything similar to those textures
I would love to help but I can’t imagine how should it look like.
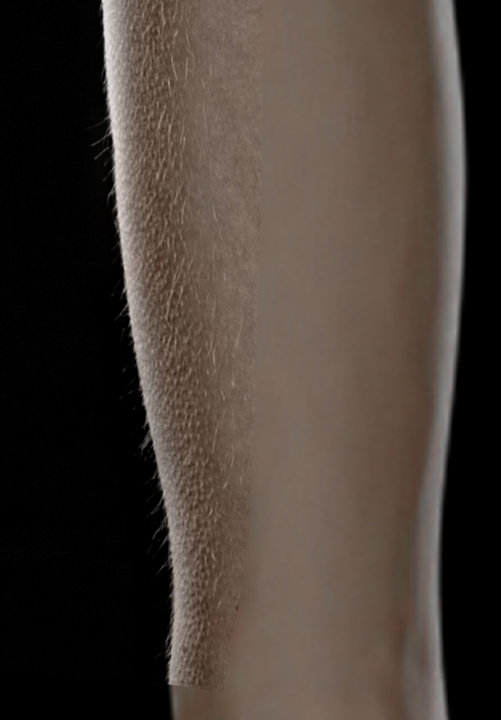
The border texture has been place manually in Photoshop. I’d like to do it 3D automatically.
My wording might not be what it should because I’m not Native English speaker and I’m not a 3D guy, I’m a photographer. So my ideas might be different from yours. (not better, just different).
It doesn’t actually work that way, like jerzygorskiart suggested.
Think about what happens as you rotate that leg. Even if you do map the border texture to the edge of the leg-- which would not be easy-- the texture, which includes things like hairs, would appear to be still. It would be very disturbing to watch
Textures are almost never mapped to anything other than the surface of the model, the same as your “field” textures ought to be. Effects like the rim lighting are accentuated by “view-dependent” material settings, like Fresnel. Hairs come from actual meshes-- hair meshes, typically as particles, but sometimes as textured hair “cards”.
A hair card is a plane, with a texture that uses transparency, that tries to simulate multiple strands of hairs with images on a single plane. When you use just one, they’re obviously flat planes of hair, but when you use multiples, at many different orientations, they can start to look more natural.
For the detail you’re showing in your picture, particle hair would be better.
Thanks for the answer. Took me a while to answer because I really really wanted a way around this. My purpose is only to produce still images (photos actually) not a 100% 3D realistic model, so I can use some shortcuts. Here is one: I don’t need to simulate reality, I only need to simulate a photo of the reality and that is immensely easier
If all you want is a 2D still, with fixed lighting and camera angle, you’ve already composited it in Photoshop. You’re already done. Photoshop is the proper tool for what you’re talking about, not Blender (although you could certainly use photoshop to composite in other images that you used Blender to make.)
Well, yes I’m done in 2D. It’s just that I do the same thing every time I need an image. So I thought of doing it 3D and shave some work in the process. At the moment, from the very start to the very finish it takes 3 days so it’s shorter than a real shooting. I hoped to make it ½ a day with 3D.
Anyway, thanks for your answers and your time.