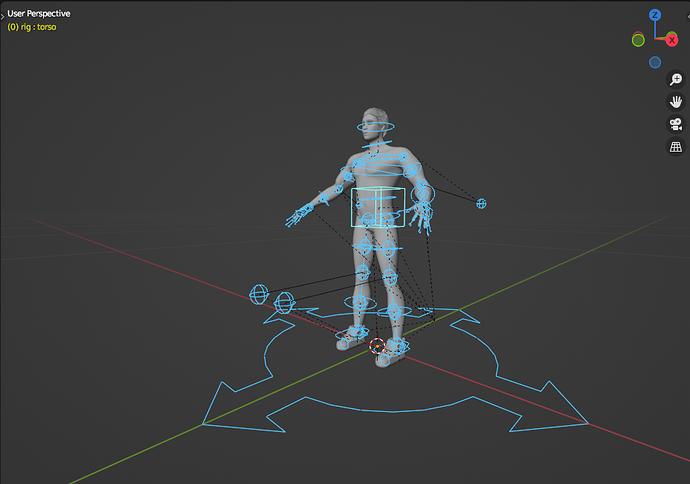
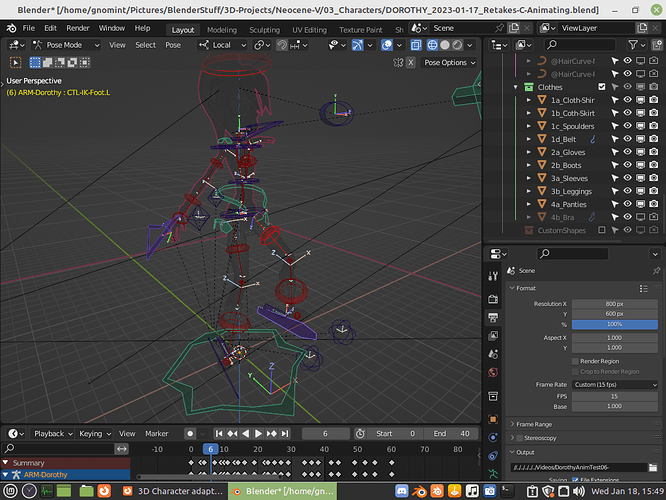
If by Bone Shapes you mean Custom Shapes / Widgets, then this is fairly simple to develop, although not always easy —requires some designing skills, references of other artists’ Custom Shapes, and naturally learning some techniques for achieving these.
Custom Shapes can be a very stylized thing; recently, I’ve adopted the notion of making (most of them) not as just Wires (Edges only), but with Faces.
Apparently, you’re still not using the Bone Groups feature for Colors, so here is a quick tip:
This tutorial is very basic and has got 2 parts; the cool thing is that it presents quite original Custom Shapes according to the shapes of the 3D Character Design; although I believe all those Custom Shapes are still all Wire-like stuff.
This is not a very clean picture, but here is a quick example of what I’m working on, making some Non-Wired Custom Shapes:
The other thing I think every 3D Rigger should know as soon as possible, is that the conventional Skinning algorithms that we have access to in software like Blender, are actually pretty ‘unnatural’ for the development of good Organic Rigging; they generate tons of Artifacts especially on Deform Bone Rotations; theoretically, all these could be avoided, if we had, first of all, a modern, consistent with organic and sculptural shapes-in-motion, Skinning algorithm. Because we do not have this currenlty it seems, what we have to deal, in order to make good Organic Rigging on 3D Characters, is to create extra Rig systems inside the Skeletons just to correct the Artifacts that will mostly likely occur, this when not having to use alternative, external solutions from outside the Amature Object (such as Object Modifiers). In practice, this means that the Rig we’re making will not be ‘clean’ nor practical in many of its features; instead, it would become relatively counter-intuitive, with the sole purpose of fixing unwanted output from the Skinning algorithms —which fundamentally determine how Weight Paint Deforms the Mesh as the Deform Bones Transforms. This means that we can try to have a very organized Skeleton; but it will be to no avail in terms of quality of Organic Rigging Deformations, if we do not develop altogether the more Advanced solutions (which could be simplified to a certain level still). And for developing such ideal simplicity, one cannot just Rig as one Models; one needs to learn some theoretical bits of Skinning for Organic Rigging in CG software; and once one gets the notions of when, how, maybe even why things happen, then it is possible to come up with inventive, cleaner solutions to older problems (even without a modern Skinning algorithm). If these aspects of Rigging interests you, check my tutorial, I mean a few documentations (academic works) which helped me figuring out how to make this ‘simpler’ as well as effective —after half-a-year of struggle without knowing why the Mesh never responded to my Rigs in the way I was ideally expecting. I just needed some basic theoretical input: to understand a bit more about what was making Organic Rigging so difficult in Blender (and it could be said in other CG softwares as well, because most, if not all, share the same conventional Skinning algorithms); of course, it would be much better if I were myself a mathematician, then I could read the Skinning algorithms… and possibly, if not rewrite a better Skinning algorithm myself, would at least be able to develop a mathematical algorithm Rig system in Blender that would automatically counter the bad output Artifacts (instead of making it manually like we do on the alternative solutions).
![Rigs of the Trade # 04 — Part 1/6 ❅ Pelvis Region Rig with Helper Bones [ Intermediate ]](https://blenderartists.org/uploads/default/original/4X/5/f/c/5fc9cf7026a154c455e7ad1dddfb865c5462ee96.jpeg)


![Blender [2.8/2.9] PERFECT Custom Bone Shapes - in about 10 minutes](https://blenderartists.org/uploads/default/original/4X/d/3/e/d3e2bcfaba787b91327fe955e8ad199f0ad44452.jpeg)

![Rigs of the Trade # 04 — Part 1/6 ❅ Pelvis Region Rig with Helper Bones [ Intermediate ]](https://blenderartists.org/uploads/default/original/4X/5/f/c/5fc9cf7026a154c455e7ad1dddfb865c5462ee96.jpeg)