I have a problem with shoulder and the finish on the edge. When I try to lift the arm, it created something bizarre as you can see. I do not know how to fix it. I am new to rigging. I used FK bones to lift it. Rig is from Rigify. It deforms vey badly. Is there any way to fix this?

You need to work on your weight painting… The arm bone is influencing a lot of the torso area… More weight to spine and shoulders there.
And blur/soften the weight paint when needed (sharp folds)
Then if that doesn’t solve the issue…corrective shape keys.
Sometimes adding support bones can help.
You need to watch tutorials about the above. Hard to explain by text. Start with weight painting.
1 Like
To further what cgPixel is suggesting, adding shoulder bones (running from neck-area to top of upper-arm bone) can solve these weird deformations with the least extra work on your part.
In general, shoulders and wrists are some of the most difficult joints to rig satisfactorally – the bones there have much larger required range-of-motion’s than any other bones in the human body.
In this first image, notice that there are shoulder bones:

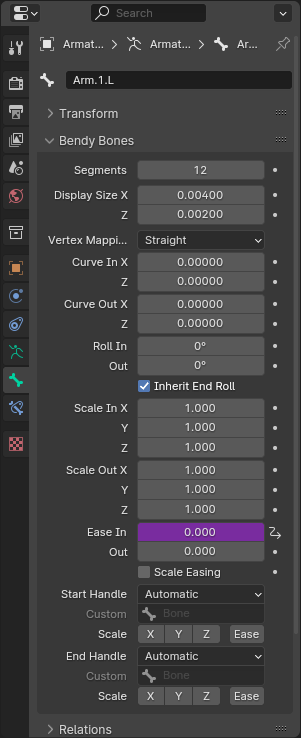
In this second image, notice that I’m using bendyBones with Inherit_End_Roll on. The arm is rigged with a standard IK (Inverse Kinematics), so the 2 arm bones don’t bend too much, but what I hope you notice is that the Inherit_End_Roll is letting the bones TWIST. With a higher-density mesh, this lets the foreArm behave a bit more like a normal human foreArm (twisting). The end out-twist depends on the rotation of the hand-bone that is hidden in these images.

1 Like
I have tried to make your recommendation but I couldn’t make it. If you are available, could you help me? I will upload the blend fille. If you are available, can you check it?
Slow internet? Your file is stuck at “Uploading…”
I will try to check back later.
yeah i guess the forum don’t let high files other than videos or images. I created a link via Wetransfer. https://we.tl/t-L17x6ITNXV if you are available, would you look at it?
i tried to lift arm with arm Shoulder.R and upper.arm.fk.R and it gives same problem again. I guess in the final, should i change the t-shirt of the character?
I looked at your rig. I don’t use Rigify, so you’re going to have to consult with a Rigify expert. You do have shoulder bones in there, but they are not attached to anything at either end. There is a ~10cm gap between shoulder bones and start of arm bones, right where your mesh is deforming strangely. If your own shoulder was dislocated by 10cm, I think you too would deform strangely.
This seems to be an overly complex rig (918 bones). I can’t tell how much of this is due to Rigify, versus what are your later modifications. A lot of people use Rigify, so it must be doing something right… but having more than 10 overlapping bones in just the region of the upperArm bone (where I would put 1 bone only) screams “overly complex” to me. But I don’t know if this is the Rigify default, or if you have been adding more bones here without deleting the previous.
308Mb is a very large file-size to ask someone to diagnose for you. Much of this I guess is all the texture images embedded in the file, but I can’t be sure. 502 meshes doesn’t help.
Check with a Rigify expert before doing something drastic.
-
If you got this rig and character from someone else, I suggest you revert to as it was when you received it.
-
If you rigged this yourself, via Rigify, you might want to start over *, and redo the Rigify steps from scratch, paying closer attention to the initial bone placement steps as you build up the full rig from the sub-pieces.
* learn how blender’s Link & Append work, so that you can copy just some parts of this file into another new file to start over – you don’t have to delete what you have here, just try again in another file. -
If you are not yet invested into using Rigify armatures, and/or don’t really understand armatures yet, I would recommend you start with simpler rigging & posing steps to get a feel for how the system works.
→ In particular, learn the Skin modifier. Draw a stick-figure “mesh” (from a 1-vertex mesh, repeatedly extrude more edge+vertex lines to define a stick-figure), use Skin modifier to make this 3d, then it has a button to turn the lines (edges) of your stick figure into an armature, to which you can parent the Skin-generated mesh. This will let you quickly generate basic humanoid & quadruped rigged forms. (These are not pretty, but this can be done incredibly quickly). On these simpler rigs (having maybe 10-20 bones tops), learn and become comfortable with setting up IK (inverse kinetics), how bendy bones behave, and how your characters’ posing possibilities change as you add more and more parts to your rigs. With a deeper feel for rigging, maybe then Rigify will make more sense. -
The blender manual recommends this set of videos: Humane Rigging
I’m sorry I can’t be of more assistance. ![]()
edit:
This video for using the skin modifier was recommended:

I’m not a rigify expert, but I am familiar with it…
This is standard for rigify, and isn’t the cause of the problems. The cause of the problems is poor weighting or poor topology, or both.
Here again, this is standard for rigify. Add in a human meta rig, click the upgraded face rig button, then hit the generate button and bam, you’ve got 918 bones.
Not only does it scream “overly complex”, but I also see flashing lights and hear sirens as well when I look at rigify. It’s too complex for it’s own good. The upperArm has 2 deform bones, splitting upper arm deformation across 2 bones for rotation deformation along the length of the upperArm bone.
Too large of a file for me to look at with my POS computer. 502 meshes is a problem. Why are there that many meshes? It looks like a simple character.
Anyway, at the end of the day, it’s still a deformation problem and topology problem.
I think weight painting would fix half of your problems and you’ll need to learn how to do that.
Randy
1 Like
I had a good look at your weights round the shoulder area and as mentioned before it isn’t correct. I have adjusted some of the weights for you so you can see the deferens. Also you have to remember that animating the arm going up needs to also animate the shoulder moving up. you also had mirror modifiers on the sleeves/hand that needed to be applied.
Here is a link to the example file: https://we.tl/t-P2m68mLb1G
sorry dude for late answer,
normally the file size was very low but when I added stylized hair and shoes, it becomes large file. Thats my bad actually. Hair and shoes becomes 1m vertices. I will fix that.
You mentioned about 10 cm emptiness on shoulder. I should be more careful about that. Even in the simply thing, all shoulders become failure.
Yeah it is a problem of Rigify. It adds lots of bones. But again i gotta say thank you ![]() for your advice. I try to make it from basic. Maybe I dont use rigify later on the movie
for your advice. I try to make it from basic. Maybe I dont use rigify later on the movie
edit: I gotta ask you this. Do we should generate Rigify? I mean can we go rigging with octahedral looking bones? I am asking as rigging beginner. Sorry for basic question
actually topology and rig failure. I added more quads to area of where shoulder and arm met. As rig failure, I did not put shoulders rig correctly. Last guy mentioned it. I gotta fix it.
ahh i thank you for this. I am learning because of you guys. Really really thank you. I have a question:
- Can we always apply mirror for meshs(like hands or shoes) when rigging?
- Which bones are needed for lifting an arm? IK or FK?
I know this are very basics but I started rigging for 2 days. Sorry for misleading you.
1 Like
Hi, yes rigging and weight painting is not easy we all started by trying first and learning from mistakes. You need to apply the mirror modifier and then in edit mode separate the two meshes and name them before parenting them to the rig.
the use of fk or ik is depends on how you intend to animate your rig, some poses will not be easy to achieve in ik but will work well in fk.
I prefer ik especially on the limbs, it’s a lot faster and less bones to key-frame animate.
thank you for your honest reply, i hope i get better. I sometimes making separatings but right now I have to make always i guess ![]()
Technically, you can ‘rig’ with just the bones, but it’s a very bad idea, as you lose all of the control features of a real animation rig.
Since just starting out, here’s a couple other things to look out for with Rigify:

To be fair, Rigify is actually a pretty powerful rigging ‘system’ that removes some of the pain and time of doing it all manually. But it’s not magic bullet (at least not for anything but the most simple objects and basic animation requirements.
One still needs a fair understanding of it all, but that really only comes from doing it.
1 Like
With armature selected,
in Properties > Armature > Viewport_Display > Display_As
you can change at any time how to display a given armature.
choices { Octahedral, Stick, B-bone (bendy-bone), Envelope, Wire }.
FK (Forward Kinematics) vs IK (Inverse Kinematics):
a really good explanation I saw in my early explorations of IK-rigging (i forget which tutorial video), was that these are 2 different approaches for animation… that WHICH to use depends on what you are trying to animate (what motion).
- General character posing tends to be easier with IK. Put the hand where you want it, and let the IK figure out where the rest of the Arm needs to be to achieve that.
- but FK is still better for some motions: the example given was a person sitting on a dock swinging their lower legs & feet back and forth, over the edge. The motion is easiest with just turning off the IK, and oscillating the knee angle (FK).
FK is a default rig. IK you have to do extra to setup the IK bone-constraints and targets (and poles). But once setup, the IK-bone-constraints have an “Influence” slider. 1 = on, 0 (zero) = off. So you can turn off the IK setup at any time in your animation, and go back to FK… and then turn IK back on later.
It’s important to learn how to weight paint, but my personal experience is I try to avoid custom weight painting at all costs.
As an example: if the back of the head is deforming too much (from motion of bunny-ears, or jaw or neck motion – one choice is (after parenting character mesh to rig) to use weight painting to zero out all bone influence on the back of the head… but now Every Time you modify the rig, & Re-Parent the mesh to the new rig, you have to remember to go back to weight painting & zero out bone influence to back of head. I find this a source of errors, and ultimately a waste of my time.
==> Instead, I add “support” bones between the moving bones, and the parts of mesh that I wish to remain relatively immobile. I’m never going to animate/move these support bones (so I put them on separate layers or bone-groups that will almost always be hidden & ignored). For a rigid cranium/skull, I just add some more bones to the back of the head to block the automatic-weights influence of the ears. Parent these “support” bones to the main “Head” bone, so they follow the head around, but otherwise they are completely ignored. But NOW i can change my rig, and reparent mesh to rig 20 times a day, without having to remember to redo the custom weight-painting.
If the bottom of the head is flexing too much from neck motions, add some support bones at the bottom of the head around where the neck attaches.
If the torso is moving too much from arm motion, maybe add support bones in region of arm-pit.
Having a ring of support bones around each eye, means my eye-lid animations won’t make unwanted parts of the face accidentally flex from eye-lid motions.
I’m still learning & experimenting. These are just my humble opinions. ![]()
Keep having fun with blender! ![]()
![]()
1 Like
Any reason why you don’t just lock the vertex groups and save having to add a bunch of extra bones, etc?