I’m very new to blender.
Is there simply no way to actually animate a character on 2s? I’ve got my project set to 24fps playback speed but I want to alternate between 1s and 2s for a lego fight sequence I’m animating. I want to then animate the camera on 1s. that way I get a nice smooth camera movement with a stop-motion style character animation. I can’t seem to get rid of “frame interpolation”. It keeps wanting to fill in the “hold” frames I create. Really frustrating to me.
I’ve looked up how to animate on 2s but all I’ve found for Blender so far is people creating an animation on 1s and going back and using “tricks” to have it play back on 2s.
I don’t want to animate on 1s I want to truly animate on 2s.
For animating on twos you could change Output Properties > Dimensions > Frame Rate to custom and change the base to 2 I think. I don’t know how you would change that with different objects.
Changing the interpolation: Go to the Animation tab and use the dropdown on the dopesheet to change to f-curve editor. Select the keys surrounding a segment you want to change and right click to bring up a menu.
I’m just spitballing here, but couldn’t you animate on 2s with a constant interpolation? I mean, you’d literally have to set a key frame for every animated object every two frames (or one frame for the fight sequences), but that would give you that stop motion feel, no?
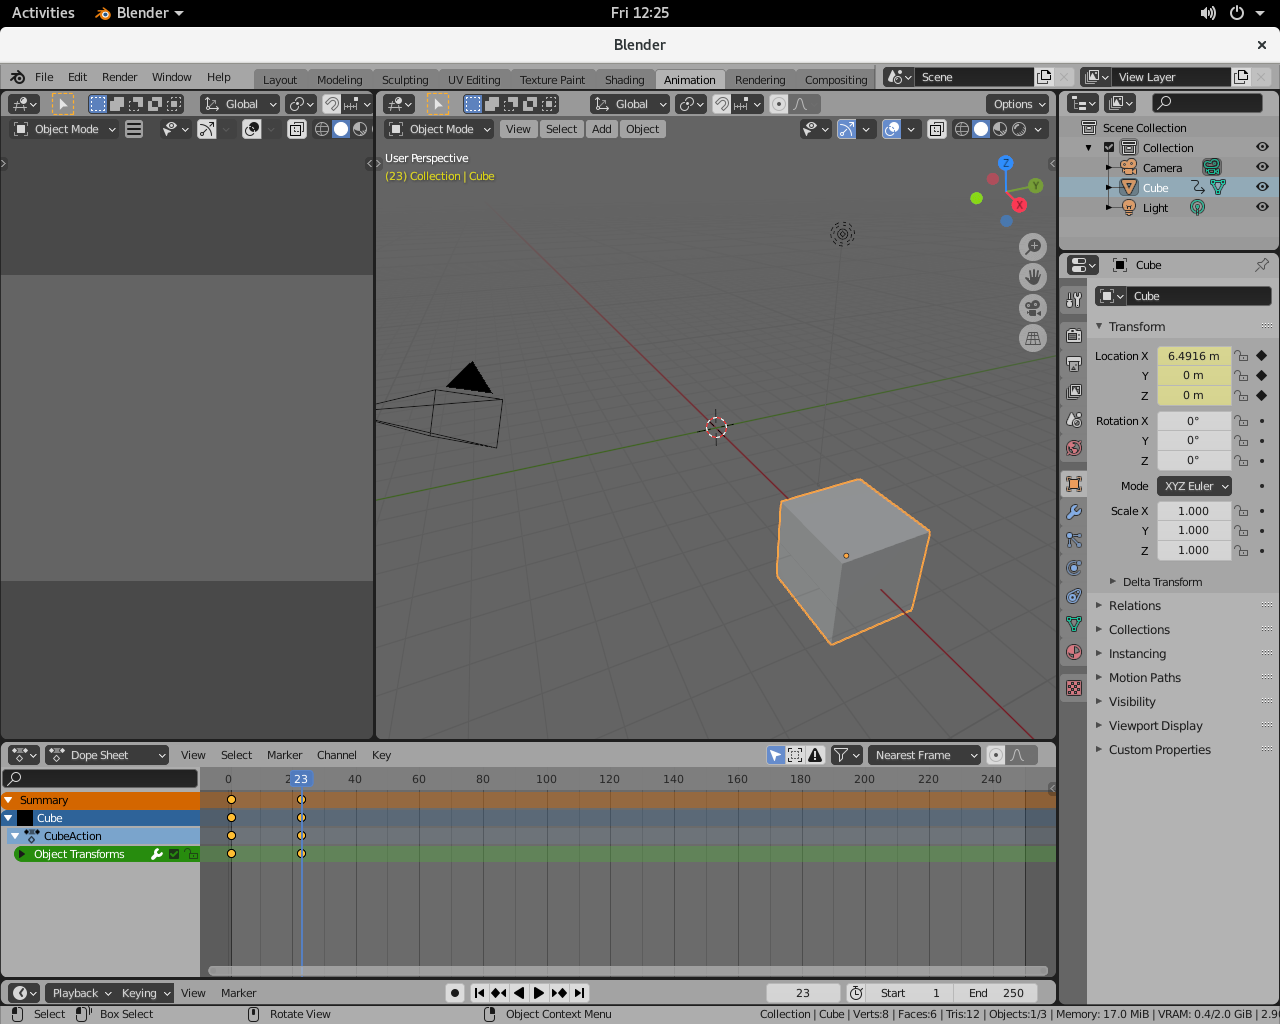
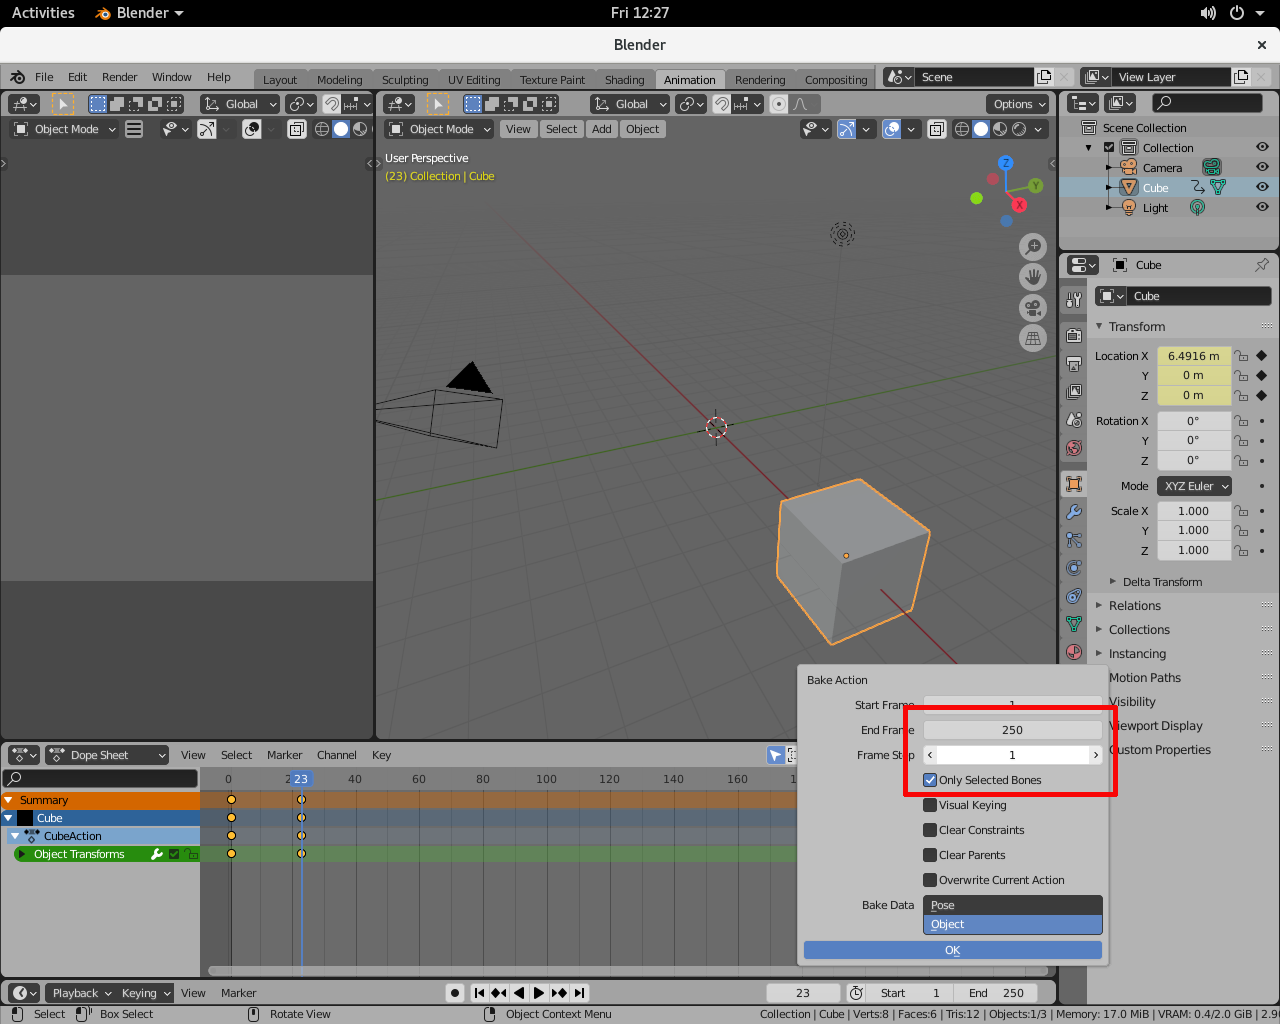
Mostly I wanted to point out how to adjust the interpolation. Actually, Hm. Here I have a cube that I set two keyframes for, now in the second image I can bake that animation (Object Menu > Animation > Bake Action) and set the frame step independent of the scene frame step which will do just that. That is, set a keyframe every other frame for the animation. Yeah, now I’m not sure. Maybe that’s a clue though. Don’t have experience with “on two’s”.
I’ve since figured that out as well. Thank you for your comment. But my next question would be, is it possible to only have a portion of frames selected to “constant” so that I could go between 2s and 1s?
It all depends on the result and how much you want to push the animation,
You can use the step interpolation on curves, that will give you a nice result but I’m not sure it’s possible to alternate with animation on 1.
This animation style is generally hand crafted, some poses are kept much longer that 2 images, and sometime you may have one keyframe for every frame on fast movements.
I haven’t watched the trailer frame by frame but animation is really fluid and still quite snappy.
I see. Well, my background is in stop-motion so I don’t really have an issue with just keyframing it all out. Even if it takes longer, at least it’s precise!
I think you’ll get a better result doing so and you’ll have more control over you keys, stepped interpolation is a good way to get a result but it’s letting blender choose what poses to keep or discard.
In either the dopesheet or the f-curve editor, right click on the keyframe or segment between two keyframes and you will get a menu with interpolation.
There’s two approaches you can take with this. For lack of better description, I’m going to call them the “Traditional” approach and the “Hybrid” approach. The Traditional approach is more labor intensive and harder to tweak, but it’s the easiest to get started with. The Hybrid approach is easier to tweak, but requires a bit more hassle in setting things up.
The Traditional way looks like this:
Set your interpolation to Constant (make sure motion blur is disabled)
Set key frames every two frames when you want to animate on twos. If you want to animate on ones, set a keyframe on every frame.
The Hybrid approach looks like this:
Animate with a more typical CG approach, allowing the computer to interpolate your inbetweens for you.
Use a complex arrangement of Stepped modifiers in the Graph Editor to change between animating on ones and twos as desired.
In most cases, the Traditional approach is going to look the most authentic, but it’s more time-consuming to do (and to adjust). In both cases, planning is essential. Get your timing right, down to the frame, from the beginning with a solid storyboard and animatic. This will reduce the amount of rework you have to do, regardless of the technique you choose.
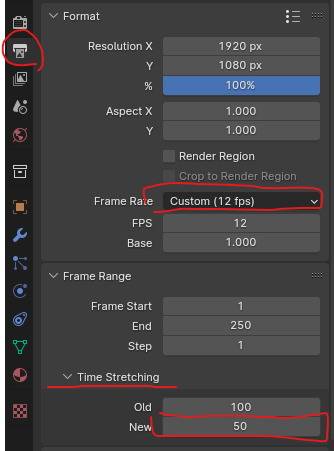
Enter these settings into your render tab if you want to convert from 24FPS to 12FPS without losing your timing.
(frame rate: Custom:12FPS
Time Stretching: old:100 new:50)
You convert to 12FPS (which just plays at 12 frames per second, which just makes things slower) And you ALSO change time stretching to compress to 100/50 (basically, 100 frames of information play every 50 passing frames, at 12FPS
Couldn’t find this anywhere on the internet, oddly enough I doubt i’m the first, but Figured I should put it up somewhere.
Sorry for the bump, but just thought I’d add here, since I’m messing with this stuff currently:
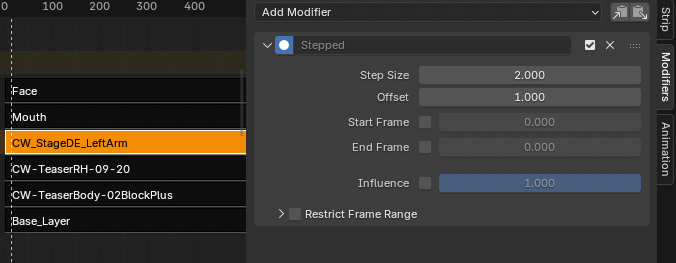
A possibly more convenient approach is to use the NLA editor. Keep your animation to one action and push it down to a strip, then you can add a stepped modifier to the NLA strip which is much easier to handle/add/remove/disable than on individual fcurves in the action itself. It also allows for multiple modifiers with different settings for 1s, 3s etc as needed over different frame ranges on the same strip/action.
This approach will even work with the Animation Layers addon by @snot_nose , (like my screenshot), though you may need to fiddle manually a bit with strip locking etc. to adjust the modifiers, but it’s still very doable.
Another helpful tool is the Loom addon (on github) This has tons of high level rendering tools that can be super helpful for rendering on 2s, 3s etc. E.g. only rendering on keyed frames, and filling in the missing files in your image sequence-render folder with duplicates, so it will still go seamlessly into your edit at 24fps.
Check it out too, it’s amazing, powerful, and takes a bit of learning