quick reminder of our YouTube comment conversation…and as I mentioned and as we talked about a script to do the following would be awesome as an addition to your add-on.
…(recap) iknow this does batch processing over image sequences but imagine if you had a video say of a character dancing that you took the green screen off so it’s just the character and the rest is alpha imagine if you brought that image sequence into your add-on and what you were left with was a character shaped video been trying to figure out how to do that with your output but haven’t been able to yet otherwise awesome add on I’m still way closer than I would have been ’yeahhhhh!
Ok, this might help: (or i have no idea what you want ;> )
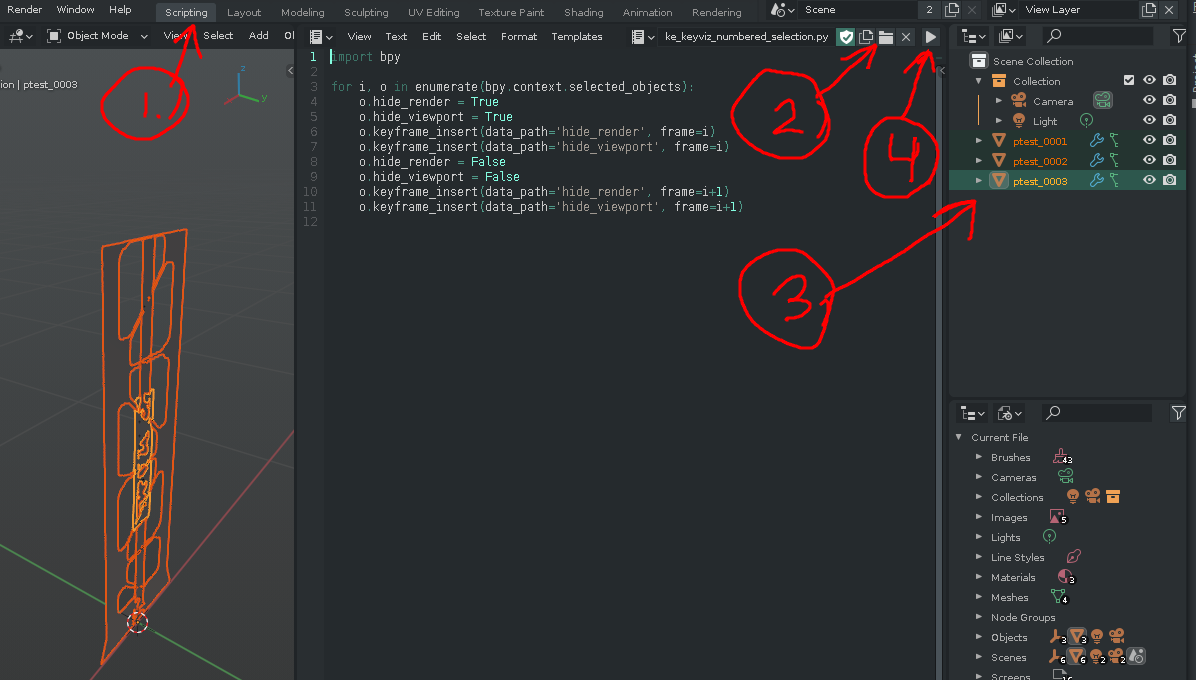
First: Batch-Import all your frames with I2M (with numbered filenames so they can be sorted) (note: This would ofc work with any objects with numbered names, no matter if you use I2M or not)
both render and viewport visibility should now be keyframed in order. and a “mesh video” (?) should be possible ;>
note: The actual number (time-stamp or whatever) in the names is not important. just as long as they are in order it does not matter what the range is or where they naming starts. Keyframes will always start on frame 1.
edit: updated script (you may need to scrub/play the time line for the view to update) ke_keyviz_numbered_selection.py (488 Bytes)
You are so awesome this is so awesome I really appreciate the script FYI just a little constructive criticism you should implement this into your add on and then you could even start selling it or something it would be kind of well rounded enough to make a few bucks for yourself you’re really awesome
The thing is on your script I just tried it out and on the 1st frame there’s the two orange keyframes one for the image is supposed to be visible and one for the one that’s supposed to be not visible and then on frame 2 those two orange keyframes move down the list one and all the keyframes after it just as they were on the 1st frame are disabled in the viewport and in render but none of the images that come before the two with orange keyframes in the outliner are disabled all those are visible and that amount increases as you move up in keyframes and the two orange keyframes move farther down the list in the outliner…soit doesnt work right… Can you help me with the logic on that so I could get it running
Thank you so much and again you should update your add-on with this script added and then you can start selling it because this is a genius tool I just modeled a shelf support in like one second after making an image in Photoshop it kind of makes it so Photoshop is one of the best Blender add-ons when you pair it with this… plus the topology on your output is pretty awesome it’d be great if it was all straight quads but after messing with the quad remesher for a long time I know how hard that could be to keep straight quads low poly… on complex topology and it’s amazing that you get that kind of awesome topology on any kind of picture
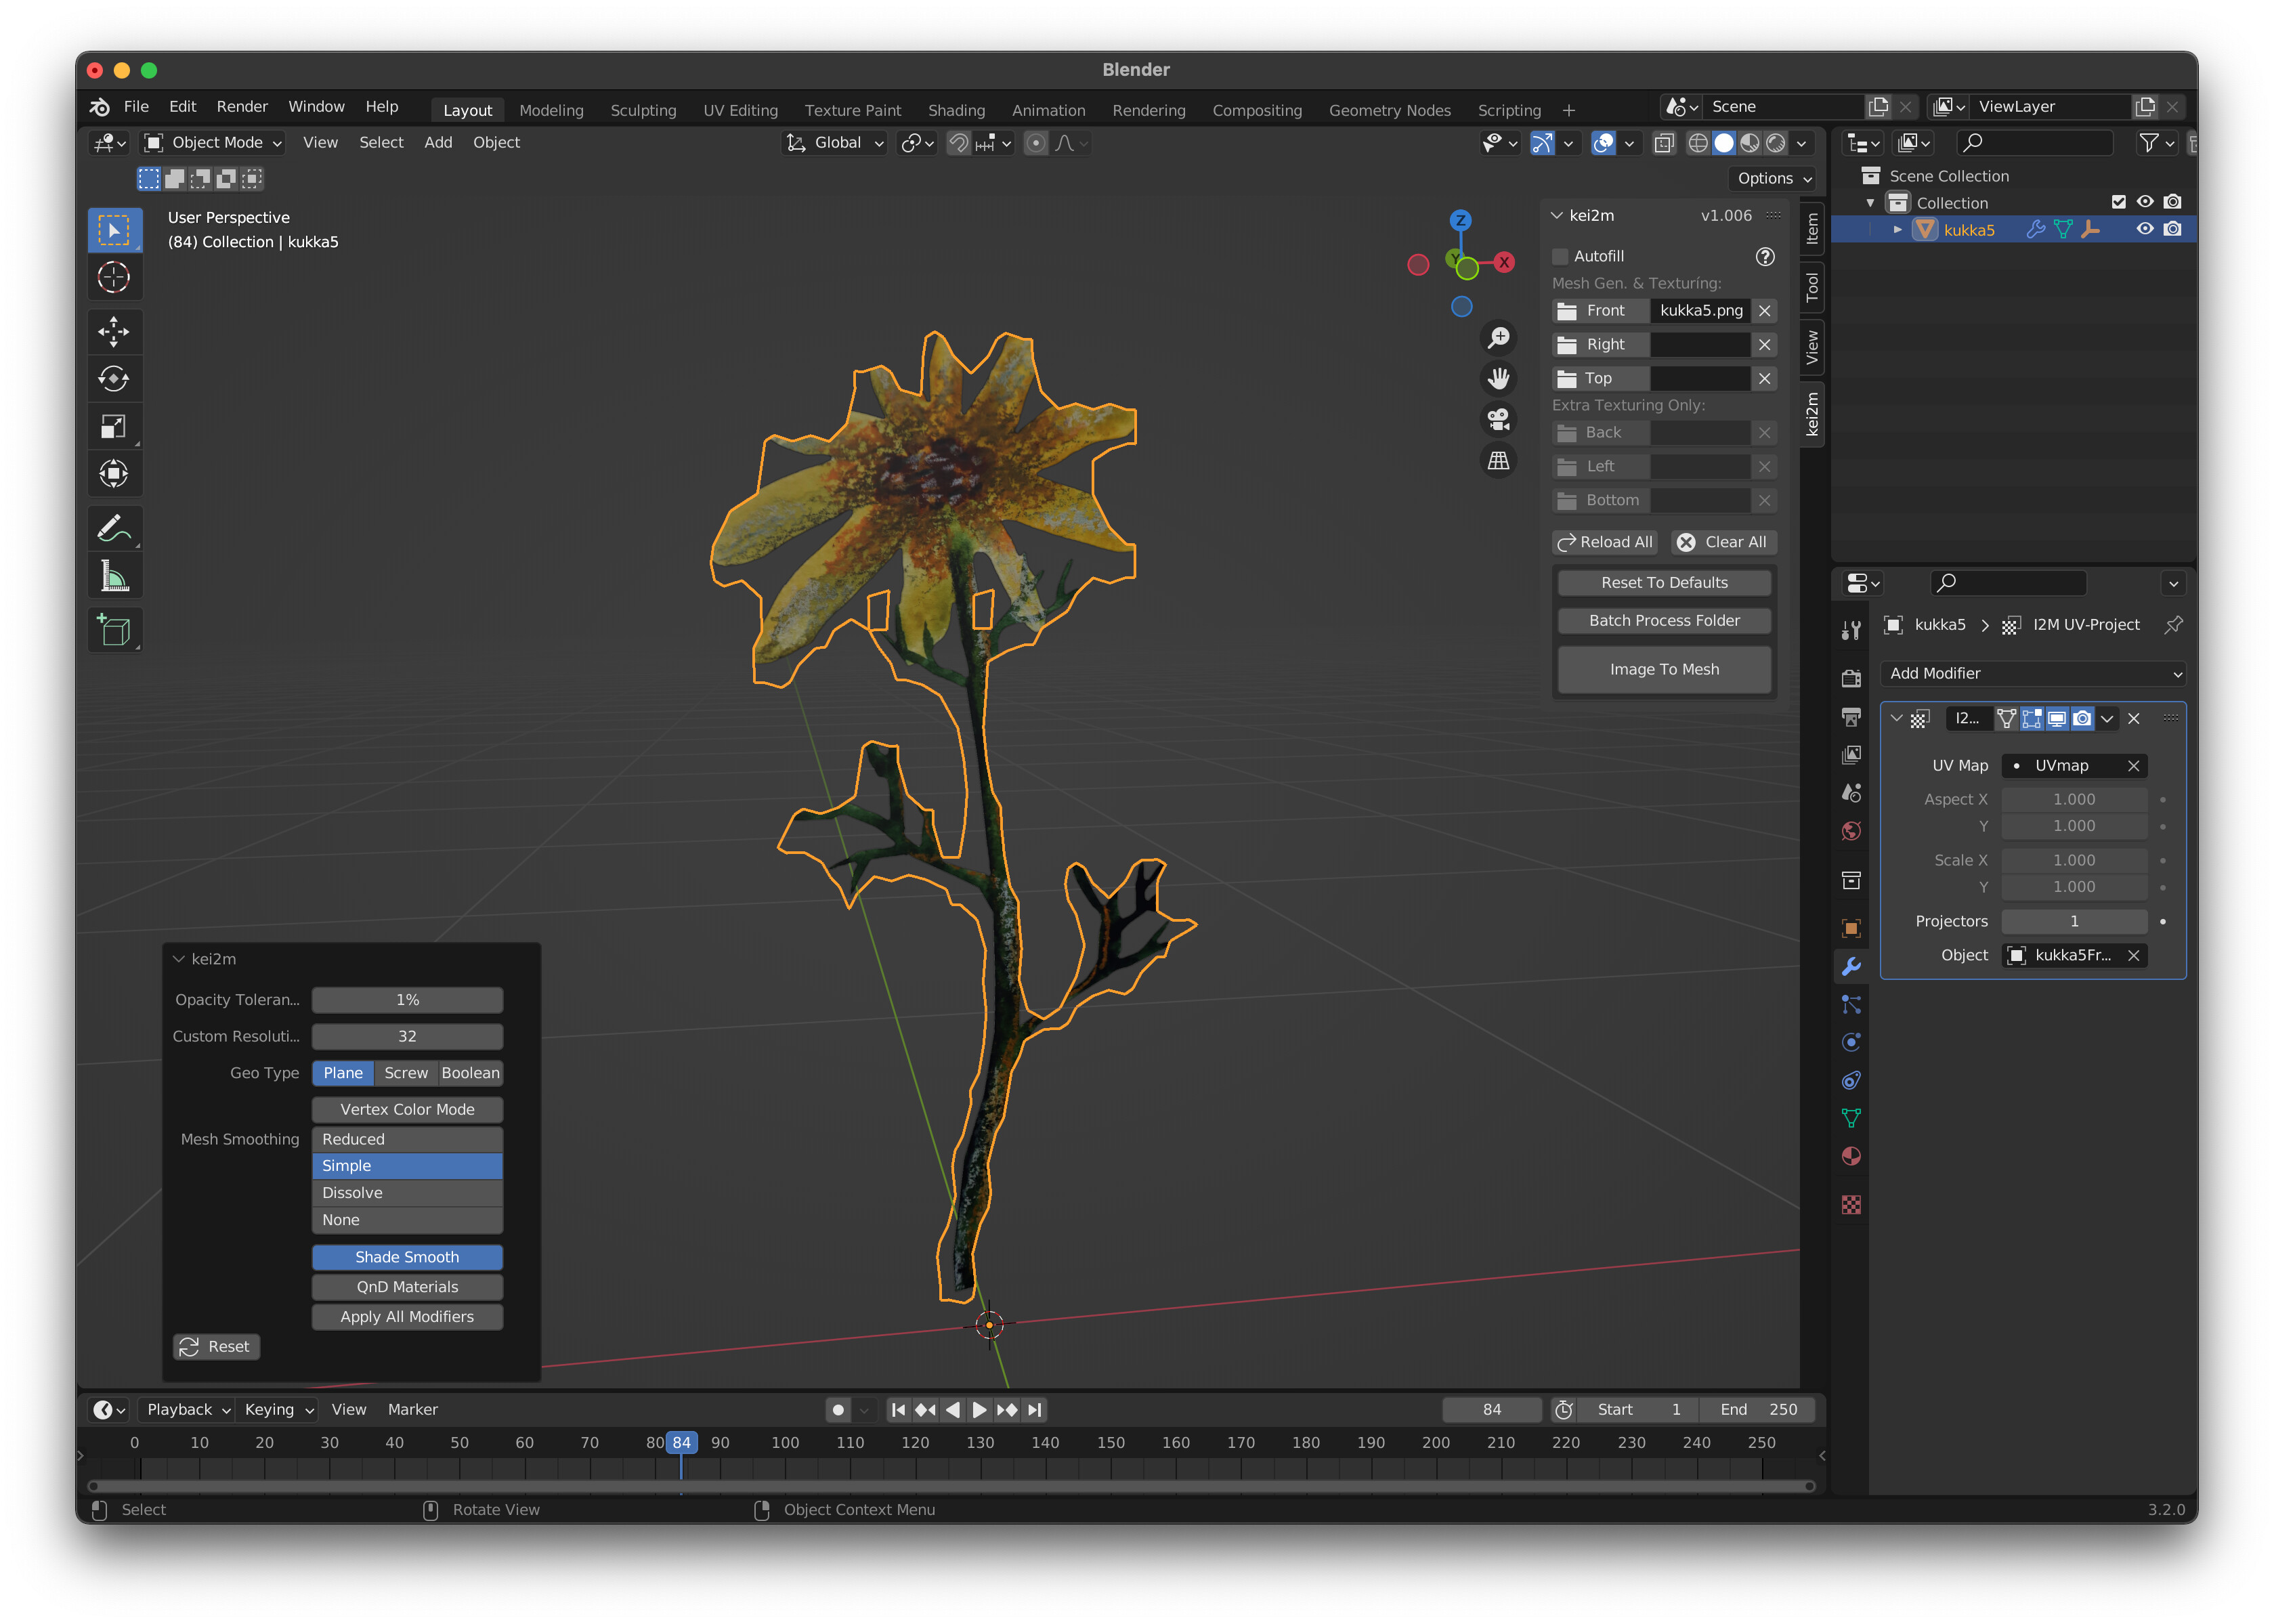
Thank you for this awesome tool, it’s great for bringing handmade art into blender. (so it could be rigged like puppet warp).
One problem: In my use case there’s really no need for high resolution, I would rather have very crude geometry with transparent “overflow”. This is possible when setting the tolerance 1%, but there’s unwanted holes in the edge of the mesh regardless of smoothing setting. It would be great if the edge was always outside the opaque parts, so this would really be a one stop solution to making a mesh out of a png.
Well that is an interesting approach ;> It is not as intended, but I can the see how that might be of some use. ( Though, it seems your internal res set to 32 in the example is probably too low, as it seems like it is clipping away details here & there.)
I dont know if I can help you though - I dont have an algorithm at the ready to solve for this unfortunately, and I fear it might get a little too advanced for me. But I’ll keep it in mind!
ed: You could probably try “mesh / cleanup / Fill Holes” post-I2M ? That would be my first “solution”
(meaning, if this does the job, I’ll just add a button in I2M that runs Fill Holes at the end ;> )
ed2: There are just too many variables at play, some manual tweaking will be required for this (hole-filling) to be a one click solution, even with Fill Holes. So, downgrading to “probably not”.
Holes are not really a problem. I meant “holes” in the edge that carve into the opaque areas, as you can see in the leaves.
So if were to improve the algorithm, there’s two options imo:
Improve the checking algo, so it doesn’t erroneously miss the opaque pixels in any blocks
Add an extension parameter, that extends the border by pixel amount, or maybe ideally extends the alpha by pixel value (like ‘minimum’-filter in photoshop)
I was testing low res, because I intend to add hundreds of vegetation in an animation.
Ideally I would pay for a tool that brings a whole psd file to blender and does this to all layers. Right now I use after effects for this, and it’s so easy to bring a psd with all the parts, and then just rig and puppet warp it. But I would prefer blender for everything otherwise.
Here’s the animation where the asset is from (made by me and my gf):
isäni on torniolaaksolainen, mutta emme puhuimme paljon suomea kotona…(minun suomi on huono;)
(better stick to english here anyways! I just went with ‘moi’ as I saw ‘kukka’ in the example )
Hmm, ok. I think it might be better to approach this at the starting point, and perhaps adjusting the alpha (layering a blurred alpha and cranking it up with contrast would produce something close to what you want for the outline) This could be done during image creation (in photoshop or where ever the content is made) ideally. (and then using a different alpha later, the original…hmmm)
Maybe there is some utility for alpha manipulation in I2M, but I’d have to think about it (i’m not very good with (potentially) complex math/algos ;D )
Ideally I would pay for a tool that brings a whole psd file to blender and does this to all layers.
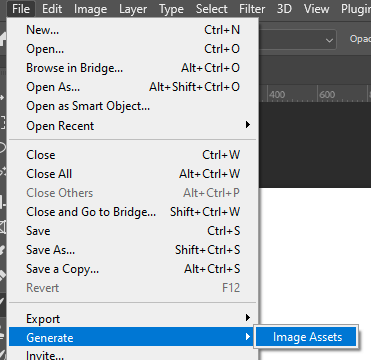
I don’t know how to do this as you describe but a work around to make your life easier is to use the Generate Asset feature in photoshop:
If you have this turn on, with your layers or group name having a .png in their name, every time you save your file it will automatically save out each layers or group as separate image, automatically cropped, in a folder
You can even add a subfolder if you want. They will be in the same location than your psd file.
Hey man ,
i love this addon , it works perfectly fine with blender 3.2 , it is not showing up on 3.3 …is there anything specific i need to do to make it run on 3.3 ?
Best
z
thx!
No, I have not seen any other reports - this might be an issue on your end. Do you use any non-ordinary installation of Blender?
→ cannot reproduce:
If you make the image black, and then tune it so there is minimal noise. Then adjust the black levels to as dark as black as u can, then export that image as an svg, it might produce more desireble results, then you can just add the original image as a texture. I also find it helpful to convert the results of your ItM to a mesh, which then gives you verts on both sides of the mesh, rather than just one side. If you were to make so it will use .svg images that might be of help. Your script is much better than converting/importing an svg to blender and that whole process. Yours is much cleaner, and easier to work with,