When adding video as images on planes I select EMIT, but the image is still transparent for some reason. Is there something I am missing? A selection that I need to check to get reflection, shadows and still be a solid video.
You can remove the alpha connection in the shader.

And if you wan to avoid that in the first place, then uncheck Alpha in the import options


This is a green screen video Keyed out in AE and exported as a transparent .mov. She walks though the whole “face” so deleting faces is not an option.
FYI I am working in Cycles. Every “tutorial” on youtube is done on Evee.
You didn’t mention that in the first post hehe. To keep the alpha of the greenscreen you definitely need to keep the alpha connection.
But with that new information I think I don’t understand the original question… If you need to keep the alpha then what’s the issue? Can you show a screenshot of how it looks? And maybe a reference of what do you expect?
Also, not related to the question but when working with transparency I’d suggest you use image sequences instead of videos with alpha channel, in my experience they tend to use a LOT more memory and can cause issues when rendering
The video clips are not that large and my system can handle it, but yes I think on the next one I may start keying them to image files instead of .mov, which I think I could do all in Blender instead of AE to Blender. With the alpha input and image input and the roughness maxed it looks like this:
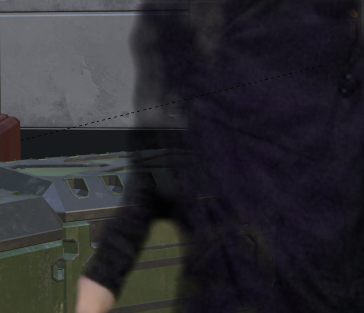
You can see through her.
Oh ok, that’s a lot more clear now, that’s just a product of the keying process, and you need to fine tune it in AE before exporting, the keying is taking away parts of the footage that should remain solid.
To make sure this doesn’t happen check the matte before exporting, parts that should be transparent must be fully black, and parts that should be solid must be fully white.
connect the alpha to the Material Output Surface and see if it is solid black and white or if you have shades of grey on the body. If you have unwanted grey and don’t want to redo the video you could try curves adjustment or color ramp node in the shader editor to increase contrast of the alpha channel.
I think I could do all in Blender instead of AE to Blender.
I once saw a green screen keying shader node group around here that could potentially allow you to do it all within the shader editor.
This is not a good idea because there’s already missing information on the video, it’s better to fix the original keying first.
Yes I agree… Not too much trouble for me to drop it back into AE and re-key it. Thanks it was driving me crazy because it was the only one that it was doing it to. Which means I must have bumped the matte by mistake.
1 Like