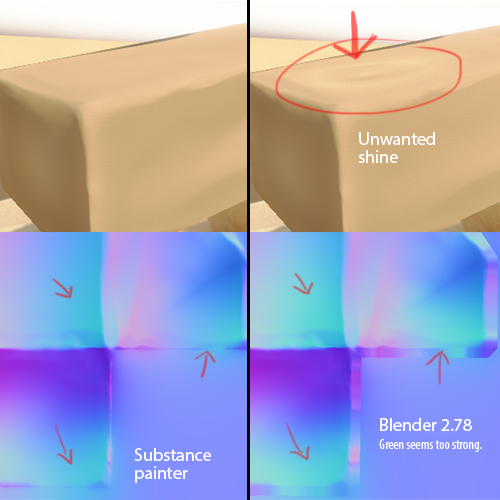
i’ve encountering some odd problems with my normal maps baked in blender, in Unity i get a unwanted shiny/gloss effect, which is otherwise won’t get if i baked my normal maps with Substance painter.
When i compare my normal maps baked in Blender and Substance Painter, it seems that the green channel is more bright in blender, i have tried all type of tinkering i can come up with, including setting the image to RAW, alpha, no alpha, 32 bit float, changing slit mode in baking, Blender internal baking and cycles baking etc. but all with the same result, i have even tried to change the color profil in photoshop to see if that would do the trick, but without any luck.
anyone had the same problem ?
anyone found a solution for this ?
i don’t know if it’s a openGL vs DirectX vs phong vs blinn rendering stuff, this is beyond me, but would be pretty cool with a unity, Cry Engine, substance painter or unreal setting for baking :).
i have attached an image where you can see the unwanted glossiness effect on low angels in Unity, this only happens with blender baked normal maps.
tools: blender V2.78, Unity 5.5.0f3, high and low poly, Sculptris alpha 6.
sadly no respons to my topic, my guess is, it’s a hard problem to solve than first anticipated.
my current findings, for anyone who should encounter a similar problem.
High vs low poly, this is properly the most important thing to note, your low poly should be as close to the high poly’s as possible, especially for edges and corners, if you have a chip in the block, a corner that is fallen off etc. then model it into the low-poly as well, if the difference is too great between the two, it’s noticeable but dark areas from an angle (see the top dark line on my rock ), think of normal maps as a support to your model, not a replacement of mesh and polys.
use beveled edges whenever you can especially around the 90 degree angles, this trick alone removed most of the unwanted shine, this will add a few extra vertices to your model, but so will splitting your edges which is often advised, i think bevel edges looks much better and you can use your moden without normal maps if you like.
to make seams less visible, using a cage while baking is a great option, yes it takes a bit more work to setup, i found that baking with a cage both in blender and Substance Painter (SP) makes seams much less visible, i have not been able to 100% get rid of seams, but found a good balance where they are barely noticeable, also, try to hide your seems as much as possible, especially create them on hard edges if you have any of these.
Straighten your UV map, yes, this is something i found very irritating, but often gives a better result blending from one seams-edge to another, blender is especially bad at blurring the edges, often resulting i jagged edges pulling wobbely color trails outwards from the UV edge, substance painter seems to much better job at blurring out the edges, here straighten your UV maps may help a bit.
weight normals, in some cases it may be very beneficial to recalculating your normals, there are different ways of doing this, the easiest way is to use a script called “weighted normals” (google it), i made some tests using this method together with bevels, sometimes it gives a great result, other times i get new problems with visible seams, so experiment with it, and always remember to make a copy of your model, because your actually changing your normals and i have not found a way to revert it :D.
so my current workflow if often like this:
make low poly
add bevels where it makes sense
triangulate if needed (sometimes you’ll get a better baking result with triangles)
add UV seams
straighten UV map (for small beveled edges, try to give them some more UV space)
sculpt on the low poly (often i make a high subdivided model before exporting to sculptris, helps keeping the original shape)
loading the high poly into Blender and adjust high or low poly so they match each other (especially the edges)
test if Weighted normals may help (here im looking for the shading of the surface, want to avoid dark areas)
create a cage from the low poly
smooth your low poly, but only where it is needed (not always the best result if you use weighted normals)
bake normal map either in blender or in SP
import into Unity (tick generate lightning maps on)
check model and go back and do changes if needed (properly many times)
By now i had hoped to have a solid workflow that would work every time, a bulletproof method for no shineness, awesome normal maps, no seams etc. but the more i dug into this topic, the more clear it became, that there is no such thing, it’s a test and tweek kind of method all the time, no straight arrows here. Test as often you can in Unity, your scene lightning, camera distance, realtime vs global illumination, textures, dark vs. bright scenes etc. all counts and makes a world of difference on your model and normal maps.
i hope my findings will help anyone as frustrated with normal-baking as i, also i would love to get feedback on my workflow or hear about your workflow from blender to baking to Unity.
Madsny, you’d likely benefit from researching the proper way to use hard edges, vert normals + bevels, and support loops to reduce the gradients you’re getting in your normal maps. Gradients are not always an issue, but extra tris and verts are pretty cheap these days, and if it improves your workflow and the result, it’s worth looking into.
The green channels of normal maps represent the ‘Y’ axis. You might notice that in a Blender normal map it looks as if it’s lit by green light from the top, while a Maya normal map will appear to be lit by a green light from the bottom. This is important information for determining whether the detail is projecting inward or outward. If it’s not what your engine expects, things will be very obviously wrong.
If you ever have a map which is inverted, relative to what the renderer/engine expects, you can simply invert the green channel in PS or similar. In my experience, Unity has never given me any issues with a Blender generated normal map, so it’s mostly nothing to worry about.