This one was tough since 15 iterations have been completed so far until I was satisfied and decided that I’ve done pretty much everything I possibly could. Of course, as time passes, I may find it somewhat incomplete and lacking something in one way or another, but for now, I’m calling it a day. I hope you like it. Your comments and constructive critique are always welcome as they contribute to my growth. Thanks!
T.
Hi, great job! The first one is more interesting (personal opinion) Can you share the lighting settings? What scheme did you use? What post-processing did you do? If you can, tell us in detail! Thank you so much in advance!
Thanks! Appreciate your interest though. I will post some details in a few days later when I come back from holiday. By the way what did you mean “What scheme did you use?”?
Regarding the world light, I used Sky Nishita (screenshot attached). This setup provided me with the majority of the light coming from outside. However, it wasn’t sufficient to create lively shadows on the chairs, so I introduced the Sun (screenshot attached). It provided a pleasant light fall-off on the chairs and some reflections on the kitchen table as well.
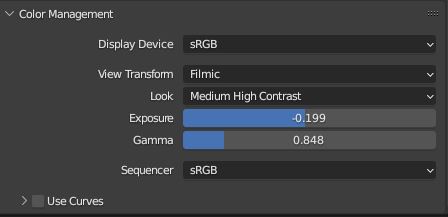
Regarding other light and color enhancements and fine-tuning inside Blender, I should mention the adjustments made to the Color Management, which provided adequate yet controlled exposure and contrast (screenshot attached). After making these adjustments, I had everything I needed in my scene. It came out to my liking. However, “almost” wasn’t enough, so I brought the rendered image into Photoshop.
To be honest, I don’t think I fiddled with any other settings unless I forgot. The resolution was set to 1000x1400 at 300% magnification, and I used 800 samples.
Now, regarding the Photoshop settings, I utilized Camera Raw (screenshot attached).
Here is the “Behind the Scenes” article for this stunning artwork!
Do check out this article, written by the artist himself. It describes the step-by-step process of creating the artwork and provides insight into architectural visualisation in Blender.