Knee and wrist oddities

I’m seeing strange deformations around the knee and the wrist of my model, and I can’t tell whether it’s due to topology around these joints, weight painting, the bones or a combination of these.

The knee weight painting looks like this…


…and when bending to a moderate degree, deforms like this, with each leg segment clipping through the other.

The wrist weight painting looks like this…


…and is deforming strangely around the forearm, with ‘crunching’.

I’d really appreciate any insight into where the source might lie for these odd deformations I’m seeing, and any suggestions as to how to rectify them. Thanks in advance…!

Best way to receive advice on how to fix this is to post the .blend file, preferably with one side posed (left or right) so the bad deformations can bee seen. Just seeing pictures isn’t enough. To me, the knee looks like there is 2 parts to the mesh, the lower leg & upper leg and they aren’t connected, but that’s just what I see from a picture.

Randy

Thanks for the suggestion; attached to this post is the .blend, with the model’s left knee and wrist posed to show the unwanted deformations, and the right side unposed.

Attachments

SubSurfApplied.blend (3.57 MB)

From what I see, the weight painting ‘falloff’ in the legs is too sudden. I’ve smoothed it out a bit, but you might want to consider using a “helper” bone. The wrist distortion is because your b-bone has only two segments. I also noticed the the bone roll of spine is uneven.

How many segments is appropriate for a forearm, generally?

I’ve looked around, but I’m unable to find any tutorials or advice on how to use a helper bone to clean up the deformation around the knee. Would you happen to know of any resources where I could learn more about using a helper bone for this purpose?

Thanks so much for the advice, and for pointing out the bone roll issue in the spine; I’ll get to fixing that right away.

Looked at the knee earlier and didn’t have time to reply, had to go to work…

Krisnack is right, it’s a weight painting problem, not enough blending with the weight paint. The lower leg’s weight needs to blend into the upper leg a bit, and vice-versa. 2 things you should do, 1st when touching up the weights, in the weight painting tool shelf, enable Auto Normalize. With this enabled, as you add weight to a vert for one bone, it subtracts weight from other bones. This happens anyway, behind the scenes, but enabling this lets you visually see what’s going on.

Example: weight a vert 100% to one bone, weight it 100% to another bone. Now that vert is influence 100% by 2 bones looking at the 3d view, but it’s actually weighted 50% to 1 bone and 50% to another. With auto normalize you can see the actual weights as they will affect a vert. You will never be able to weight a vert 100% to 2 bones.

2nd thing I think you need to work on is the knee topology & edge loops. The file title is ‘subsurfapplied.blend’, did you apply the subsurf modifier? If you did, don’t do that. When you apply a subsurf modifier with a level of 1, you get 4x the amount of verts. You now have 4x the amount of verts to weight paint (I don’t know if you did this before weight painting), 4x the amount of verts that must be moved on screen as you animate. Likewise, that’s 4x the amount of verts that must be moved when scrubbing/previewing your animation, that can slow down a computer quite a bit.

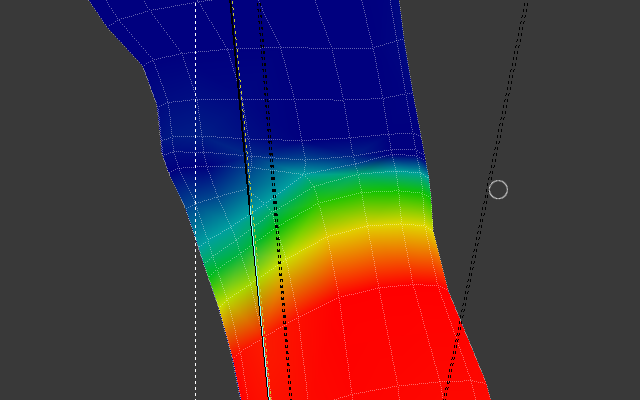
Now look at the topology of your knee:


There are quite a few edgeloops in there that you could get rid of, but then again, they wouldn’t be there if you haven’t applied the subsurf modifier. I’d try to redo that knee and get rid of the diamond shaped face, keeping the area all more squarish quads.

Common practice is to have an armature modifier on a mesh, then the subsurf modifier below the armature modifier. Modifiers work from the top down. So the top armature modifier poses the mesh, the next modifier, the subsurf, does it’s job and subsurfs the posed mesh.

This can help overcome deformation problems as well…

It’s late, other projects, etc…
Randy

Thanks so much for the considered response and advice…!

I’ve blended the weight paint around the knee as suggested, and that really made a huge difference, to the point I’m satisfied with the deformation it’s giving now.

As for the subsurf, I actually only applied it after I’d (thought I was) finished with the weight painting, and only for the purpose of using the model in the BGE as the next step. I also fixed the order of the armature and subsurf modifiers in the versions that haven’t had the subsurf applied yet, though; thanks for that tip, too.

And I just realised that the file I attached failed to show up.

Attachments

SubSurfApplied2.blend (3.76 MB)

Thanks so much for the .blend, and the help provided therein; the weight painting I went with ended up very similar to your .blend, and I’ve taken your suggestion of using 8 bone segments in the lower arm.

The community here is always so very helpful; I truly appreciate all the kind assistance.