Krayne's Tools: Free addon for Blender!

These are just a few of tool scripts I developed to make my particular workflow in blender a lot faster. But I thought others might find them useful so I bundled them together into one addon to release to you!

Each tool is optional, as they may mess with your particular layout. They can all be turned on and off from the addon preferences:
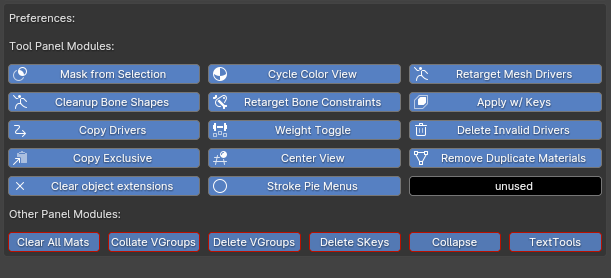
kt_PrefsMenu

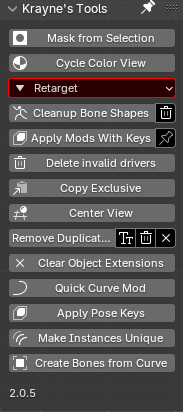
It creates a new tab in the N-Panel called “Kraynes Tools:”
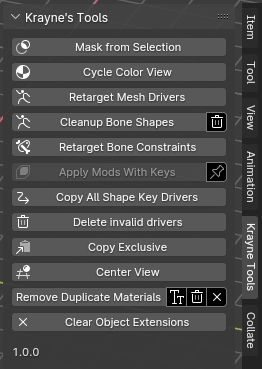
kt_ToolPanel

All of these tools have tooltips and descriptions or are self explanatoty, so hopefully you don’t NEED to reed the rest of this. But right now, the only documentation I have for it is this post.

The “Other Panel Modules” area is for features that do not belong in “Krayne’s tools” panel
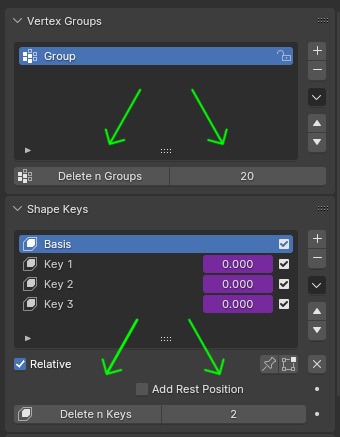
kt_VGShapeKeys

for deleting large chunks of vgroups or shape keys. Using a positive value will delete N groups below the active group/key, using a negative value will delete N items above.

This function does NOT delete the originally selected group/key: I found that when actually using this it was really easy to lose my place in long lists like that unless I leave behind the selected item.
I made this cause I found that locking/unlocking long lists of groups then deleting all unlocked groups was a rather cumbersome way to do it, and in the case of shape keys there was no way at all to “delete all unmuted keys” so it was necessary especially when joining objects with a large number of keys together that had duplicate or unused keys.

Both Vgroups and Shape keys will skip any locked/muted groups/keys.

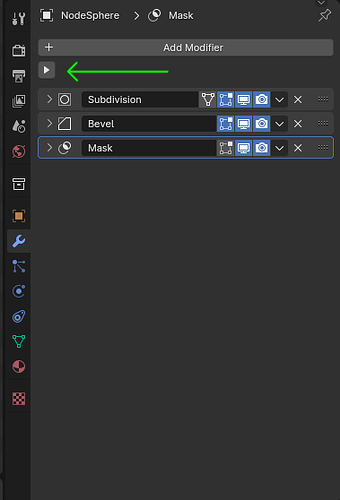
I made this one for when I have a ton of mods or constraints on an object, or in my case, a bunch of bones with constraints/mods. Clicking that triangle will expand/collapse all items in those lists for ALL objects selected, since blender remembers the expand/collapse state for each individual object.

I found this useful when adding and modifying bone constraints where each bone has the same two or three constraints, and it saves me a step when I click back and forth between two bones with different expansion states of the constraints in order to compare values.

Next, there is an addition to the text editor context menu:
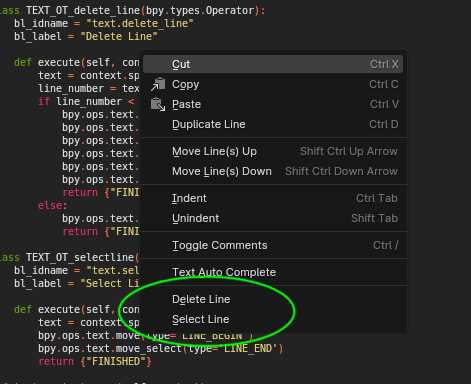
kt_TexTools

I’m honestly confused as to why these aren’t there by default. If bender does have a fast way to delete and select single lines, I couldnt find it so I just made those functions and added them to the Text Editor right-click context menu:

The last “other” module creates an additional tab in the n-panel called “Collate.”

It takes the list of vgroups on active object with lots of names ending in .L, then lots of opposing names ending in .R (leg.L, arm.L, leg.R, arm.R, etc.) and collates them together (staggers them: leg.L, leg.R, arm.L, arm.R, etc)
In the case where I’m weight painting a new model with bilateral symmetry, I find it easier to just paint half the model and use a mirror modifier to fill in the other sider.
When I’m creating new groups it is much more efficient for me to create all of the left side first, one at a time, so I can easily compare them to each other, then after that add the empty .R versions of those groups and apply the mirror mod.
Then, when verifying that each side is indeed symmetrical, or when introducing deliberate asymmetry after the fact, it is far more efficient if they are in the LRLRLR order rather than LLLRRR.

This feature works both ways:
“Intercollate” will take the ordered list and stagger it.
“Extracollate” will take the staggered list and order it.


Overview of the Tool Panel Modules:

Mask from selection:
Takes the edit mode selection and uses it to make a new mask in sculpt mode. It is honestly baffling that Blender does not have an easy way to do this, as it can be super useful for any sculpting workflow where you need to be vertex-level precise with your masking.
The way this works is kind of klugy: It first inverts the edit mode selection, then hides them (leaving only the original selection visible,) then it goes into sculpt mode, does a mask > fill mask command, then it unhides everything.
I could not find a more direct way to do this, but it works fine for me but it might be slow if your mesh has a high vertex/edge/face count.

Cycle Color View
This cycles through the color type in the 3d view in solid shading mode. It loops through the four that I use most often: Material, Random, Object and Texture
It also assigns the key B to it, but this can be changed by right clicking the button and changing the shortcut. For some reason, this key assignment only works for this one module and not the others.

Retarget Mesh Drivers
The most powerful module in this addon, and the one that by far took the longest to figure out and develop.
After searching for hours for an addon that retargets drivers, all I could find were addons that retarget animations. In my case, I don’t want to retarget animations, just mesh drivers. Working with a model that has a bunch of pose-corrective shape keys each driven by armature bone positions, I find this indispensable when making new versions or using multiple versions/instances of the model/rig I am using to keep all of the keys targeted to the correct armature.
This isn’t a problem when copying with shift+D. But if I have a version of the mesh from a different file that I want to put onto my armature in THIS file, because when copying the mesh from one file to another, it always copies with it the armature and any bone shapes the armature has.
This module can be used to retarget from selected mesh to active armature.

I know that the DAZ importer (Thank you Thomas!) already has this function, but it is specific only to models imported using it, and I wanted to make a more general version.

In addition to retargeting to armatures, it distinguishes drivers of type “Key” so it can also retarget from mesh to mesh. This is useful for similar reasons as above. In my case I have shirt filled with shape keys that match the keys on the underlying model.
So if I turn up say, the “heavy” key on the base model, the “heavy” key on the shirt will also go up and the shirt will expand to fit the new body type.
Useful when I want to use the shirt on another version or instance of the figure.

Cleanup Bone Shapes
Working with lots of versions or instances of the same armature copied from other projects can pile up duplicates pretty quickly. Also, annoyingly, if I copy an armature with bone shapes from one project to another, when I past it it ALWAYS pastes all the bone shapes right into the scene with it, which I then have to remove from the scene (but they remain in the blender file.)
This function not only automatically deletes these from the scene, it also checks all bone shapes and shape objects for duplicates and removes them. This works by looking for a numerical extension (.001, .002, etc) and lack thereof, so it will not work if the duplicates follow another naming scheme, so it only works for duplicates generated by Blender.
The trash can icon next to the button controls the deletion. With it unchecked, the button will simply change any bone with duplicates to the base instance of each shape (the ones with no extension)
With trach checked, it will automatically delete the remaining duplicates from the file.

Retarget Bone Constraints
This is probably pretty niche, but it is very useful for my workflow. In my case, I have an outfit that I put on my character, but my outfit has lots of extra parts sticking and or hanging off it that I want to specifically control with its own armature, which is controlled by the main character rig through copy rotation and copy location constraints.
This button retargets all the bone constraints on the outfit’s rig to the main character’s rig, provided the bones in question have identical names.
Useful, again, if I want to take this more complicated outfit and put it on a different figure using the same or similar rig.

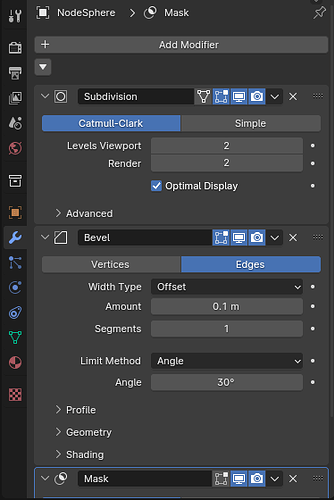
Apply mods with Keys
Are you annoyed whenever you go to apply a modifier and it says “Modifier cannot be applied to a mesh with shape keys”?
Well, with this button you can apply all mods on your mesh while preserving the shape keys! Applies all mods at once, in future versions I might make it skip ones that are disabled in viewport.
The script also attempts to preserve the shape key drivers, but it only copies the expression, target and variable, not the F-curve associated with the driver.
If your mesh has drivers with custom f-curves, checking the pin next to the button will leave behind the original so you can manually copy over drivers. I still cant find a way to do that using blender python.

This one is also klugy because there was no real direct way of doing this.
The way it works is that it goes through all shape keys active object and creates a duplicate for each one, making sure to match the name of each dupe with the shape key it came from.
It then selects and pins the appropriate keys and applies all shape keys using the shape key specials menu command “Apply All Shape Keys”.
Next it deletes all keys on original object, activates the original, and selects all the duplicates, then does “Join as Shapes” from the shape key specials menu. Then it deletes all the duplicates.

In other words, this will be REALLY slow on meshes with lots of verts and 100+ keys

At some point in this process it creates a full duplicate of the original to temporarily hold data, checking the pin by the button simply prevents this object from being deleted in the end. This duplicate will be named “xxx.” and is only intended for manual driver copying before deletion.

**Copy All Shape Key Drivers"
is actually a sub-function within Apply Mods With Keys. It attempts to copy all shape key drivers from one mesh to another, provided the shape keys on both objects all have identical names.
Again, I could not find a way to copy drivers off of shape keys while keeping F-curves intact. It’s not a problem with drivers on the transforms (loc, rot, scale) nor does it seem to be an issue with drivers controlling other properties, just shape keys. Help here would be appreciated!

Weight Toggle
This button simply “inverts” the Weight value when weight painting, switching back and forth between 1 and 0 to quickly switch between “draw” and “erase.” This probably isnt the best way to do this, but in weight paint there is no obvious way to erase without setting brush weight to 0. I assign it a hotkey of X, although when I put this all in a package with modules, tha

Delete Invalid Drivers
One click to clear invalid drivers so you don’t have to go through a long list of drivers to select the invalid ones and avoid the valid ones to delete.

Copy Exclusive
Blender has a strange habit of copying all of an objects parents/dependent objects with it when you do a ctrl-C Copy Objects. As mentioned before, copy/pasting an armature that has custom bone shapes also pastes the bone shapes to the scene. It is like this with other objects, so if I want to, say, copy a just the mesh off of a figure, or just one item of clothing, it always ends up pasting more objects than I copied.
This makes sense in making sure the pasted object works correctly, but isn’t really necessary in most cases and to me is quite annoying since it adds that many more actions for me to preform before I’m ready to actually work with the object.
This button will copy ONLY the selected object(s) and leave the rest.
Again, more kluge as this works by copying and passting the selected objects, then selecting the new duplicates, deleting all the other objects that got pasted with it, then it copies them again. This effectively “clears” the object of all its dependants and then copies these objects instead.
This button will NOT work on armatures with custom bone shapes. The bone shapes get pasted no matter what, which is why I have Cleanup Bone Shapes button above.

Center View
Centers 3d viewport on world origin without moving 3d cursor.

Remove Duplicate Materials
Made for the same reason as Cleanup Bone shapes, using the same method. This will go through all slots on all selected objects, check if the mat has a numerical extension, finds the “original” copy that has no extension and changes the material in the slot to that (This does not just rename the mat, it makes sure that it and all other places where duplicates of that mat are used are all consistent and the SAME material.
The “Tt” checkbox by the button toggles case sensitivity (I have not tested this)
the “Trash” checkbox deletes all the duplicates after reassignment.
the “X” checkbox is there in case your “original” material already had a numerical extension. This will clip off the extension, but will only work if Trash is also checked since it attempts to remove all extensions on all materials. This wont work if you have “mat, mat.001 and mat.002 etc.” since blender will keep auto-assigning an extension when you rename something to something of the same name.
Which is why all these dupes must be deleted first.

Clear Object Extensions
Similar to clicking the X on Remove Duplicate Materials, this works on all selected object names. I have not tested this yet with the above example, but I find it helps to clean up the object names when I know there are no duplicates.

Stroke Pie Menus
When sculpting, I frequently need to change the sculpt stroke method between space, line, dots and anchored, but blender’s UI is a little lacking there, making you go to the sidebar, go to brush settings, scroll down to and expand stroke then select from there. I know there’s already a popup for that, but it is still a dropdown list that you have to click on, so I made it in pie menu format. Also, when using the cloth brush, you need to instead switch between Deformation modes (drag, push, etc) so I made a pie menu for that too and afik blender doesn’t have a default equivalent.
I have assigned ctrl-X to bring up the stroke pie menu and ctrl-A to bring up the cloth brush pie menu.


Scripts were made and tested on Windows 10 home in blender 3.6.5. I don’t think there’s anything platform specific in there, but I know that due to API changes this probably wont work in any blender before 3.
Created with help from ChatGPT 3.5. I don’t know python very well and Blender’ version of python even less so it saved me a lot of time finding the correct things way to do things.
That isnt to say it was easy. ChatGPT was trained on an older version of Blender’s API, and sometimes it is a struggle to get it to understand what you want. And it did annoying things like adding arbitrary checks and giving me whole classes when I ask for a function. I’d like to know if the paid version is better with this and knows the latest blender API.

I hope some of you can get some use out of this! Let me know below which of these tools you find most useful, and also let me know if any of these tools I made actually have an equivalent built somewhere in to Blender.

Post any bug reports or issues here, and there is half a chance I’ll be able/willing to fix it!
10 Likes

Also, I couldnt figure out how to get tooltips to work for the checkboxes by some of the buttons. The variable and layout entry both haver descriptions, but none of them show up.

Is it actually possible to give these things tooltips?

Looks like maybe add a description=“tooltip text” to your bpy.props.BoolProperty()?

I actually just joined to thank you for your tools, apologize for the $0 on GumRoad (trying to figure something out and wasn’t sure if your tool would help with one small thing… it didn’t, but I plan to come back and toss some money your way soon), but also report a small bug:

The tool I was specifically interested in was “Apply w/keys”. If I deselect everything except “Apply w/Keys” in Preferences, nothing shows up in the Krayne’s Tools tab. Seems that way for everything if the first (Mask from Selection) tool isn’t selected. Minor thing, but someone might complain/be confused and probably easy to fix. I didn’t dig into the code to see what the issue was, though.

Thanks for contributing your tools!

The sculpt masking tool alone makes this worth getting. Thanks!

You’re welcome! And if you want, you can install just that as a module on its own. Just take kMaskSel and install it as an addon then you can bind anything you want to execute object.mask_from_selection

Thank you for your input. I had not noticed the issue with the first button disabling all of the rest. And yes, it is a BIG issue, since the intent for this addon is that no one module or button should be needed for it to work.
Also, It turns out it was as easy as deleting a few lines to make it work, and is now fixed in 1.2.0 which I will release soon.

As for the bools for my buttons lacking tooltips: Yes, they DO have a description=“Tooltip” part for the BoolProperty. It looks like i’ve done everything right but it still wont give me tooltip for the five checkboxes in my tool panel.
I want THIS to work because otherwise it isnt really obvious what those checkboxes do.
In the case of the Remover Duplicate materials (which still needs fixing since it doesnt work quite right yet) the “case sensetive” checkbox doesn’t actually do anything and might be unnecessary.

Update: Krayne’s Tool 1.2 is here!

Bug fixes:

  • Fixed a bug that made it so that you had to have the first button (mask from selection) active or none of the rest would show up. Now you can deactivate Mask From Selection without deactivating the rest.

  • Fixed a few minor bugs here and there

  • Remove duplicate materials is still kind of janky and still needs more work to be really useful

New module:

Added “Quick Curve Mod”:

This new button takes your selected object(s), creates a new cure object that is a straight line 1 unit long along the +Y axis, then creates a curve modifier on your selection and targets it to the new curve.

It can also detect weather you already have a curve selected, and it simply makes a curve mod on selected object(s) and targets them to the active curve.

If your active object already has a curve modifier but no curve, it will create the curve and retarget the existing driver.

I find this very useful since I make a lot of animal tails, and I find it much easier and more precise to pose them using curve modifier rather than bones on an armature.

It does mean you can’t animate them very well, but that isn’t what this tool is for.

Link to gumroad here. It should be an option to download the 1.2 along with 1.0 when you click to download, but I’m not sure (I’ve never done versions on Gumroad before)

Update 1.4

-Fixed “Mask from selection” not working with the 4.1 API changes. now it should work both versions
-Added a feature to the “Collapse Modifiers” Next to the triangle for expand/collapse. This new button will delete all mods or constraints on the object
image

-Added a new module, Move Lists:
image
This uses BatFINGER’s Quick Move Vertex Group mod and expands its functionality. It now works for shape keys as well, and I added a “lock” button. The lock button will move the key/vgroup but lock the view of the list. That way, if you need to move several items very far away, you can lock the view and do them one after another without having to search for the next one every time!

-Added new context menu for mesh edit mode: Krayne’s Tools, with two modules:
image
The first one, Align Vertices, will align all selected verts to the active vert, based on which axis you choose. If no vert is active it aligns them to the median point.
Axis is chosen through Adjust Last Operation:
image

The second one, Center Vertices, does the same thing except it aligns them to the object’s zero point along the chosen axis.

The reason for Align Vertices is that the normal way of aligning verts (Select verts, press S-Z-0) doesn’t work right.
When working with a mesh that is being deformed by an armature or by several shape keys, this doesn’t always work right, scaling around a center that isn’t where you want it. This function bypasses the scale operator and manually sets the coords of the verts to the desired axis.

The reason for Center Vertices is pretty much just for the Mirror Modifier. If I’m sculpting half of something and I use certain brushes near the plane where it gets mirrored, the verts move off of the plane.
This is so that if this happens, I don’t have to move my 3d cursor or search for a vert that is at 0 to reference.

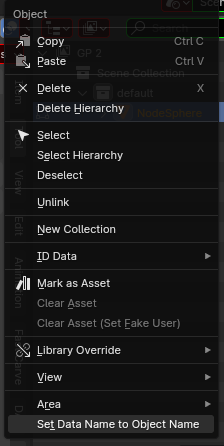
-Added new item to Outliner Object Context menu: Set Data Name to Object Name:
image
This is just a quick and convenient way to make the object and data names consistent.
If you’re like me and don’t like having a ton of objects that you named all having mesh data names like “Circle.001, Cube.002” etc. then this mod is for you!
Works on all object types that have green data block.

3 Likes

Update! KT 1.4.8

-Added a module: Mesh Tools!
This is just a set of very basic alignment functions. When modeling and sculpting with a mirror modifier, sometimes the verts along the object origin well be moved out of alignment. Rather than having to check the cursor is at 0 then press S > X> 0 it is just a right click away!

Same thing with the align function, except it defaults to centering on active vert.

I also added a set of linear distribution functions for verts and object. Now you can evenly space all objects/verts between the first and last selected!
I’m genuinely shocked that Blender doesn’t have this feature built in. I did search for it but coulldn’t find anything. Maybe it is there under a weird name and i’ve never noticed it before, but if this particular function is not then this part of the addon is for you!

-Put “Copy Exclusive” at the top of the object context menu

-fixed a few bugs. Most notably I fixed the “clear all materials” button: after the API change, the “delete slots” button stopped working. Its fixed now!

-I made some other small changes to a few of the modules but, and I apologize for this, I did not document properly.

1 Like

Update: KT 1.4.914
New Features added!

–Shape Key Functions:
image
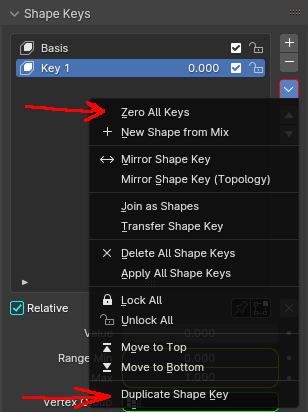
Two new entries to the Shape Key Specials Menu:
The first one speaks for itself. Zero All Keys sets the value of all shape keys to 0. Convenient way to clear the values for all of your shape keys without having to select them all. Useful if your mesh has a LOT of keys!

The second one, Duplicate Shape Key is a little more complicated. It creates a duplicate of the active key and moves it to the spot just below the original.
But if the shape key has an extension of L or R with a separator (for example: key.L, key L, key_L, key-L) it will automatically swap the L/R extension for the duplicate AND it will mirror that shape key, to easily make corrective keys for things like arms and legs that need to be symmetrical but driven separately.
WARNING: The method for moving the key is kind of slow, so if you have a lot of keys you might have to wait a few extra seconds.

–Added InsertKF:
image
image

Added two operators to handle adding keyframes to the visibility options for multiple objects:
image
Pretty niche use, but its there for now in the search menu only (I haven’t decided where it these ops should live)

–Added NameSet:
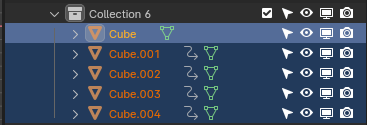
This sets the data name of object(s) to the object’s name. This way you can quickly make the object names and their data names consistent. This way you don’t have to have to look through a long list of "Cube.001"s or “Cylinder.005” etc to find the correct mesh for your object! Applies to all types of data, including armature and curve and more!
This one also can only be found in search menu:
image
I want to put it in the menu when yo right click on an item in the Outliner, but I don’t think Blender lets you modify this one. I just put it in quick favorites since I have no quick favorites in my outliner.
This will work for all selected objects (but not collections, since collections cant be keyframed)

–Added ClearExt
Similar to NameSet, this will attempt clear any numerical extensions of the format .### on all selected objects. (This also only works on objects and not collections, but that is just an oversight rn)

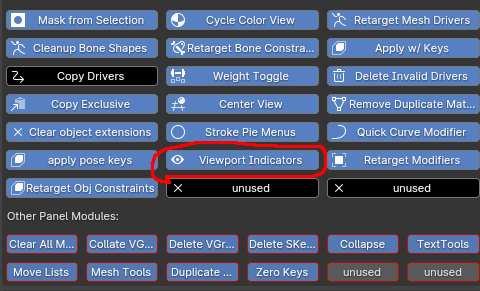
–Added Viewport Indicators
image
image

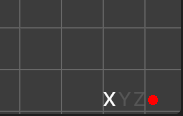
This adds indicators to the bottom right of the 3d viewport. One for Simplify and one for Symmetry. If you’re like me and your workspace is really crowded and dense, the built in symmetry buttons in the top of the viewport can get covered up or scrolled away. This lets me know at a glance weather symmetry is on or not before I edit.
The circle is an indicator for simplify mode: Empty black circle means Simplify is off, filled red circle means simplify is on.
This is useful for me because it isn’t always obvious at a glance when I have simplify on, and as a result I accidentally do things like bake lineart for the unsubdivided meshes.
It also helps me avoid unnecessary switching between on and off since on some very large and high poly meshes, switching it on can take as long as 5 or even 10 seconds.

The indicators do NOT show up in viewport when you activate the addon… you need to go into the addon prefs and click Viewport Indicators off then on again. I’m still trying to figure this one out.
image

–Added Retarget Mods and Retarget Obj Constraints to kRetarget
Now you can retarget all modifiers or object constraints from all selected objects to active object!

–Added buttons, prefs and menu items to go with these new additions.

-Fixed cloth sculpt pie menu: Wasn’t working right before.
-Fixed ApplyModsWithKeys to better handle disabled mods
-Removed the Copy All Shape Key Drivers button since it never actually worked and I still haven’t gotten it to work yet
-Made several of the buttons and menu items only active in their appropriate modes. Full breakdown at the start of init.py
-Fixed an annoying attribute error that would show up in console whenever you right click

I now realize that my tool panel is getting rather full and crowded, so the 2.0 release will consolidate some of the functions and move others to more appropriate locations.

https://krayne.gumroad.com/l/ifdcct?_gl=1*1v3a94f*_ga*NDY3NjM2ODA4LjE2NTIxNzQxMTM.*_ga_6LJN6D94N6*MTcxOTU0Njg2Mi43OS4xLjE3MTk1NDY4NzAuMC4wLjA.

1 Like

I have a question: Is the fact that this is going through Gumroad stopping people from downloading it? I only use gumroad so I can keep track of the downloads. If I were to load it directly here, would there be a way for me to know how many downloads it gets?

1 Like

You can use a URL shortener that points to a Gdrive download link. Just make sure that the shortener service you use is not predatory or flooded with ads. Those services offer link tracking basically.

thanks i’ll try that!

1 Like

Or Github.
However, I’d say Gumroad is a great place to be with your tools. As people take a moment to read, they will look. You are offering a LOT OF USEFUL tools that
need to be studied, to make the best use of them. I mean like a class. Deep stuff.
Show more examples of your scripts success in your workflow. It reads great. And there’s a lot to read.
Robert

Did you look at the new extensions platform yet?
Maybe you can set up your own repository, and set up the addon there?

Yes. I plan on making a YouTube video detailing how these things are used, because many of them don’t have obvious utility but they help ME out in my workflow immensely!

1 Like

Someone else mentioned the blender exxtensions site and I am seriously considering switching to that for hosting

1 Like

Personally? Not at all. I’ve only become aware of your addon this week, but I find gumroad to be a perfectly fine host.

1 Like

From what I understand from it all, you might look into the whole repository thing.
It’s like your own ‘addon server’ where people can DL’d & install your addon from. You can add additional (your) repositorie(s) in the preferences.

I suggest reading up on it, as it is a cool concept but will take time to fully mature and being adopted by everybody.

edit:
developers announcement: Changes to Add-on and Themes Bundling (4.2 onwards) - Announcements - Developer Forum (blender.org)

docs: Extensions - Blender 4.2 Manual

1 Like

Krayne’s tools 2.0 is here! I’ve made a LOT of changes so I will outline them briefly here:

#CHANGELOG 2.0:

Updated kCleanArm so that it now removes bone shapes from scene even if the armature doesn’t have dupes
Fixed bug in kbfMoveLists that printed an error in console whenever search menu was opened
#Added kxColTogg.py
#Added a preference for kxNameSet
#added kInstUni
moved nameset and clear extensions to outliner object and collection context menus
updated clear extensions to work on collections
Simplified mask from selection module and added selection to mask
Fixed indicators to work right away and switched sides
Added Retarget Object Drivers
Fixed kCleanArm to work in more situations
#Added CopyKeys
#Added AdvExt
#Added BoneFromCurve
added prefs for previous 3 comments
added Retarget keys to kRetarget
added shape key functionality to kxNameSet
#added ktPropKeys
Revamped init
Combined some modules and made them all independent addons
fixed installation bugs
moved all retarget buttons to a dropdown menu
Fixed other misc bugs

I will describe the new modules briefly here but I plan to go into all of the modules in depth in a video or a proper document.

kxColTogg.py

Collection Visibility Tools: Adds an item to the collection context menu in the outliner. When you right click you have options to either hide (exclude from view layer) all selected collections or reveal.
To fix the way Blender can forget which collections are active within a nested tree of collections, so when you activate (click the checkbox) the parent collection none of the children are active. This usually only happens when I deactivate one collection and work in another for a while, but it is often enough that I made this module for it.
I don’t know if anyone else has noticed this or if its even an issue for anyone else. Is for you?

kInstUni

Make Instances Unique:
Not quite the same as Realize Instances, this instead goes through all selected instances and gives them a unique datablock. For example, I have a row of window models and the proportions and such are controlled by shape keys (Say, keys for x and y positions of the pane dividers, thickness of trim, etc.) and I have like 50 of them placed on a building but I want to change the proportions of certain individual windows. Since shape keys belong to the mesh data and not the object data, changing the values of the keys on one changes all of them. That’s what this is for. I’ve only needed it once but thought it was worth adding here

CopyKeys

Copy Shape Key Values
Speaking of shape key management, this one copies shape key values from the active mesh object to selected mesh objects with matching shape keys.
It does this by comparing the names of the active and selected objects. If one or more selected object has a key with an identical name to one in active, it copies the value from active to selected.
I found this useful for many of the objects I make which I set up to have varying dimensions and proportions and such, and sometimes I want to copy the values on one instance to another or more

AdvExt

Advance Extensions
If your scene has a lot of copies or instances of an object and you want to insert or remove one without having to manually renumber them all, then just use this!
I made this one mainly for use in armatures when I later decide I want to subdivide a bone, the addon can bump up the extension of all the bones ahead of it. But since 4.2.1 blender now automatically does this, so bleah :roll_eyes:
This also works for shape keys and vertex groups and can be found in their respective specials menu (dropdown menu)

BoneFromCurve

Creates bones from curve points then hooks points to the bones
It also sets up IK for them allowing you to turn any curve into an IK noodle!
I’ve been modeling a lot of machines, and a lot of parts have cables or hoses that have to move around with the object, so I made this to automate that setup. Like, for example, the power cables going between each joint of an industrial robot arm.
If you put an empty at the end of your target curve, it will parent the target bone on the IK rig to that empty!
I made this specifically to work with curves because curves automatically smooth out bends, and you can easily change the thickness on the fly. Unfortunately, curve objects have no vertex groups and can’t hold an armature modifier, so I solved it using hooks and empties parented to the armature.

ktPropKeys

Ok this one is really niche. I mentioned earlier that I like to make some of my machine parts with shape keys to modify various dimensional parameters on the fly (for complex objects not easily made in Geometry Nodes.)
Well, what if I want to make a whole family of parts with mutually controlled shape keys?
Like for example an axle hinge assembly that holds a long I beam with another hinge on the end. I want to keep all of the objects separate but changing the width of the hinges necessarily changes the width of the beam. I can give them both a set of identical shape keys but I want them all to be controlled by custom props on an empty so that empty can control them both.
This module goes through each shape key on selected object and creates a custom prop then adds a driver controlled by the prop. It also numbers each property in the order the keys appear in the list (skipping basis, of course)

Other

I tidied up the UI, too. I put all of the retarget tools into one dropdown menu:
image
but I don’t think I like this and would prefer it to be a sub-pane in the toolpanel.

Finally I reworked the init file (the handler for all the modules) to be far, far more efficient and less buggy. I took it from 813 lines of code down to 388, and that’s without removing comments or extra lines!
Link to download below!

3 Likes