Many tutorials explains how to make a walk cycle, but only very few of them actually tells you how to move your character forward while the feet stick to the ground.
The problem I’m facing however, is a bit more complex than this:
I want to do a walk, then stop, then climb a tree and then jump over a cliff.
How would a pro animator approach this task?
More specifically I’d like to know if a pro animator would choose to move the Root bone at all, or only move the character forward step by step? Also I’d like to know if a pro animator would approach this task using Pose-To-Pose or Straight Ahead?
I’m not a pro animator, but for the kind of action you’re describing, I can’t imagine a walk cycle would ever be used. Instead, you’d shoot some reference footage and then do pose-to-pose animation. The root bone would probably not be moved unless absolutely necessary.
The problem with the Follow Curve constraint is that you cannot put it to a hold and have the character stop halfway through the curve, then follow it again. Not that I know of.
The simple answer to your questions is animation baking. This is what baking is for.
Create your walk cycle.
Load the walk cycle action. Constrain the rig to a path or move the root bone. Slide or scale the keys if necessary to tweak to positioning and timing. Bake it in as solid keys. Then animate the climbing of the tree.
this is something i’ve struggled with. for mocap stuff i’m often doing the approach of taking bite sized clips and stringing them together and blending them in the NLA. but they’ll often have differing root positions, so it can end up getting pretty hairy with various constraints to compensate for location and rotation differences between the clips. so after getting something close, i generally bake it all down into a single continuous clip.
when animating from scratch, the approach i’ve seen is to do a blocking pass where you step pose through the foot placements for the hips and feet, then adding breakdowns and polish after that. it can give a cleaner and more intentional performance than trying to mash together more generalized walk cycles or mocap clips, but it definitely requires more skill at getting natural feeling weight transfer for each step.
It depends on the situation but baking in walk cycles is overwhelmingly the most common method I’ve known and always used professionally. I’ve only known walks to be blocked out in the scene from scratch mostly for exceptional circumstances or if it’s just a step or two in a bigger action and bringing in a walk cycle would be a ridiculous complication.
Walks and runs are such complex and time consuming things to put together that it makes no sense to be building them from scratch for every scene especially if it’s a quadruped. There is normally no time for something like this in production. The most common method I’ve known is the baking one I have described and it’s also very flexible once you dive into it.
It’s not normally used with non linier animation editors like the NLA though. It’s better to just stay working with raw simple keys and keep it clean and clear to understand in the dope sheet and graph editor. To steady a foot, slide the timeline to find the best foot placement in your baked path walk and delete the planted foot keys around it. Although often if the path is set up well foot sliding can be minimal. By using the NLA for something like this you are just adding an extra layer of complication and potential problems.
my nla approach is largely with mocap data that is heavy on the keyframe data. the nla is practically required just to achieve usable performance.
i’d be curious to see a more involved breakdown of your workflow. for example, are the feet ik or fk? if they’re ik, do they have their own path follow constraint? if they’re being moved by the root, then the sliding would be in root space not local space, right? or do you set a root controller only as a constraint that can be attached and detached as needed?
The Follow Path Constraint when turning on Follow Curve option, so that the object rotates as it follows the curve, needs to allow for moving my object without the need to animate the path itself (without the need to press “Animate Path” button).
What I need is a constraint similar to the Curve modifier for Objects. I don’t want to animate the path, because I want to fully control my walk cycle animation, which I can’t as long as my path is animated.
I hope you get my point.
It would make a walk-run-stop-and-jump animation a lot easier.
What I need is something similar to the Clamped Track Constraint, but with the rotation of whatever is being clamped to the curve.
Sorry I think I didn’t explain this clearly enough first time and should have said don’t constrain the root bone to a path. You would use an empty object as a temporary root in this case. Put that one the path and parent constrian the pelvis and feet to that. I am working right now so don’t have full concentration.
The feet are always going to be IK. You never hack the rig in any of this. Especially as the rig would normally be referenced into the scene. The way to think about it is as the rig operated like a rod puppet. You would bake the animation onto the IK controllers for feet and knees. After baking both the root bone and feet controllers would be baked solidly into world space totally free of the path constraint.
The full advanced approach especially good for quadrupeds is to constrain then bake an FK linked empty object hierarchy to the animation of the feet knees and pelvis controllers linked to it’s own empty object root. Then constrain that empty object root to the path. This way you can work into the path walk animation more freely as you have that secondary FK layer of control to work with. Once this is done then constrain the IK rig back onto those. Now the rig really is being maipulated as a rod puppet. When you are happy you can bake the resulting movement back directly onto the rig. This is a great way to move about quadrupeds with complex walk cycles.
This is not my method exactly. I was originally shown it.
Phew so many edits. What did I get into
Anyway hope is more clear now and that it helps.
thanks! this is great insight into other people’s workflows. i may give this one a shot at some point.
a lot of my stuff has been mocap performance based, which has translation built into the various takes, hence my reason for stringing them together in the nla, blending between takes to assembled the best performance.
also challenging for me with walk cycle based stuff is that often characters are doing more elborate things, like turning and walking backwards while talking to someone etc. they don’t usually take more than a few steps before doing something quite ‘custom’.
I need a step-by-step guide for this one. I’ve never baked an animation in my entire life with Blender.
Also, I don’t know how to control the Follow Path Constraint. When I hit the “Animate Path” button, the object moves from one frame to another, and I have no say in it what-so-ever.
That’s why I need the Clamped To Constraint to have the option of rotating the owner as it moves along the path.
A “rotation/follow curve” option for the Clamped To Constraint would also allow for a more “layered” or non-destructive approach to animation in Blender, and no need for baking anyway. I feel I have alot more control using the Clamped To than Follow Path, except that I need my object to face the right direction as it moves along the curve (which Clamped To does not allow for… why?)
The simplest way to see it is to think that baking is there to remove constraints and other set ups you might have in an animated scene to stabilise and simplify the scene after animation is done. So if you have a character picking up objects and have multiple constraints animated on and off. Before sending to lighting and render something like this would normally be baked to make sure the scene was as stable as possible once it moves departments and others start work on it.
This is especially important when multiple rigs and other FX set ups are referenced across a network and all interlinked in one scene. You can never hard parent or hack into a rig that is networked and so will often need to use multiple overlapping constraint set ups on it in a complex action or scene.
Often the baking process will be scripted into the studios animation pipeline but also now it’s very common for scenes to simply be entirely cached out into Alembic and other point cache formats before rendering and lighting for lightness and stability.
Baking is used all the time in the process of studio animation but for some reason is seldom talked about in tutorials and guides. I never really understood that as it’s so important and commonly used.
It also makes so much possible in actual animation where you are needing to combine saved animations and poses in multiple ways.
I would perhaps start first perhaps by doing some baking experiments on rigs and constraints to get a feel for how it is working and what is possible.
I would need time to look at this. But if this is the problem why not have a parent object for the object you want to face a certain way ?
I am possibly not totally clear on the problem you are having with the Follow Path constraint ?
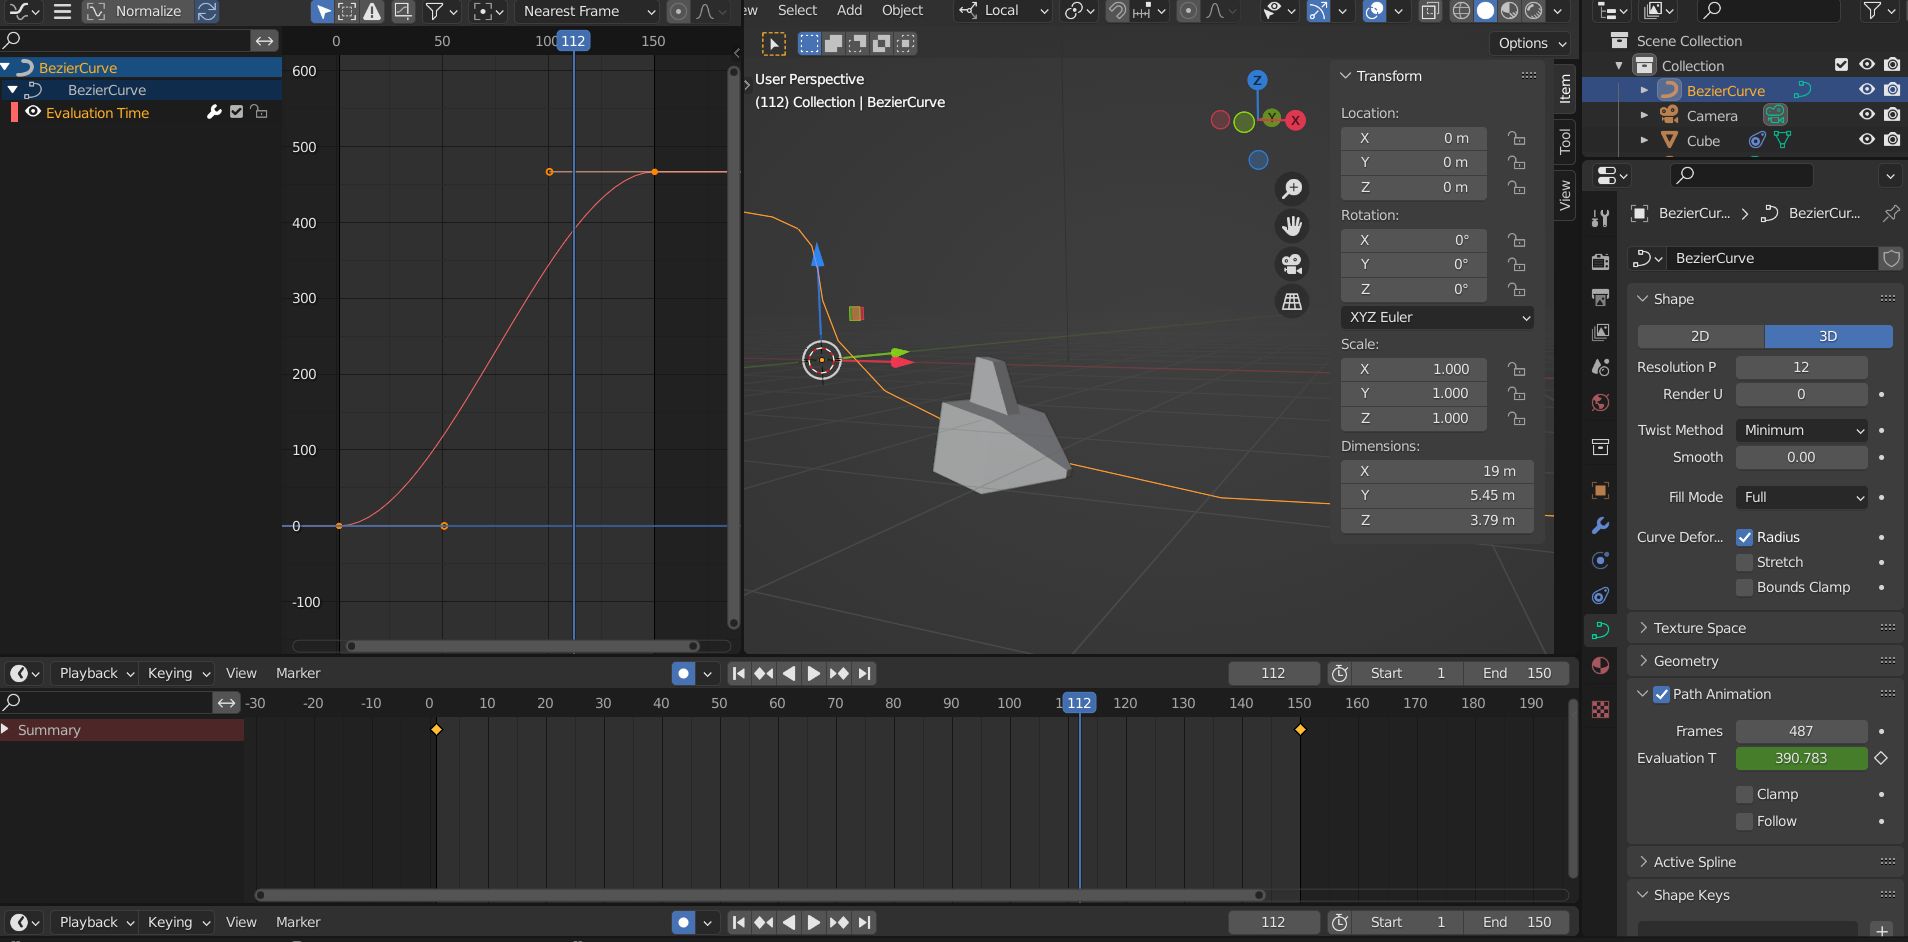
But it is easily possible to have precise control over the speed and timing of an object animating along a path using a Follow Path constraint. This is an object that is pointing in the right direction following along the path and also slowing in and out and stopping at the end. This was done using these rotation settings and keying and animating the Evaluation Time in the Path Animation section of the curves drop down.