Light and Shadow catcher at the same time. How?

How do I get a light or emissive object to cast a light onto a shadow catcher? Currently im only able to cast a shadow onto the shadow catcher… Ive tried changing settings in both the lights and emissives, as well as the shadow catcher itself but to no avail. It still only chatches the shadow.

Does anyone know how to do this? I need the light and shadows to be catch by a transparent object for the purposes of rendering out a png that will be composited in photoshop onto a photo.

The Shadow Catcher catches both light and shadow, but the light isn’t visible in the viewport.

If the Shadow Catcher pass is turned off in the render settings, the shadow will be part of the main layer in the resulting render, appearing as a dark blob of color with alpha, the same as you get in the viewport.

If the pass is turned on, the shadows will disappear from the main render and appear there instead, which will be dark in the shadow areas, 1.0 in unaffected areas, and >1 in areas that are receiving illumination. The intended use is to multiply this image with the background, so the shadow areas get darker, the light areas get brighter, and the rest of the image is unchanged (x • 1 = x). Note that since PNG clamps at 1 and applies your chosen display transform (Filmic, AgX, whatever), curving the values away from linearity, you’d want to render the pass to EXR instead, to preserve the relationships between light & shadow and keep those 1+ illumination values.


If what you wan’t isn’t illumination, making the background lighter, but more of a solid blob of white color that’s actually layered on top, that might be slightly trickier. You could maybe render a second pass, with the shadow plane solid and receiving light, and try something with a luma key?

Thank you Carter. However, I am in fact trying to catch the light itself… see how there’s a light spill on the ground from the area light when I turn on shadow catcher, and that same ligh spill disappears when I turn it off? Thing is I need that light spill as an alpha or png transparent so I can layer it into photoshop.

So I want the light spill as shown here on this regular plane…

However, I dont want the plane. I want the light to be on a transparent plane (like a shadow catcher).

Here you’ll see that as soon as I turn on the shadow catcher checkbox, my lightspill disappears.

Is there no way to tell blender to only accept the light spill from this light source onto the shadow catcher?

Right, and that’s what the technique I just described is for—capturing the effect of the light on the object, but not the object itself, and allowing it to be transferred to any other image in compositing. Should I have used an image instead of a blue solid to demonstrate in my example? That first picture is the viewport, the second is what the Shadow Catcher pass looks like, and the third is the composite, with the pass multiplying brightness onto the solid blue background.

What, in your mind, does this “light pass” you want actually do? Do you want it to blend additively with the layer behind it? Or to brighten the background, like a color correction adjustment? Or to be a solid white blob that layers over top, replacing the values of the background behind it?

The first one, you could probably render the plane on its own, with shadow catching unticked and all the other lights turned off, to get only the effect of that one light, and then layer that render on top of your background with Add or Screen.

The second one is the effect of that method I just described—the area of the shadow is multiplied down to become darker, and the area of light is multiplied up to become brighter. (If you wanted manual control, you could also use that solo’d light pass I described in the previous option as the mask for a color correction.)

And the third one, you could take that solo light render, run a luma key to give it an alpha, denser in areas that are brighter, and use that mask to layer over a white solid (or your desired light color). This method is the only one that could be encapsulated in one RGBA PNG, since all the data is just standard color & alpha meant to be blended as usual, no adding/multiplying.

(The one extra problem you’ll might run into (and which I did momentarily forget about, sorry) is that, as shown at ~5min in that video, a light can either have or not have the Shadow Catcher role: it can represent a real light (meaning it will cast shadows, since the effects of its illumination are assumed to already be present in the original footage), or exist only in CG (meaning it will illuminate the scene with more light, but its shadows won’t be darker than the original scene, since they’re merely the absence of the light being added), but not both. That means if you wanted to do this with the Shadow Catcher pass, you’d need two passes, one for shadows and one for light.)

(Or you could render the shadow in the main RGBA (Shadow Catcher pass turned off) and use only one extra Shadow Catcher pass, for the light only

2 Likes

Can’t you use a light group AOV to single out this particular light? haven’t tried but think it should work?

1 Like

Yes, but the lighting on the plane won’t show up in the light pass any more than it would in the main pass as long as it’s still a Shadow Catcher—you’d still have to run a second render with Shadow Catcher turned back off. You could use a light group to avoid having to mess with the world and any other lights, though, yes.

WOW thanks for that extensive response. Much appreciated. So I have a photo of an existing building and I modeled some roof elements (with help from perspective plotter) onto it that have light sources (the white parts are esentially backpainted plexi with neon fluoroscent tubs behind so they would glow at night). I want to be able to create a night scene (via some day for night photoshopping…crappy glow paint over in photoshop doesnt do it justice as shown) with a glow coming from these light elements. This light source should spill onto the existing photo roof.


This is wwhat Im going for:

Ill test your suggestions in the coming days. These light passes are saved in the rendered window, correct?


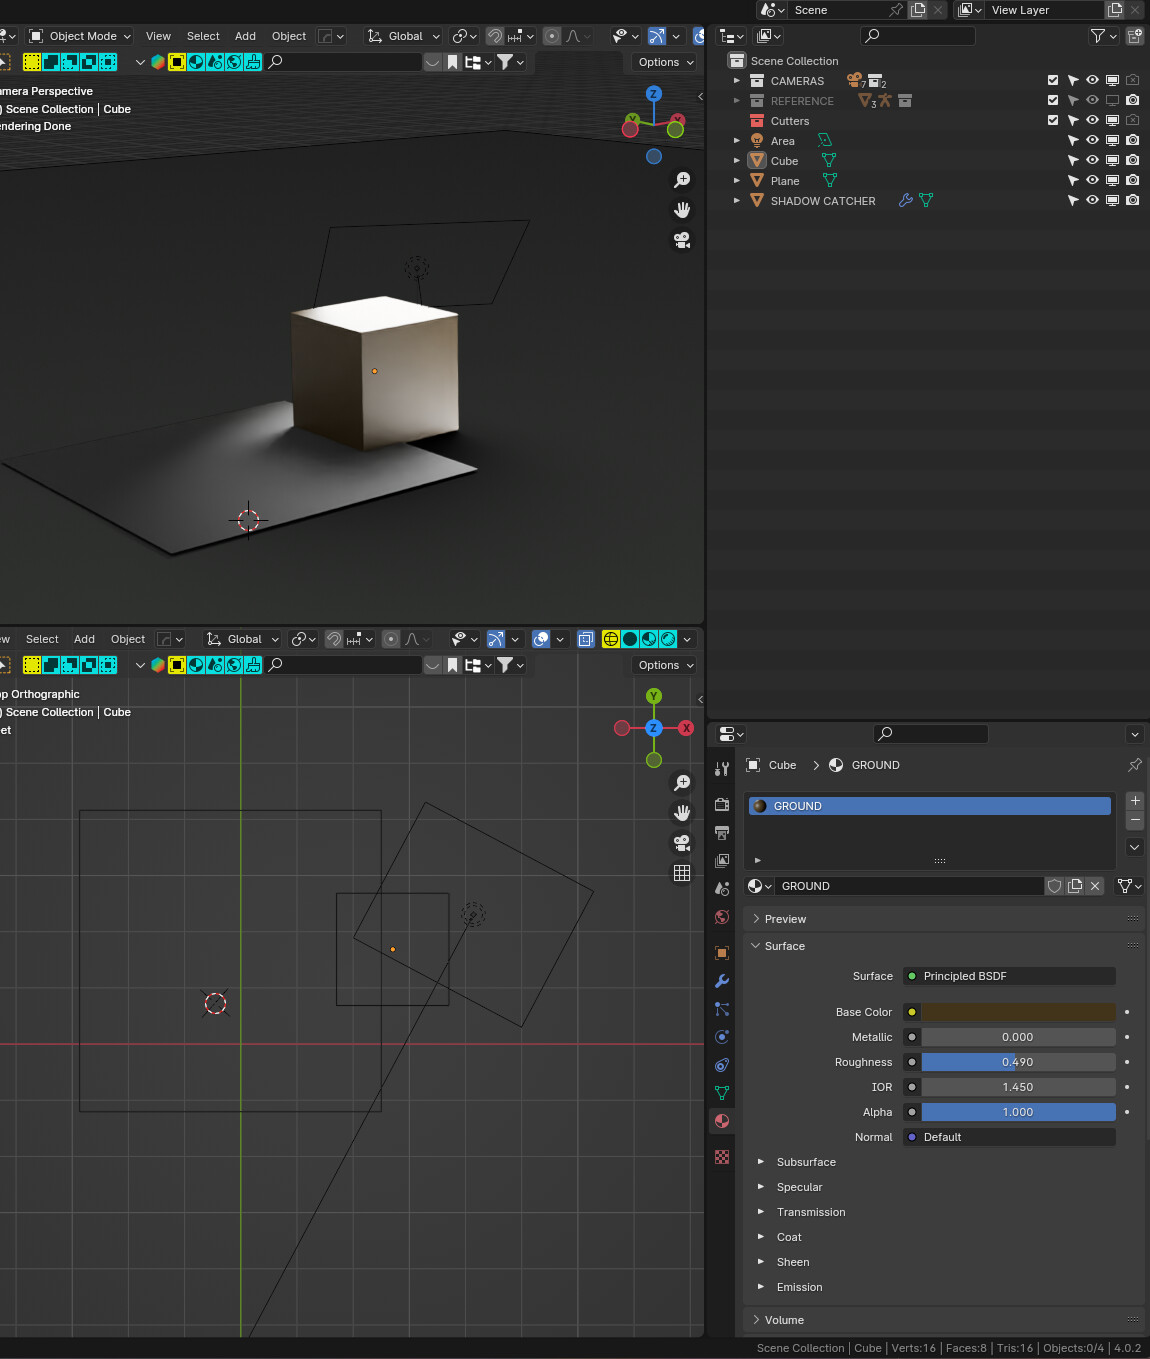
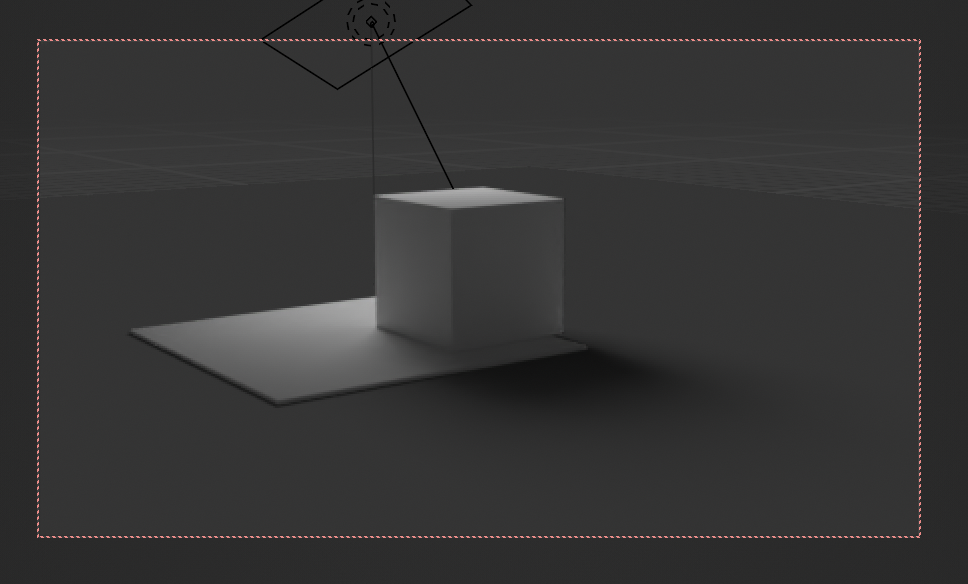
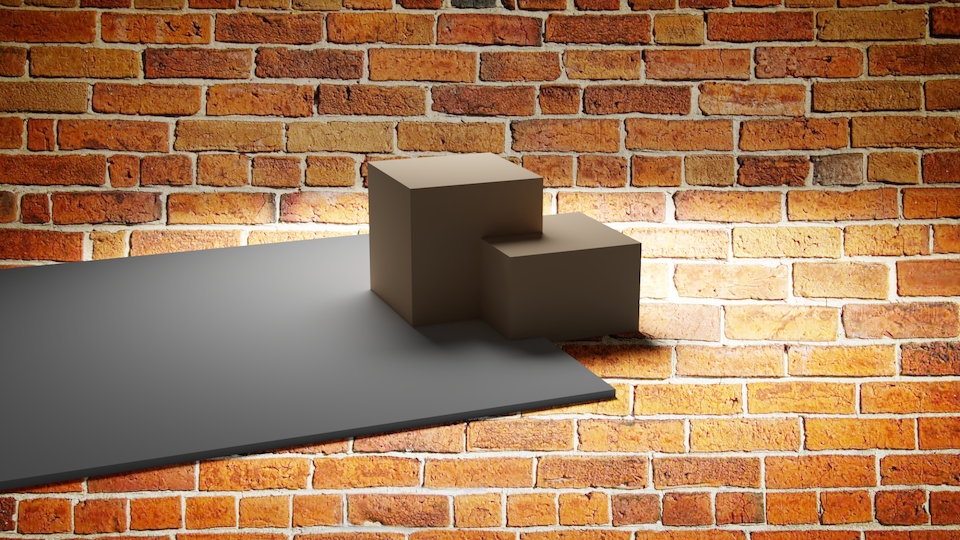
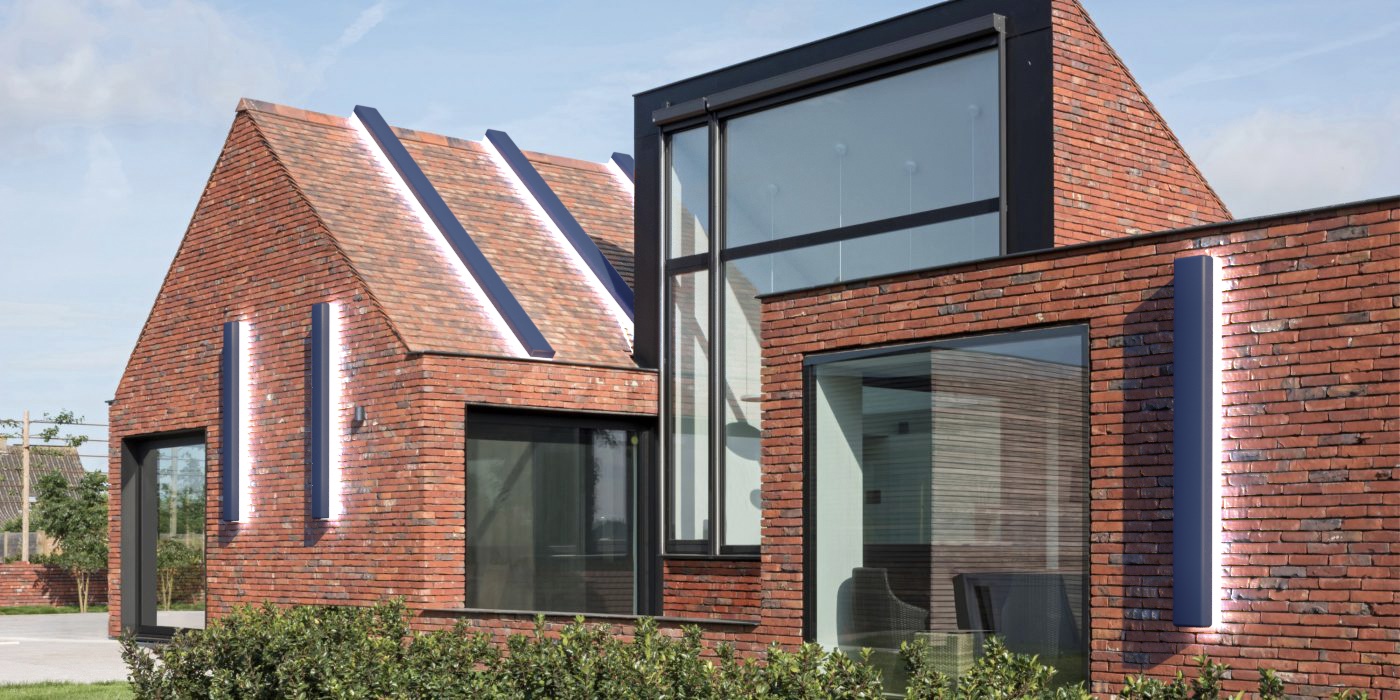
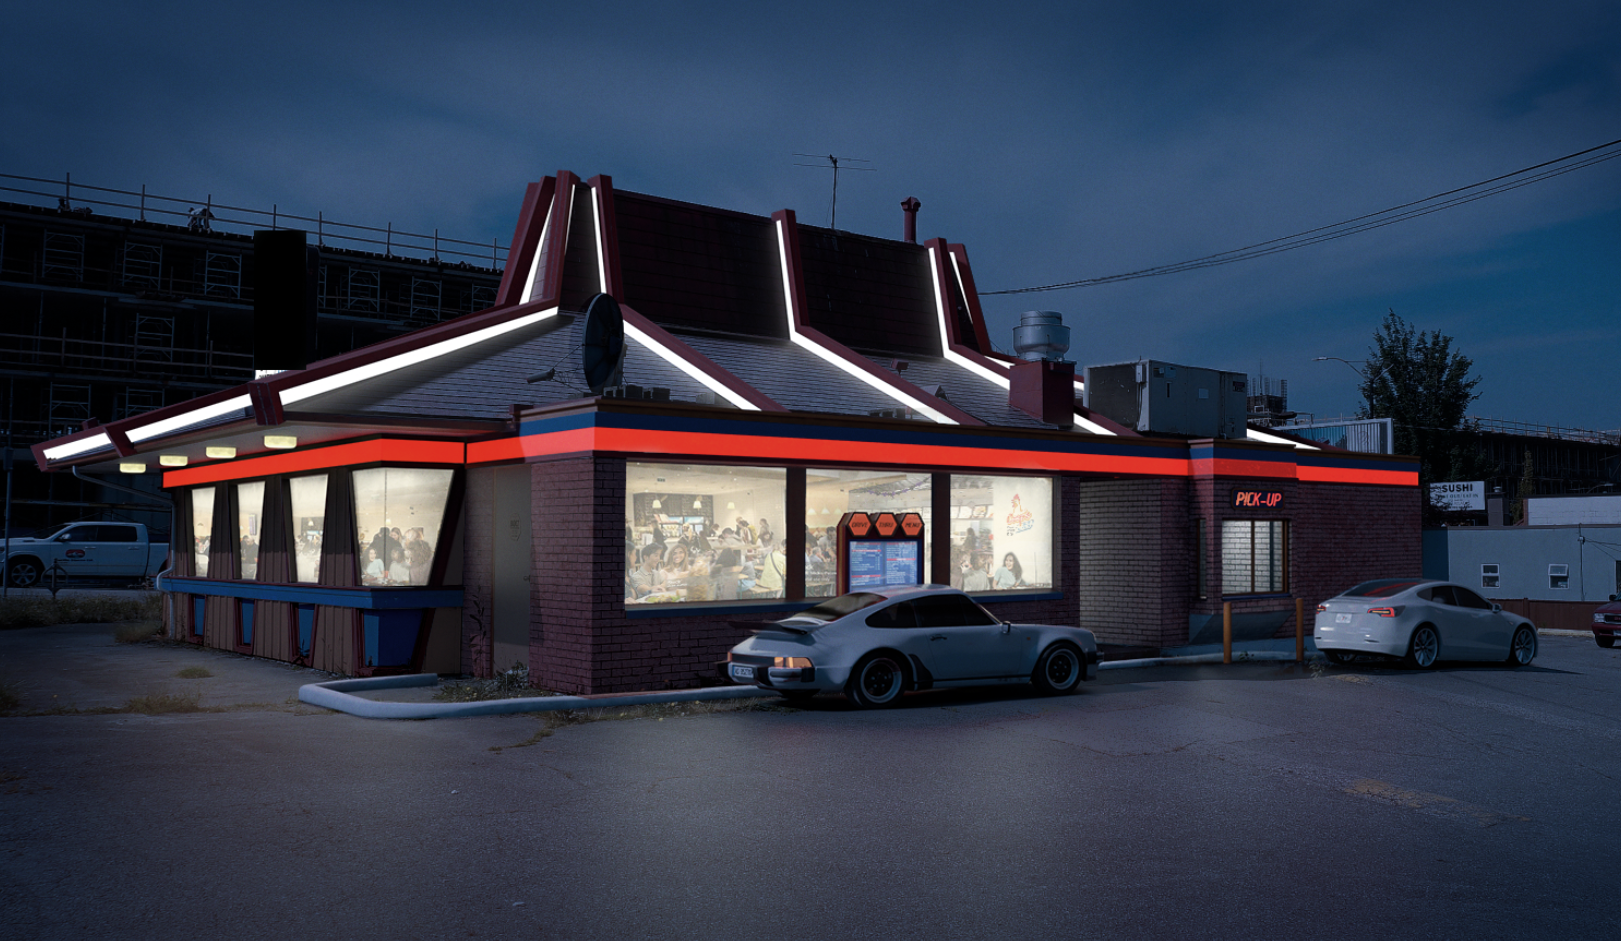
Oh, so you’re actually in an easier scenario, then! Since you’re just adding elements to an existing scene, which themselves cast light, your shadow catcher pass will have both shadows and light, no problem. So that’d be the most straightforward way: just export your shadow catcher pass as an EXR along with your main RGBA, and put that layer between your background and CG, set to Multiply.


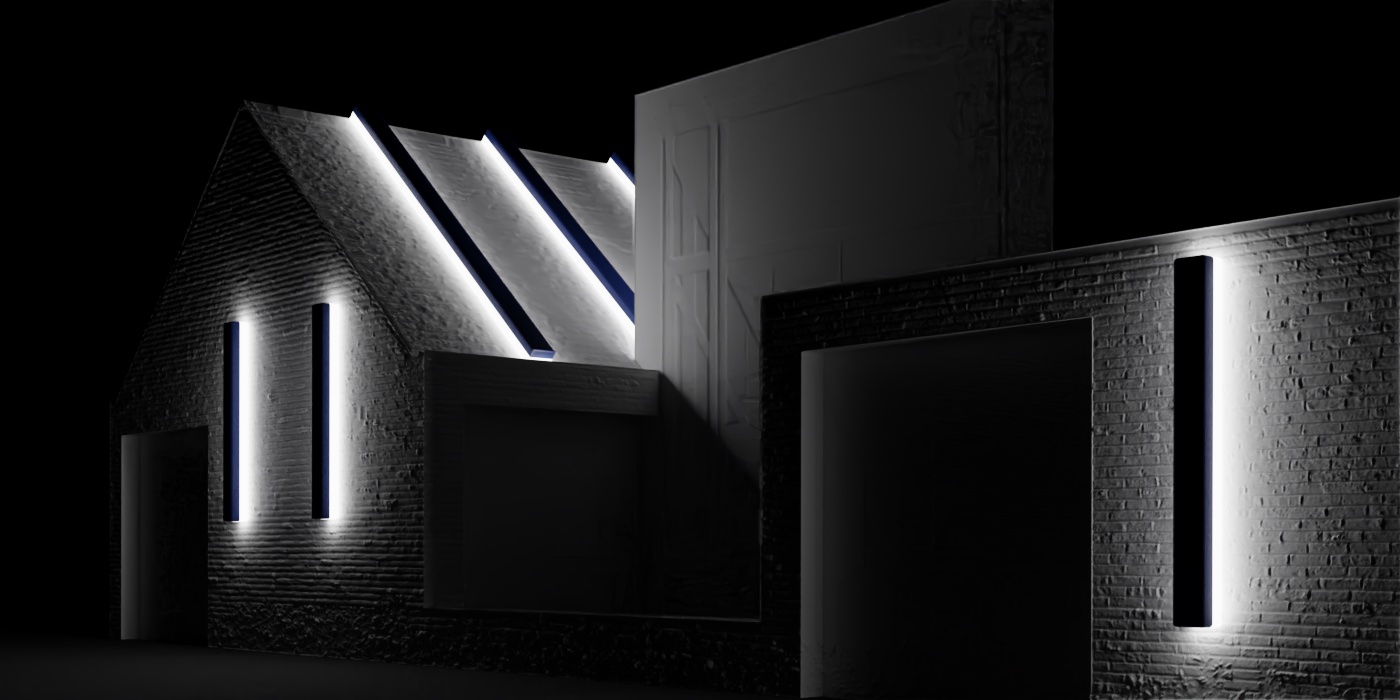
The thing about that, though, is that your shadows and illumination are both baked into the same pass, so you can’t adjust one without changing the other. So you could render out two Shadow Catcher passes*, one with the lights turned off (meaning you’ll only get the objects’ shadows in the pass) and one with the objects set invisible to shadow rays (so they’ll cast light, but not shadows): you’d end up with an “illumination” pass and a “darkening” pass, both of which still get layered in and set to Multiply, but can now be controlled independently. (Or, again, you could turn the pass off for your main beauty render, so the shadows carry along as black blobs right there in the RGBA—again, though, you lose some control there: you wouldn’t be able to color-correct the objects without changing their shadows too, and vice versa).

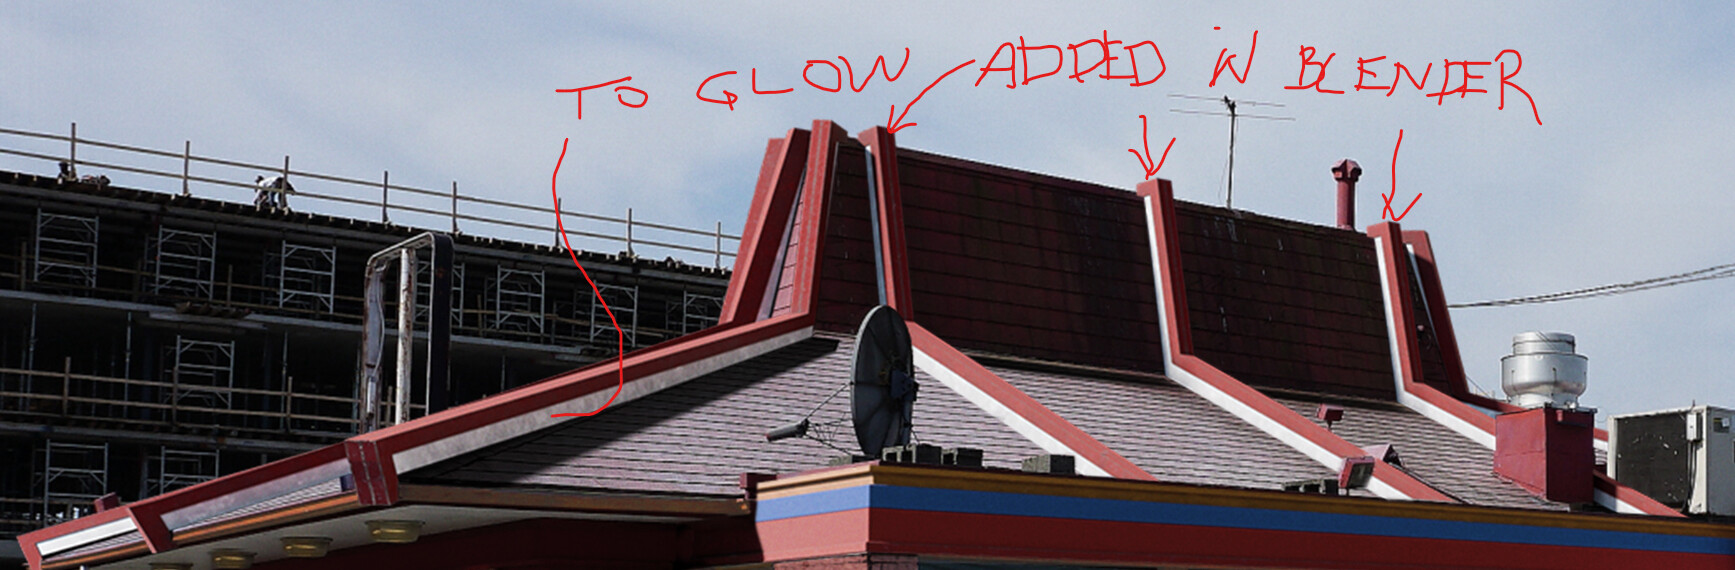
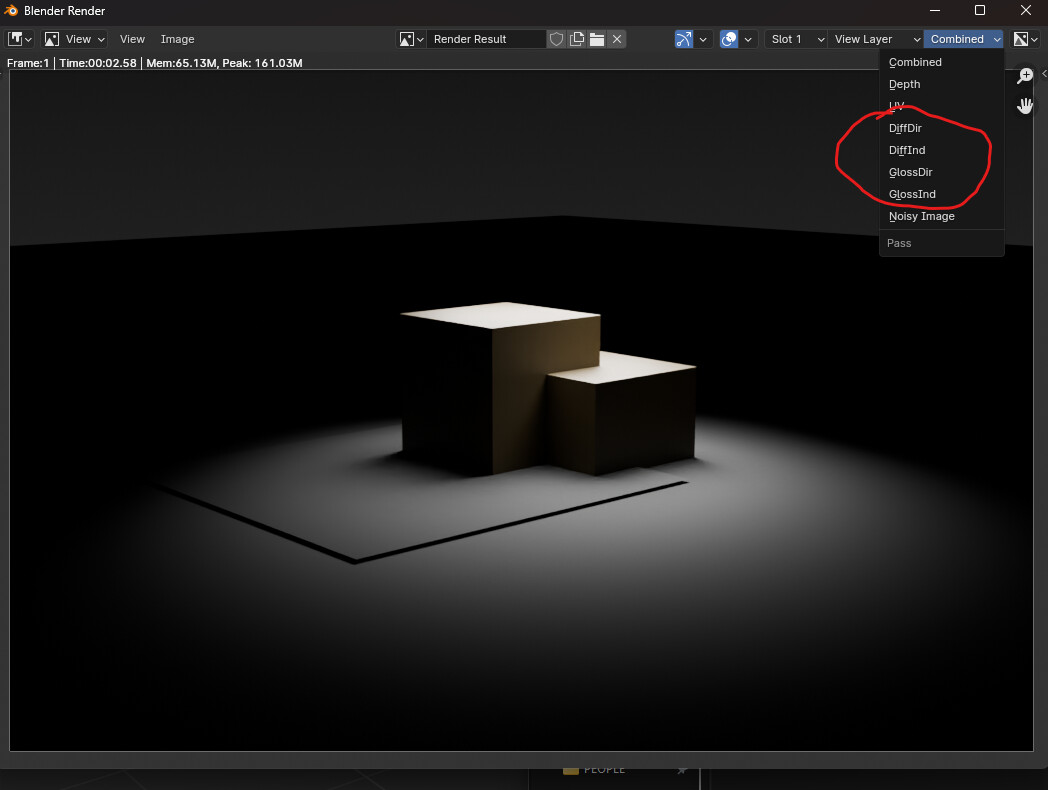
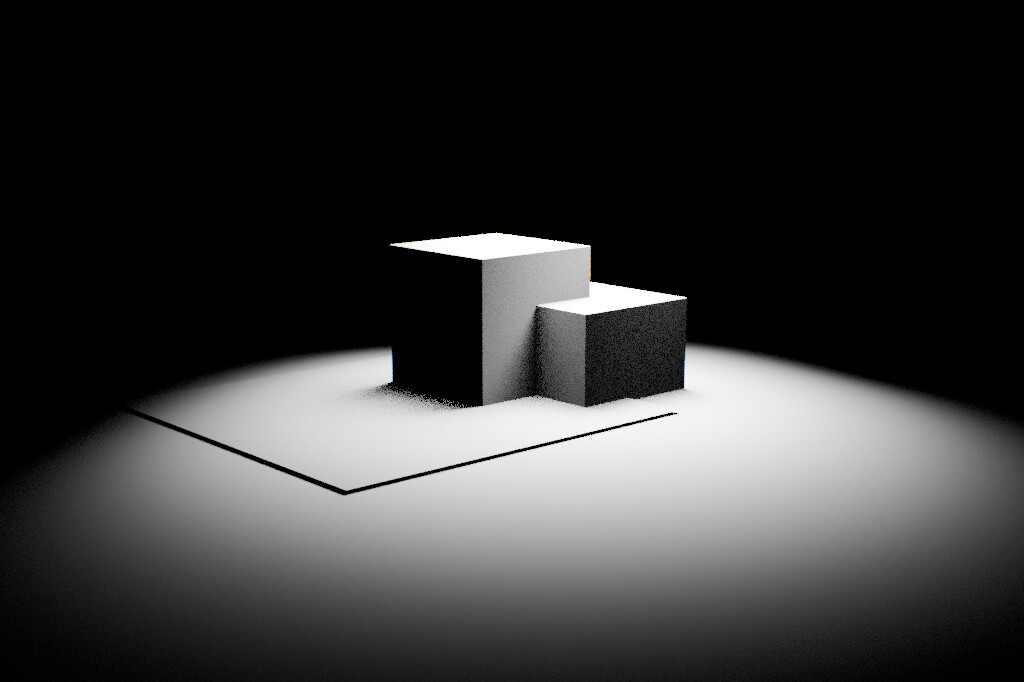
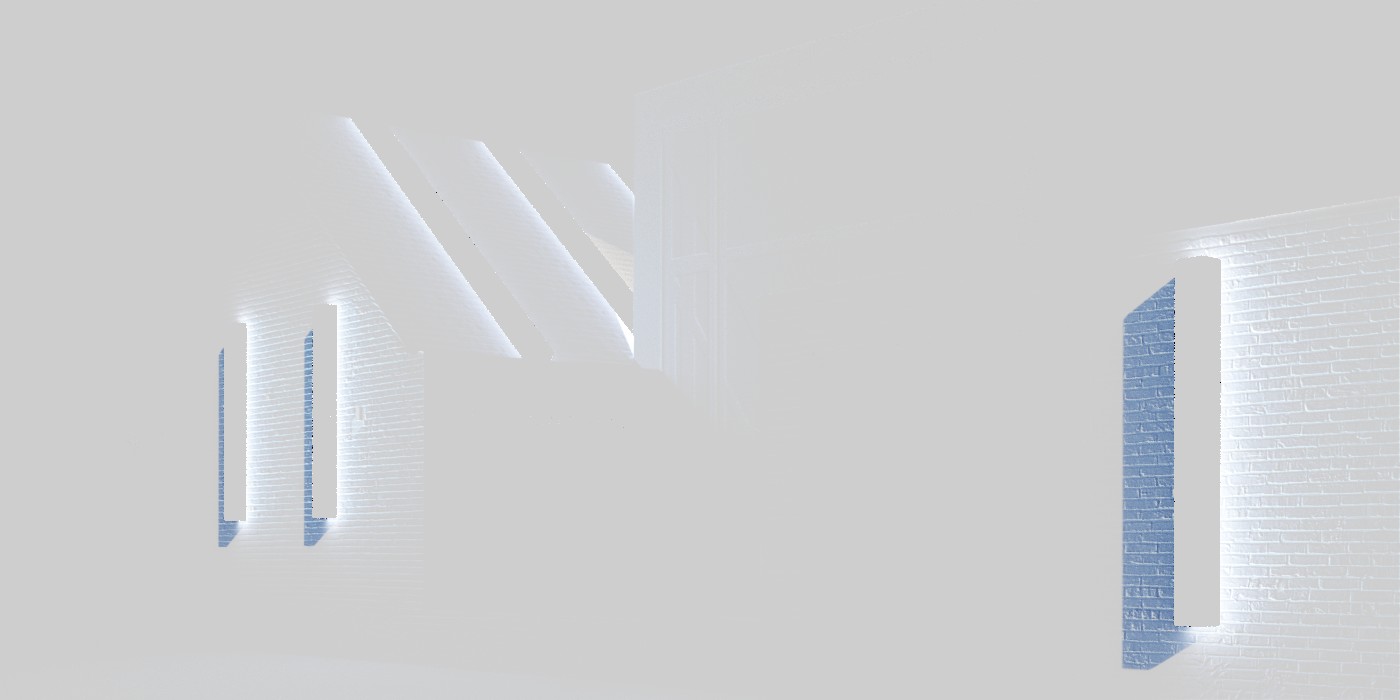
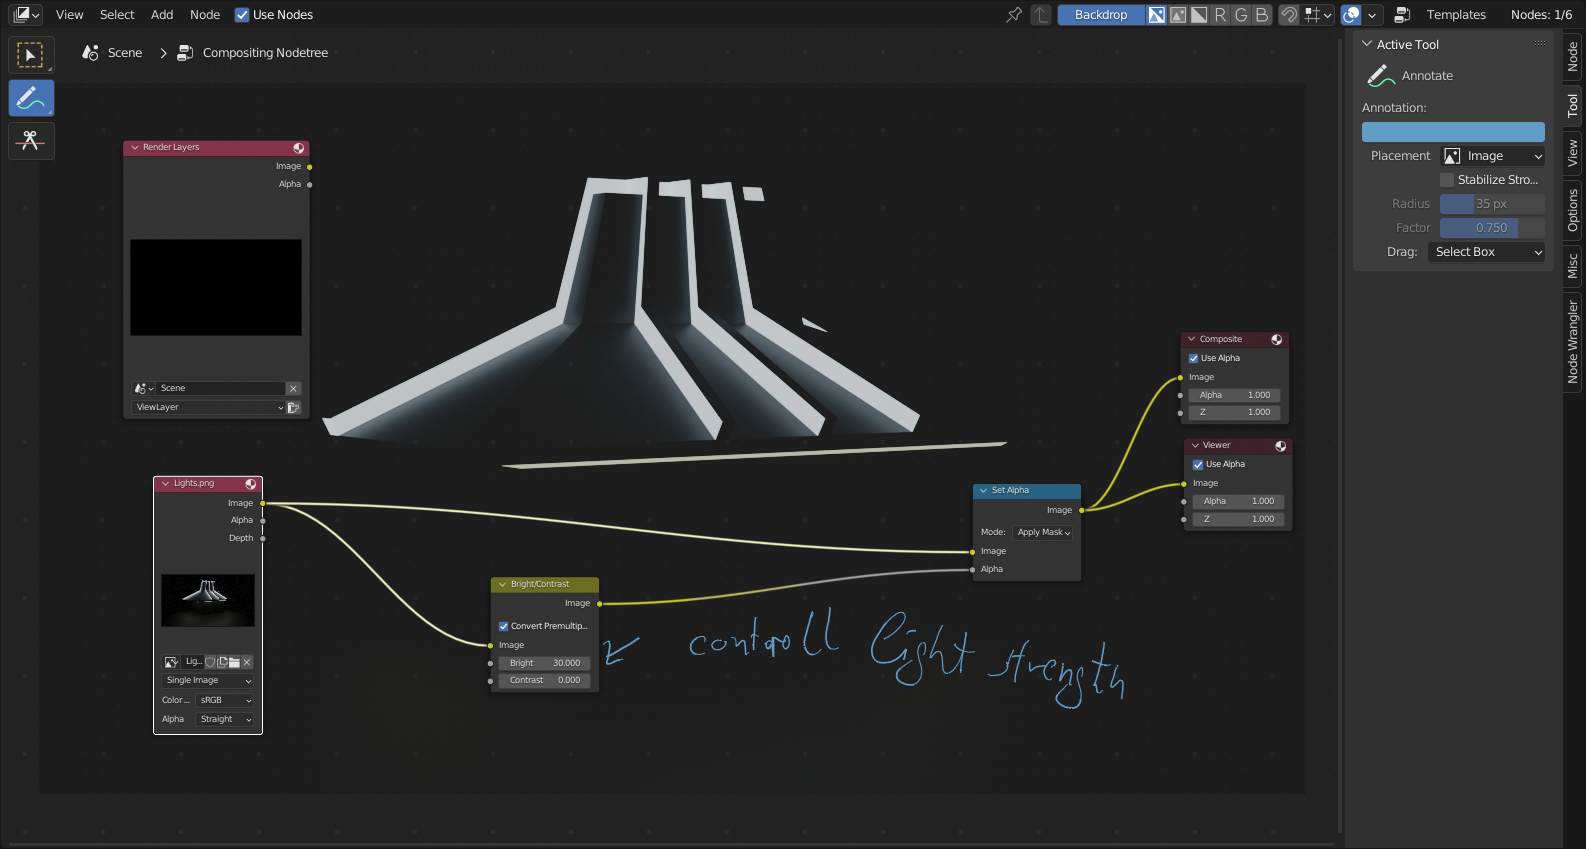
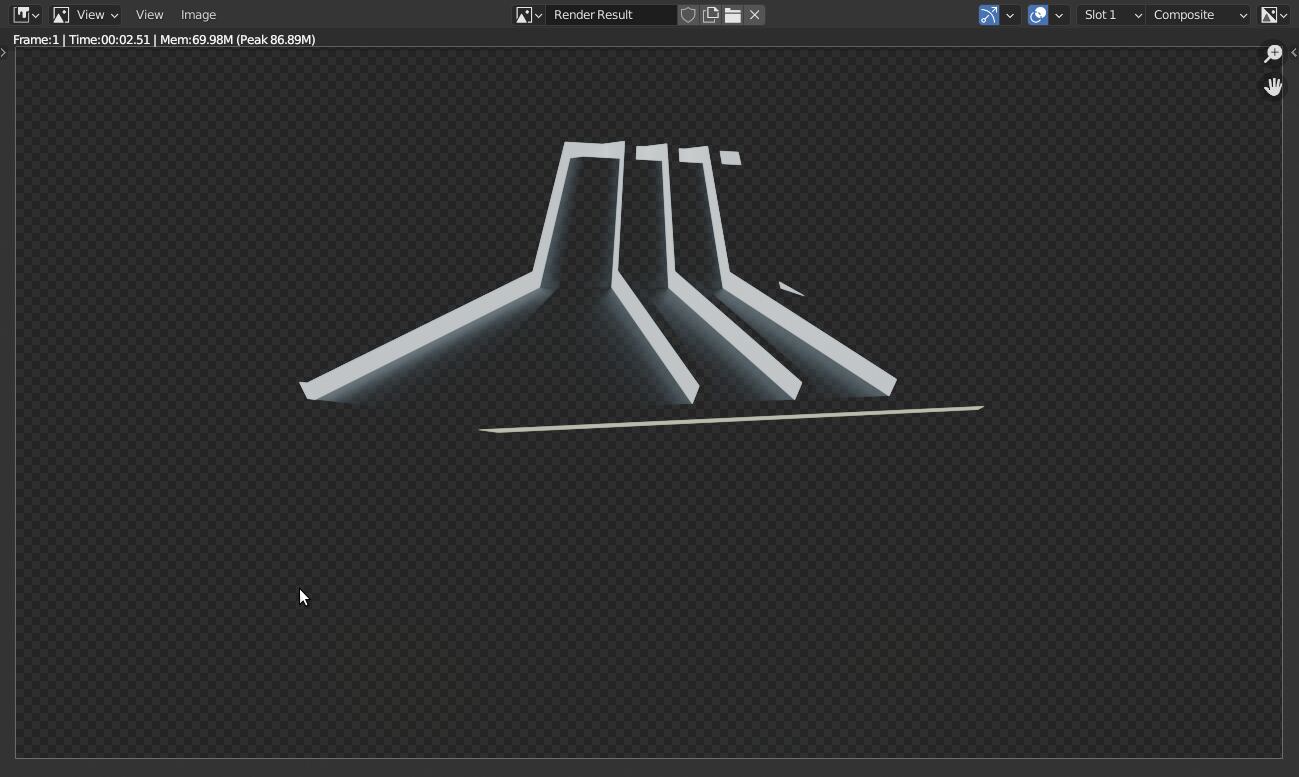
Another option, if you’d rather not mess with EXRs and 32-bit (necessary for the superwhite values to work correctly), would be to render that extra “lighting pass” I talked about: simply setting the building to white, and turning off everything but the light sources (Or, yes, using a lightgroup (which skips the “turning off other light sources” part, but still requires changing textures if you have any—in this case, I’d projected the house image onto my blocking geo for bounce light and bump mapping), or grabbing the DiffCol pass from the final render (which still requires turning off the other light sources, but skips the material-swapping part, since it’s just illumination divorced from surface colors).)


You can then use that render as a mask for whatever fully controllable color corrections you want: changing color, contrast, brightness… (you could even try using it as an inverse mask for your day-for-night look, so the rest of the scene gets dark & blue while the illuminated areas stay the original color? I dunno, could be interesting to try.)

*You could also split one Shadow Catcher pass into two by clamping A’s values at 1.0 (so it only has values 0-1, and can’t brighten) and B’s below 1.0 (so it only has values 1+, and can’t darken), and while I imagine that’s possible in Photoshop, I’m not sure how, as I haven’t really touched the program for a few years, and never worked much with 32-bit float back when I did. You could easily do it in the Blender compositor on the way out, though, splitting the one pass into two and saving them to separate outputs.

4 Likes

Thanks Carter. Your dedication and effort to clarify this for me is insane. I much appreciate it. However, i dont have a building per se. What I have is a photo of a building onto which im modeling some elements. It appears in your example that you have a model building inside blender. I’ll review your notes and try to implement anyway onto the shadow pass with the EXR as mentioned. Fingers crossed… gosh I wish blender just had a dang “light catcher” that is transparent like shadow catcher.

No, I understand, that’s why my example was exactly that: a photo of a building that I lined up in perspective and roughly modeled. Isn’t that what you have? There has to be some stand-in geometry to catch the shadows, wasn’t that the whole point of all this? That would be your “model building.”

And Blender does just have a dang light catcher, it’s the Shadow Catcher we’ve been talking about. I don’t think you’d want it to work exactly like the dark shadows, since without the ability to be additive or multiplicative, the only way to bake the light into one transparent PNG alongside the shadows would be that solid method I mentioned, where the light is just a solid color replacing whatever’s behind it (which looks pretty funky!)

3 Likes

I’ve tried this every way I could think and my shadowpass is still not catching the light, even when I save it as an exr. I think Im going to have to give up on this or find a video tutorial step by step…Im obviously missing some steps here. Probably have to see what settings need to be turned on and all that. This can’t be this difficult.

If you reimport & view the exported EXR in Blender, is the data there? If it is, that means it’s getting lost on the Photoshop side. Is your document set to 32-bit? If it’s not, Photoshop will clamp values above 1 and you’ll lose those overbright values that create the brightening effect.

The exr comes into photoshop as a normal color render with no shadows. I dont know anymore. I give up.

Okay… i didn’t followed directly from the other thread to this… and now i just took a quick look… ( :+1: @carterbk have to re-read this… )… but nonetheless a very very quick test scene; no lights (no env nor lamp), black mat (blue in the viewport) two light mats (bluisch but greenly in the VP and yellowsh but orange in the VP (under roof) … do not ask why…) :

as rendered PNG:

and composed because i didn’t bother with alpha in the orig render and didn’t want to play with exr…)

It’s a bit difficutl to see but there are the dark grey crossed underneeth
Or… have a look here…

…so this was just some minutes up to half an hour (mostly typing and saving image :wink: )

(the ligth on the ground is a bit problematic…)

So now…

  • either i just didn’t get the initial problem
  • or my weirdly playing arround may give some new impulses…

…and… i have to re-read @carterbk solution :sweat_smile: ( looks really nice…)

1 Like

thanks! this seems to give some better light than my photoshopping hack…yours gave me this result with a screen blend mode in photoshop:

and my earlier hack gave me this… I notice that yours retained my emissive light panel texture (the red strip) and better retention of the asphalt texture when compared to mine which looks flat/washed out:

Yeah, this the exact method I was talking about back at the beginning, where you render on black and use the brightness as alpha, giving you “solid” light that obscures what’s behind it.


Or, if you then set it to Screen, it’s the other one I mentioned back at the beginning:

1 Like

As i said… just had a quick look at yours , remembered my “previous” comment…

…render on black… and then quickly/wildy did “something”…
…so this is a “parallel” development of ideas… or mutual reassurance :wink: