Light/Shadow problem with eevee

Hello !
I’m brand new to Blender and recently decided to learn how to render on Eevee. I’ve only used Cycles so far because I preferred the style but I’d like to do some animation so I need to learn Eevee which allows me to render much faster.

So I decided to follow this step-by-step tutorial: https://www.youtube.com/watch?v=qKZQaBkVcT4&t=1386s

I had no particular problems until I had to manage my lights in the volumetric fog…

Indeed, I was able to get a good result in my viewport, but once the rendering was finished, I had a scene with shadows flickering all over the place. Here’s an example: https://youtube.com/shorts/X-Ti2t_r8-4?feature=share

My other concern is that sometimes white dots appear and disappear where I’ve put pointlights in the buildings (visible on the GIF above).

I was very careful to hide each light behind a wall, so that they’re never in direct contact with the camera, but there’s no difference…

Also, in front of my ship, there’s supposed to be a kind of headlight that’s visible in certain angles in my viewport but invisible in the render, would you know why?

Am I setting up Eevee wrong? Are there any specific things to check before working with volumetric lights and fogs?

I’m using a MacBook Pro M2 max 32Gb RAM with Blender 4.2.2 Please let me know if you need more information about my scene or my Blender settings.

Thank you very much for your answers

It seems to be a problem with the reflective material, but please refer to the link below to see if it is the same problem.

Or, reduce the reflection of the material in that part.

If it’s another cause, I think we need to find the cause.
EEVEE is different from Cycles, so it is unlikely to be a problem due to rendering noise. :thinking:

I think I see more than one type of flickering here.

  • There seems to be flickering on the surfaces themselves. I would check the camera’s “clip start” and “clip end” values. It’s important to adjust them to the scale of the scene. The clip start shouldn’t be smaller than it needs to be (you don’t need to see objects 1 millimeter in front of the camera) and the clip end shouldn’t be much farther away than it needs to be (you don’t need to see things 100 km away). This is also a concern in Cycles, but Eevee is more sensitive to it.

  • I see a big dark flicker in the volume. For this, you might need to adjust the volume settings. The first thing to adjust would be the range. Volumes in Eevee work on similar rules as the clip depth settings, the volume shouldn’t be visible closer or farther away than your scene needs, or you are wasting precious samples where they don’t matter and spreading the volume’s quality thin.

  • Also, you may need to increase the quality of the main volume settings. This means making the “resolution” finer (ex. use 1:2 instead of 1:4), increasing the “steps” and the “max depth”, and possibly increase the main render samples, as it does have an effect on the quality of volumes.

Hello! First of all, thank you two for your answer!

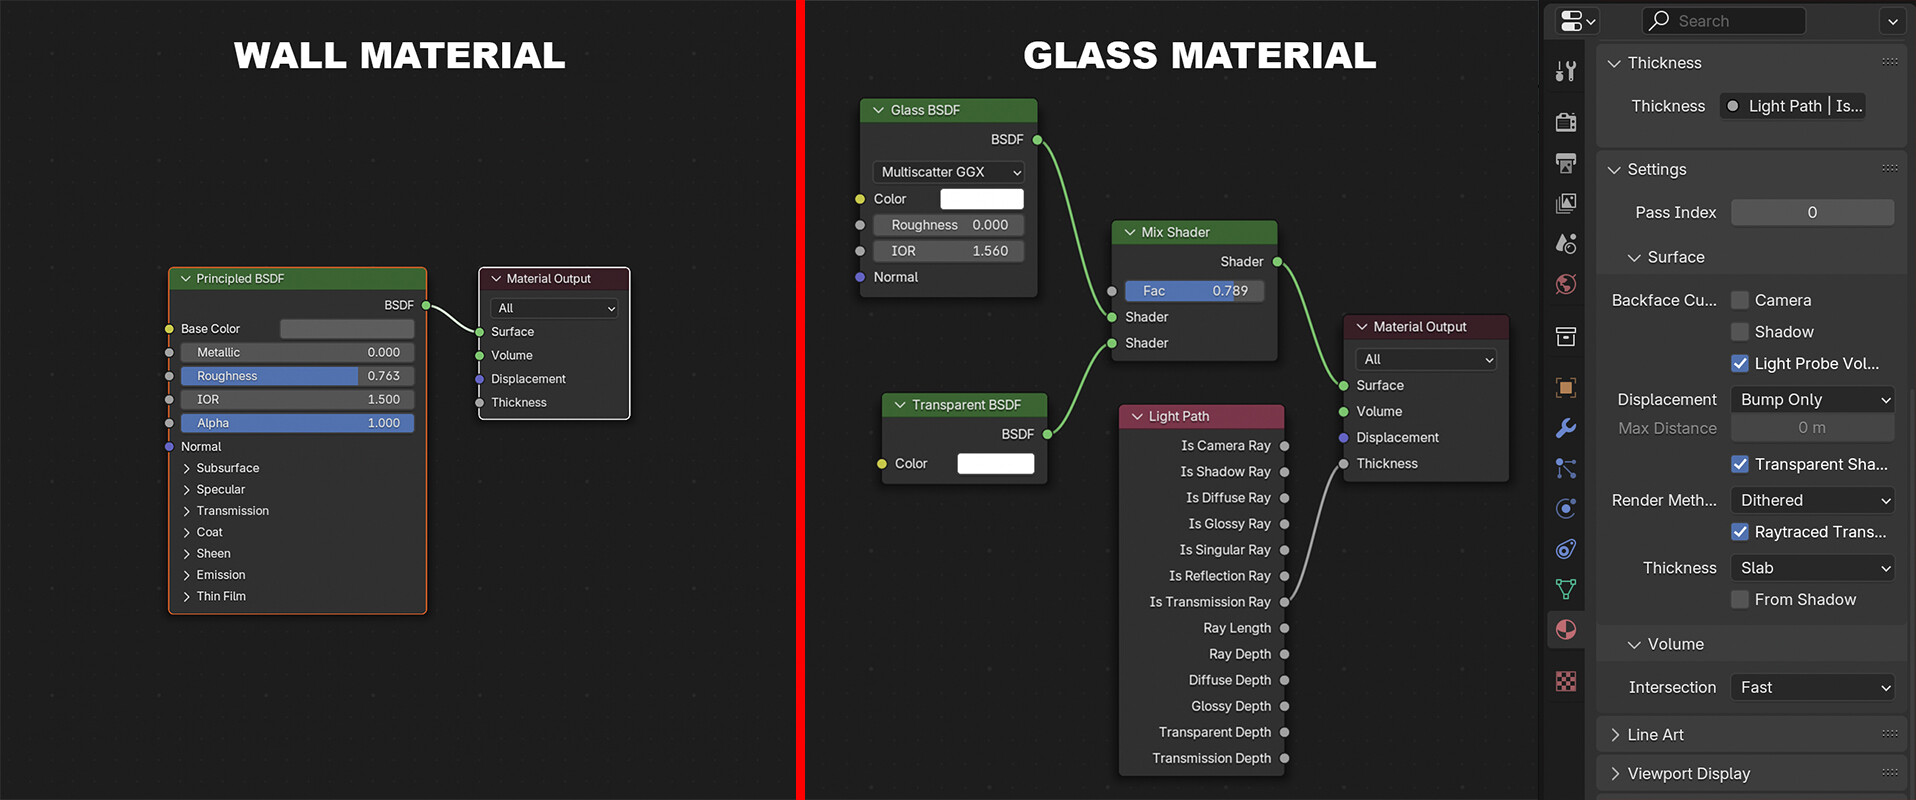
What I don’t understand is that my building contains only 2 materials:

  • 1 simple gray color for the walls

  • 1 glass material

I’m trying to play with the roughness and IOR parameters in the shader editor, but I can’t get a good result. I’m trying to achieve a perfect view inside the lit apartments (like real windows). I’d also like the large area light to reflect diagonally on the building’s windows. By changing the roughness and IOR values, the interiors become blurred or the area light reflects too much on the windows and masks the interiors…

I’ve tried a lot of tutorials to get different aspects of glass and have tried several things: but the light problem doesn’t change. Once I’ve finished rendering the animation, I see that a lot of things flicker. Some frames are ok, but many others have problems, unfortunately…

I finally tried redoing the whole scene.

I recreated the buildings and their textures and replaced the point lights with area lights pointing upwards. The flickering white dots have disappeared from the render, but you can still see frames where the light leaves the room, and I don’t really understand why.

Here is my new render :

https://www.youtube.com/shorts/sT_QrmFKTfA

I’ve also found that by bringing my camera closer to the scene, the problems seem to be less present. I’m using an orthographic camera and when I wanted to choose my frame I had put the camera very far away, which is a mistake. Now my camera is super large but much closer to the buildings.

thank you again for your help

*Here are my EEVEE settings for raytracing and volumes. I had already set the resolution to 1:1 (tried so many things)

That is, in my opinion, a weird glass material. The way you have mixed the glass and transparent is going to cause weird double images. Usually, I would plug “is shadow ray” in the fac of the mix shader, so the transparent is used only for the shadows.

I did it with a principled bsdf here, but same principle.

Also, why is “is transmission ray” plugged into the thickness? That makes no sense to me. I would just plug a “value” node into it so I can choose how thick the refraction is.


But anyway, that’s for refractive glass, which is a glitchy approximation in Eevee.

The windows of a building have so little refraction that it might be less trouble to completely omit it for an Eevee render and build a fake glass shader out of transparency and reflection.

This should give you a good approximation of a glass pane for Eevee. This is going to be rather noisy at first, but the mesh has a simple shape, so you should be able to switch the render method from “dithered” to “blended” to get a smooth result and solve that problem.


For the flickering, does the model have overlapping geometry? This looks a lot like z-fighting.

Thanks for your explanations!

So, I changed the glass material and copied the nodes you showed me but now my scene is once again full of light and shadow errors… (exactly as in the first rendering video I sent on my first message).
In fact, I have the impression that my problems all come from the same place: glass composition.

I started using blender 3 months ago and I’m still having a lot of trouble managing glass textures (even more so on EEVEE). I don’t know much about nodes and I can’t figure out which parameters I can change to get the result I want. I’ve tried changing all the lighting in my scene, but I get the impression that the glass reacts strangely to my lights.


As for the flickering, in fact my building is composed of a single block that I duplicated using the array modifier. I’d forgotten to check “merge” in the array settings, perhaps this will help remove overlapping? or do i need to apply the modifier ?

Here is how the glass is made with old eevee version :

I was thinking of going for something simple when I decided to redo this scene hahaha

Are there faces between the blocks that are being arrayed? Faces that end up superposed once the modifier is active? The merge option can help with that, but there is an other option I would consider.

Is each room just a cube with a deleted face? If it is, you should try adding thickness to the walls. Having single face walls between rooms is asking for rendering problems. You could do this by doing a “solidify” on the walls.

If this doesn’t do it, would you be willing to upload the file? I could tell you exactly what the problem is if I had it.

Sorry for the delay in replying, I have a lot of work at the moment and I’m creating this in my spare time.

I tried applying the modifiers then merge>by distance to remove duplicated elements but “removed 0 vertices” so I don’t think I have a problem with faces sticking together?
The apartments are made up of a room cut in two with a few elements around it, I of course applied a solidify before applying it so there’s thickness everywhere.

For my scene, of course, I can send it to you:

Thank you for the time you spend helping me, it means a lot to me

After looking at the scene, it appears the glass’ blend mode cannot be set to “Blend”. I didn’t realize you had multiple layers of glass visible through each other. The blend mode can have trouble understanding the depth of multiple layers. This is a bit unfortunate, because the dithered mode takes more samples to render cleanly, but it will look better.

I also see that the presence of the fog seems to cause some flicker. I am not sure what could be done here, it seems like a bug or limitation of Eevee. If this was my project, I would render the volume as a separate pass (using view layers and holdouts) and composite it back in, that might get around the problem.

I don’t know how much knowledge you have of compositing, but here is an example scene where I do just that. Don’t hesitate to ask if you don’t understand how it works and want an explanation.
example_separate_fog_eevee.blend (1.1 MB)


Rendering without fog and with dithered glass seems to solve most of the problem. I still see a little bit of flicker on some pieces, but those pieces do have overlap problems in their structure.

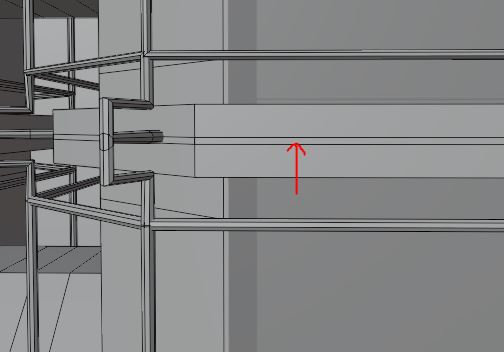
The borders between floors have a little bit of overlap.
overlap

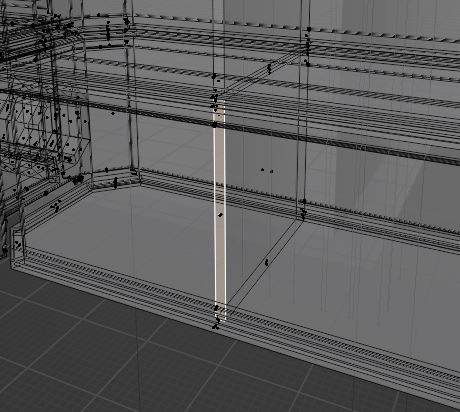
The front face of the interior wall seems to be overlapping with the glass.
wall_face

Oh okay, you’re telling me I can export my scene without the ambient fog and another scene with just the fog?

Being new to blender I focused on learning the basics of modeling and texturing. I’ve worked a lot with cycles but on still images, so I’m very interested to understand how you would have done it, as I really like the look of volumetric fog in my scenes, I find it adds a big touch of realism.
I haven’t tried compositing yet and I don’t know anything about it.
Here’s what I’d usually do:

  • export frame by frame in .exr format
  • import the whole thing into Davinci Resolve to manage my editing and colorimetry, then export as .mov.

I didn’t quite understand your scene. I see 2 nodes on the compositing that separate the fog from the sphere, but I don’t really understand what that does.
Also, how do I export this kind of setup? And how do I combine them afterwards? Do I need another program to reassemble the 2 at the end?

You could do it by exporting 2 separate renders, but there is a way to automate the whole thing inside Blender. That’s what my example scene does: when you hit render, it automatically does 2 renders and combines them with the compositor.

You need to first know about the existence of view layers.

By creating 2 view layers, you can break a render in different parts, which you can individually modify and put back together in the compositor. Each view layer allows you to change the visibility settings of each collection, which render passes are output to the compositor, and if you are in Cycles, the ability to override the number of samples (this can be useful if you have to render an object that needs a different number of samples than the rest, you can render it separately and save on render time).

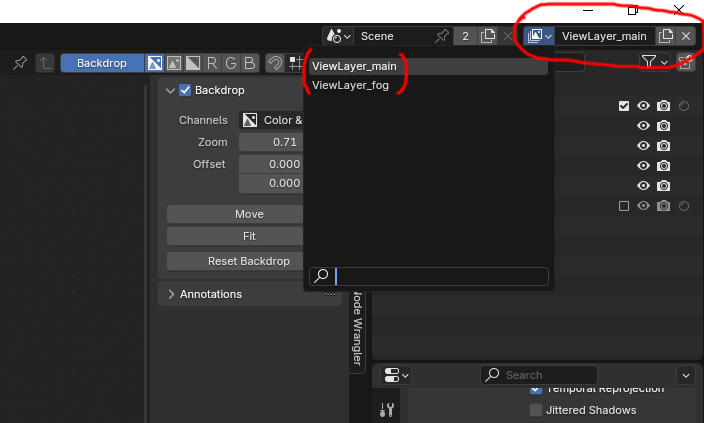
In my scene, there is a “main” view layer where everything is visible, except the fog, which is an object in a disabled collection. So this view layer renders the solid scene without fog.
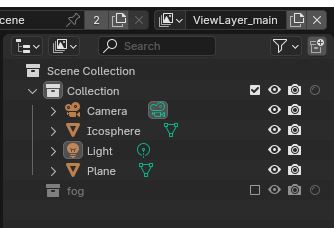
view_layer_1

There is a second “fog” view layer where I have made the fog collection visible, but the main collection has been set to holdout. Holdout causes objects to become transparent holes in the image, so the different parts of the image can be put back together as if they had been rendered together. You can activate the holdout setting in the “filter” menu.
view_layer_2

Here is what the holdout does. The objects become invisible, but in a way that still blocks what’s behind them, leaving only a transparent background. That way, you can just drop this render layer on top of the rest with “alpha over” and it will just fit perfectly, because the parts of the object that would be behind something else don’t get rendered.

In the “fog” view layer, I also added a holdout sphere object around the scene, so the entire background behind the volume can be transparent. If I don’t do that, there would be an opaque sky in the fog view layer and It would complicate the compositing. I did this particular holdout object using a material (the holdout feature can also be done in materials).


When you have your render layers prepared, you can just go in the compositor and duplicate the existing “render layers” node. You can then change which view layer each one uses.

Then, I combined them using an “alpha over” node, which simply uses the existing transparency of the render, no blending modes required. This is possible because I rendered the fog with a transparent holdout background, and because the non-rendered objects were carved out of the image with holdout, everything fits as if they had been rendered together.

At this point, everything should work and you should get a fully rendered image when pressing the render button.


Now, if you wanted to get really fancy, there is a way to go even further. You will notice the “render layers” node in the compositor also has a “scene” option. Blender lets you have more than one scene in the same .blend file. You can see the scenes list right next to the view layers list at the top of the screen.

If you were to duplicate the whole scene using this feature, you could have 2 versions of your project in the same file. You can then set one of them to render with Cycles and the other with Eevee and mix the 2 renderers automatically in the same render. One really great use of this is for adding Eevee volumetrics to a Cycles render. Eevee’s volumes looks almost the same as Cycles’, except they render way faster.
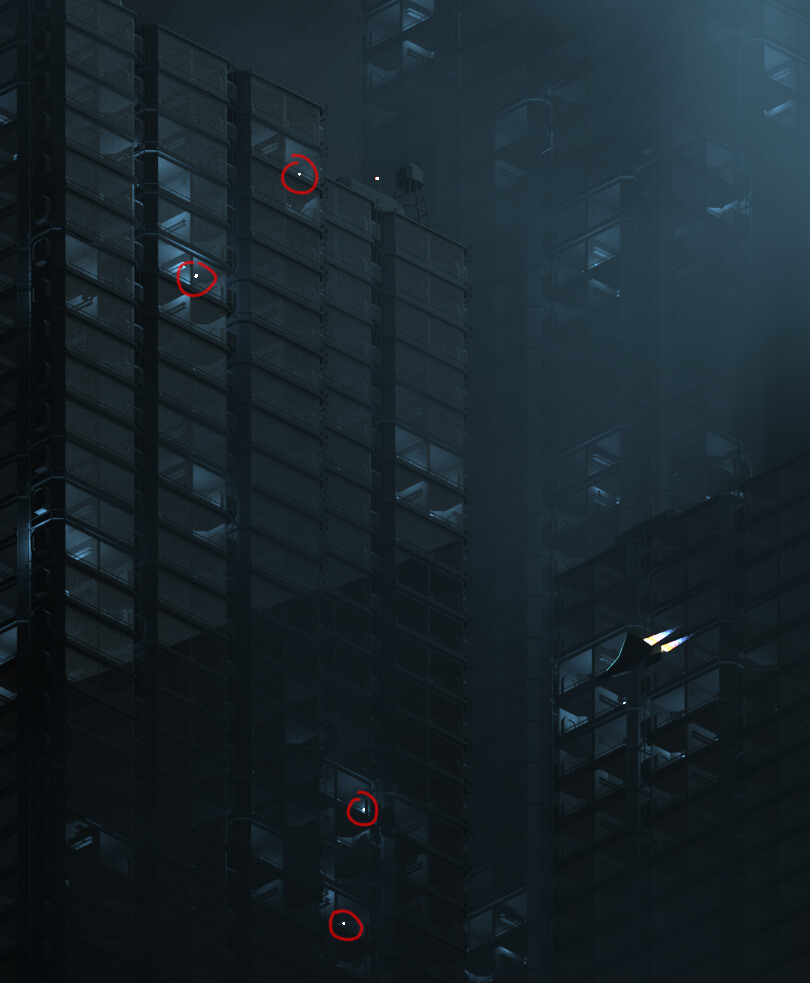
it’s completely insane, I didn’t think it was possible at all.

Thank you so much for all these explanations, it’s a way of doing things that I didn’t think was possible at all.

I have the feeling that I’ll be using this function absolutely all the time!

So I corrected the overlapping problems on my basic mesh, I created another scene with the Cycles engine, on which I imported all my instance collections. I applied the holdouts and updated the compositing tab.

I followed this tutorial to help me do exactly what you were talking about : https://www.youtube.com/watch?v=tWkQAeFzyH4

Now when rendering Cycles takes over the whole scene very quickly, including lights and geometry, and EEVEE comes on top to apply my volumetric fog.

I don’t know how it’s possible, but by separating the rendering with the 2 engines, I have a much faster rendering time despite using Cycles - it’s impressive.

I’d like to thank you very much for all the help you’ve given me, I’ve learned a lot thanks to you and I’m going to use these techniques in many of my future renders. You’ve taken me from frustrated to happy today, so once again: thank you very much!!

Here is my final render : https://youtube.com/shorts/Me2fJkS3fiE?feature=share

Volumetrics make a Cycles render way slower because of the way Cycles work.

Cycles renders images by sending light rays that bounce multiple times through the scene. Each ray of light can interact with multiple types of surfaces over its trajectory, which means that in Cycles, volumes also affect the rendering performance of diffuse and glossy surfaces, all surfaces are rendered together as a single big thing.

If the whole scene is covered in volumetric fog, everytime a ray is sent, it gets the extra task of continuously checking if there is volume over its entire path. And then the ray bounces off a surface and has to keep checking the volume for the entire lenght of the second bounce.

Eevee is different, it renders each of its features separately. This is less realistic, as different surfaces don’t fully interact together with the full optical realism like in Cycles, but is faster to render.


By the way, rendering the fog separately can be useful even if you render it in Cycles, because you can use fewer samples and you can denoise it separately from the rest. One of the big problems with fog is that it’s difficult to denoise, because the denoiser has to somehow treat the transparent volume and what’s behind it at the same time, and it’s not built to do that.

If you denoise a volume pass on it’s own, you not only get much smoother results for the volume itself, but the volume also doesn’t interfere with the denoising of solid surfaces.

If you want to render a volume in Cycles, you can get it to go somewhat faster by reducing the volume “max steps” and increasing the “step rate” in the render settings. These settings are a bit high quality by default and can be made to render faster.