Hi All,
I am kinda stuck on soft objects / cloth. IGE Pillows and Belts.
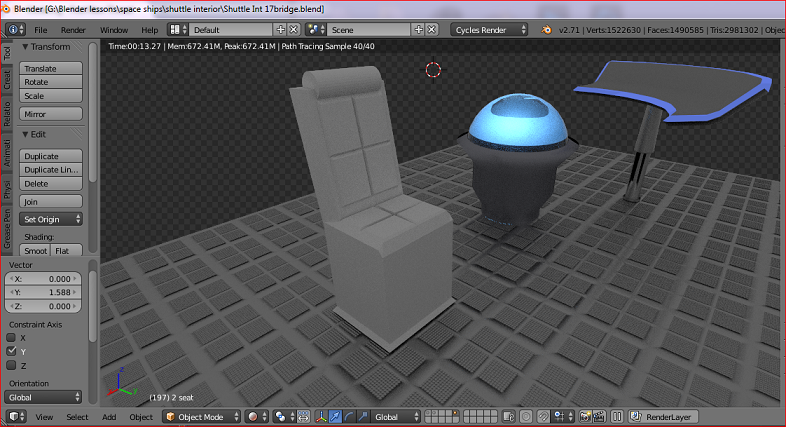
I have the hard surfaces down O.K. but I am wondering how to make a seat belt? A 5 point Harness For a seat like this…
Any suggestions, blend files you might want to share? I am kinda going blank here for the belt part. The buckle and attach point are in my head, but the cloth parts…? Like a pillow, I just have not been exposed to the knowledge yet.
Thanks for any direction on this. Here is a snap of the shuttle chair…I need a harness for.
Everyone could help you more easily if you post a reference photo from the internet of exactly what kind of belt you want. From the sounds of it I would just model the belt buckle connector part separately. Then for the belt I would just scale a cube down on the z axis. Extrude it to form the shape you want and add a subdivision surface modifier. You can use loop cuts to make the edges harder or the crease tool. Its gotta be really thin for a seatbelt. then texture it. I hope that helps.
Crease tool…I will look that up. Thanks for the name, and suggestion on how you would model it. I was really curious about creating a cloth look. Apparently according to your read, sub divide my surfaces is all. Thanks for your input.
WELL IF you know what they are, it is appreciated if you share them when replying… You know what I mean? Otherwise you kinda just litter a thread if you do not have solid input. FWIW.
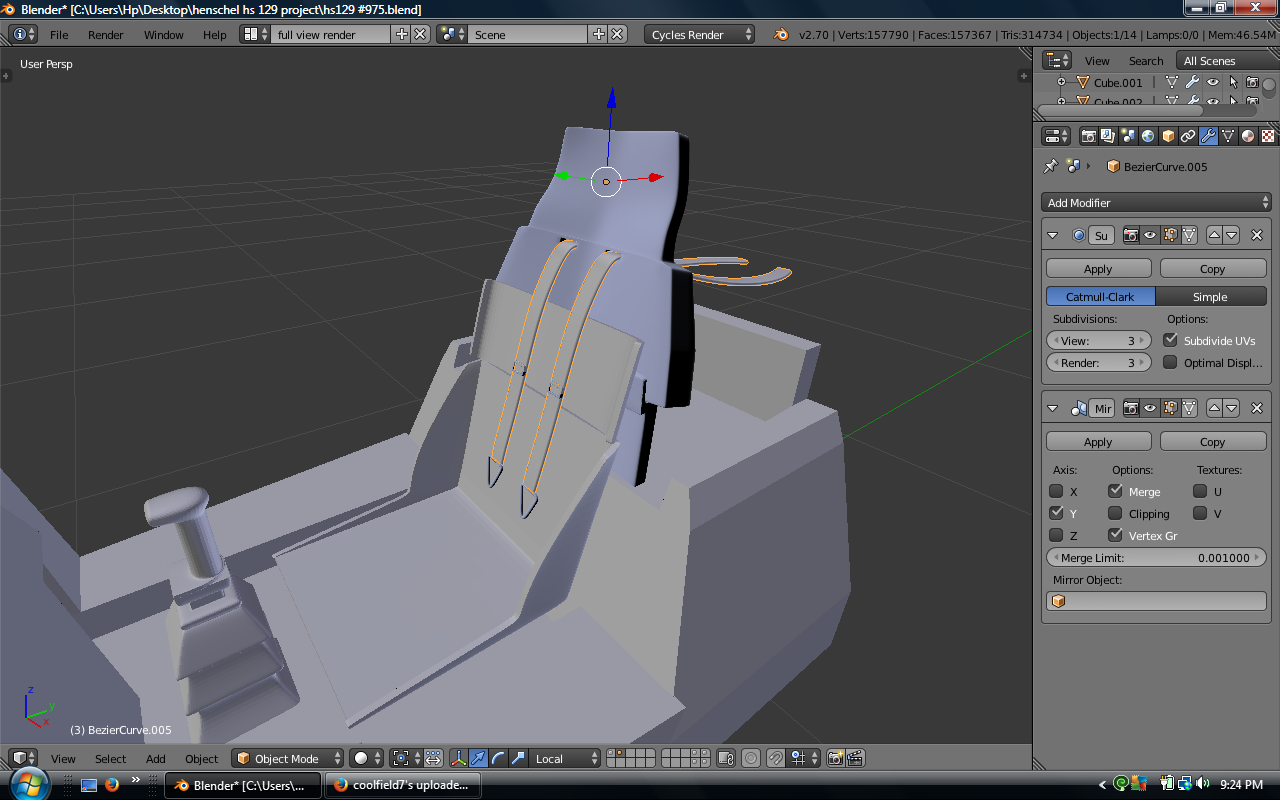
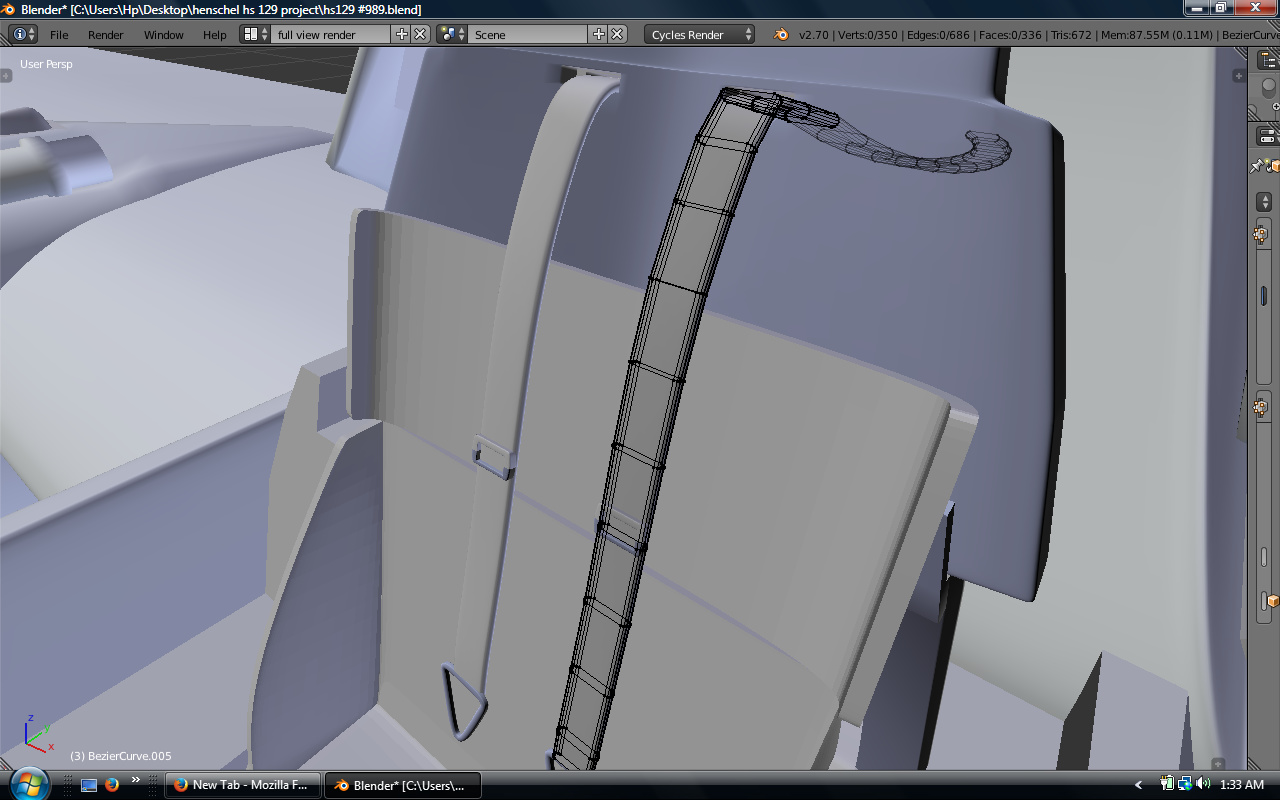
To make the straps you can do what I did for my planes seat harness. I used a bezier curve. Make the curve in the shape of the strap, turn the bevel depth and resolution up to what you want, change the fill to Full, and convert the curve to a mesh (ALT+C > mesh from curve), but it’s a long cylinder thing! Not to worry! Take half of the cylinder and stretch it out, and you get nice round edges and the strap. The other parts you can model.
Yes that was VERY helpful. Giving suggestions and screen shots really do help. Thank you! I will give yours a try. I am wondering; you did not provide a rendered shot.
You’re welcome! LOL the first attachment is a render. The final renders of my plane won’t have the cockpit too much in focus so I might just put on a simple cloth texture.
ahh that is what you do… assign it a woven texture / UV to get the classic weave. That was one of things I was wondering about. For some reason I am not getting the hang of modeling with bezier…? I am sure it is just getting to know the key strokes. Again appreciate the time you took to post and direct…
Yeaaaa. You might want to look up some tutorials on cloth though to see how to get a realistic material. I really don’t work with clothing at all. The bezier is a tricky fella. Opening another window with a top or side view can help manipulate it and you can keep an eye on it, many times I thought I was manipulating it along the Z axis but it was also being changed on the X axis. No problemo, good luck!
i thought to post here and in hopes of getting someone’s blend asset is all. Like a grid floor I have now… I can share it if someone were to ask…
That Bezier…Same thing over here about the axis. That will be one of my next challenges using that. Thanks for input. Oh no one can say you are working in the dark over there… In Ref: to your first pic of a rendered file that looks like Materials view it is so white! LOL I am the opposite, I work in low light work on my lights and buttons and so forth and then use “World” light later to bring it up to an ambient setting.
Gee… I was not asking about texture or material. It was all about harness shape, construction if you like. Construction, related to your seat model since there wont be animated or simulated harness which automagically would fit to the seat’s forms. Well maybe there is something like that but i doubt it’ll be free now with all the market tendencies… Textures are secondary. Easy. Easy since in your shot they always will be on a second plane and just briefly in the frame (if that is an animation ofc).
Continuing construction theme: if the harness is not rigged (well, maybe you should consider doing this if somebody in your movie will get into that chair) it’s a brief modeling and tedious positioning for the details of harness, different if seat is not taken or if there is some person in it.
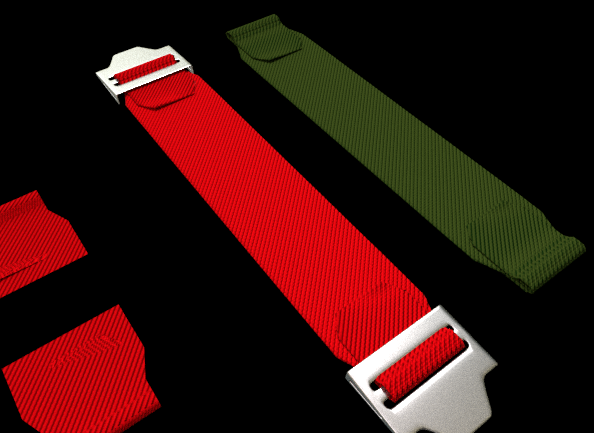
To the belts (i wont go into accessories - you haven’t provided any insights) :
add Plane, add Array modifier to it. Do not mess with values yet.
add Bezier Curve, straighten it in edit mode (scale all points selected Y to 0) and move starting point to 0,0,0 coord.
add Curve modifier to the Plane. Object - your curve’s name there.
in Array modifier for plane set Fit Type to “Fit Curve”. Add your curve’s name in.
From now, if you edit curve - Ctrl click with end point selected - it will grow and belt will be extended as you like. Select 2 points and w subdivide if needed. Rotate handles, Ctrl-T to tilt some point.
“yeah… but its razor sharp…” - add Solidify modifier in stack. Add Subdiv too while at. Array mod has 2 fields: Start and End caps - model some belt end and set there. Do not add any modifiers to the end parts - they will be taken from the belt Array itself. Do not even think of adding some accessories there - material will be overridden (even if there are several) for some unknown.
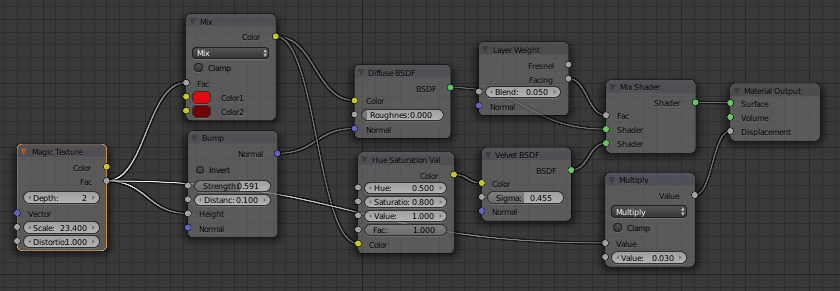
Now to the “shaders” which we all know is most important selling point…
Can this be used? Is it good enough for your scene?
Awesome Eppo, just awesome. Thanks, I guess my reply came off flippant. Not my intentions. Cannot hear or see personality on forums. Those are terrific. I went another route though… Due to the challenge of too much uniform without any ‘lived in look’ if you get me… I will keep this tutorial and play with it a bit later. YOUR help is always appreciated especially with the TIME you take to unravel the Blender Mystery.