So, me and a friend were wondering if it’s possible to make a Low Poly look like a High Poly, but without the High Poly model.
How?
Well we can simply do the unwrapping stuff and then, in photoshop, we do all the details.
With this high detailed texture/UV Map we export with Crazy Bump into a Normal Map.
Then we apply all the maps and supposedly it will look like a High Poly model… right?
Is it possible? Are there any “side effect”? Is it wrong?
The high poly model is simply a way to get the normal, ambient, spec, diffuse and bump maps without resorting to photoshop. If you are good at photoshop, you can do without the high poly model. Your method will work, especially if you are already very familiar with ‘high poly’ maps so you know what to paint.
It will work for surface and texture detail, but will not bend the light as a properly baked normal map would. It will still look like a low poly model wrapped around in normal mapped textures.
Normal maps are in essence mathematical models that contain the data required to bend the light around the low poly model as if it where a high poly model. It’s impossible to paint that.
I had an idea once to paint a grayscale texture over the model and use it as a bump map. And then bake that out to a normal map. But that still will not work as a proper high poly model.
What you can do is take your low poly, harden all the edges you want to be sharp, and subdivde the hell out of it. Use that as a base normal map, and then in gimp use proper layer blending to add in other normal maps from your surface textures.
Actually i have been trying to do some nice painting in photoshop and then convert as a normal map, but its missing something, it stills looks low poly.
Well, i guess there is nothing as making a high poly, we can’t simply simplify everything.
What about using image as a displacement map on a subdivided copy of the mesh? In essence the details of the image would be turned into geometry (a high poly mesh) that you could use to bake normals to the low poly. I’m no expert so maybe someone more knowledgeable could expand upon this method.
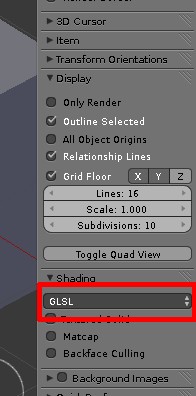
What you can try is painting your bump map directly on the model in Blender.
To do so, unwrap your model and assign a new texture to it in the UV/Image Editor, the color of the texture should be 50 gray ideally (as bump max will be black and bump lowest will be white, so gray should be a good base if you want to carve and extrude bumps, if you don’t carve but only extrude, you can then make the color of the texture full white) .
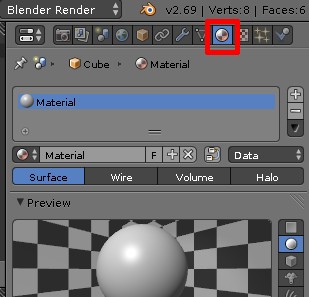
For that material, in the Texture panel set the texture you already setup in the UV Editor, set the Coordinates to UV and in the Influence tab enable “Normals” and disable “Colors”
An experience to do, seems pretty interesting honestly. I will consider it in future attempts and experiments, but now i«m really close to the dead line. Thanks
Well for know i will consider this thread closed, since i chosen the path of High Poly, after tryied to fake a Normal Map with a good texturing work in photoshop and still didn’t quite worked well.