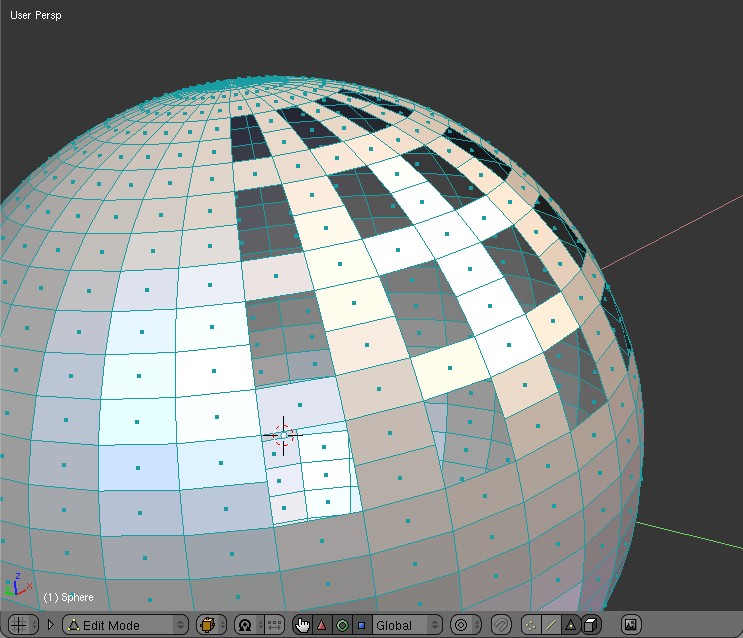
I have a grid made up of tiles (see image) and I have an object (sphere with bump). Now I need to recreate the surface of the sphere from the tiles.
Shrinkwrap does not work, because the grid is flat so the projection is strongly distorted. Also, the concave part of the object (bump on the sphere) would not be modeled.
So what I need is a method to make the grid follow the spheres surface.
That should be similar to follow path, but now in 2D.
I have no clue what to try next.
Hopefully, anybody out there can help me.
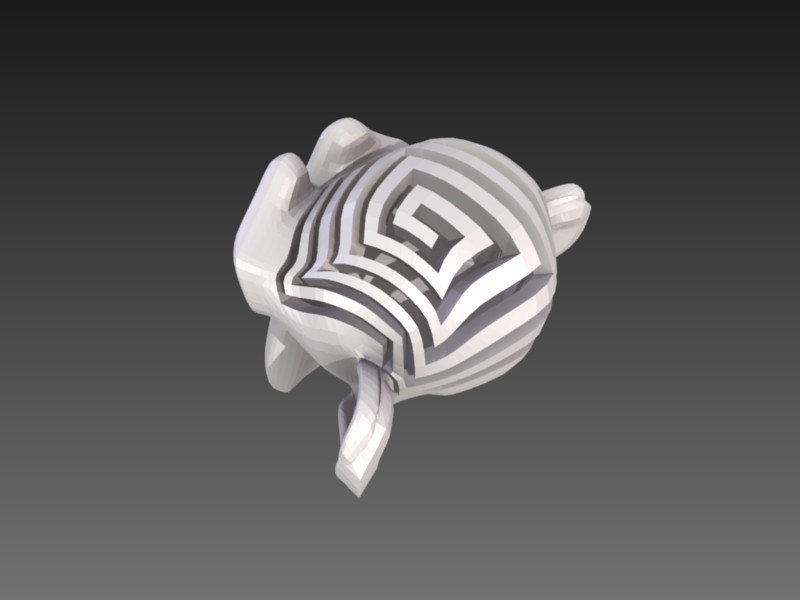
It is the same process just more geometry. You will need a clean mesh (no triangles) and then just select it and in edit mode w key subdivide until it has enough geometry to make the pattern you want. then just select faces and delete making the pattern. When finished use the solidify selection script to make the whole thing solid.
Here I did a quick test of Suzanne to show you. I should have subdivided a time more I think. Also make sure to w key smooth after each subdivision.
Thanks, Jimtuv! Looks great. However, seems like some extra hours of modeling if you want to get the pattern like 30 times onto the object.
I just thought there might be a way to automatically map many tiles of the pattern onto the object. Maybe I will try some manual boolean operations, although in my experience they mess up a mesh quite a lot.
can you show an example for what you’r looking for!
to shown how the plane with tiles is map to the sphere!
shrink wrap is doing something but around a sphere it will probaly distort the tiles a lot
because the way the mapping is done but that to be expected here for mapping to a sphere!
you could use a mapping from rectangular to spherical coodinates
but this would requires the use of a script if you know how to work with scripting!
otherwise did you try to uv map it instead there are already several mapping technic wiht UV Unwrap
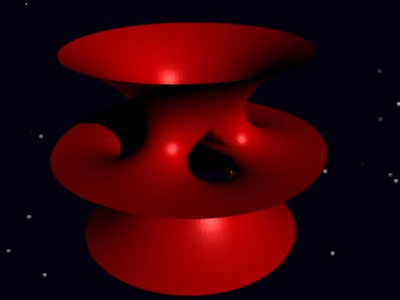
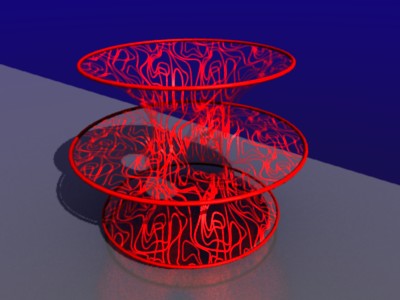
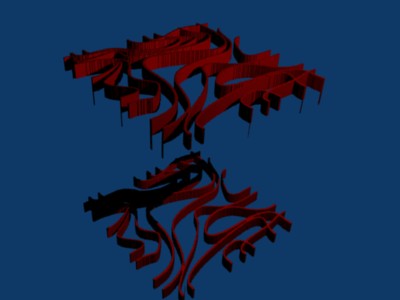
Thanks, RickyBlender. I rendered a more complex example (see attachement). The object is known to mathematicians as a Costa Minimal Surface. You can see one image with the whole surface. In the other render I put a pattern as alpha transparency on top. It works quite well and is almost perfect like that for render.
However, what I need now is a solid wireframe of the object with the pattern on top. So, I somehow need to turn the texture transparency into a mesh modifier. There’s probably no way to do that, but maybe the pattern could be mapped onto the mesh in another way? Any ideas? Is there maybe a software other than blender that can do it?
Finally, I need a solid model for 3D printing. The pattern will make it not only look nicer and print cheaper, but the semi-transparency will also make it easier to grasp the structure of the object.
not certain if this can be done in blender
cause your trying to get a mesh from a texture and export it!
texture are not real like a mesh they are only an image or a procedural math texture !
mind you we have in 2.5 the new volume texture which may bring new texture in 3D but again don’t think this is a mesh either!
there is one way i can think to get a mesh if you do the real model for you object in 3D
if you have the equations to do it but this would also mean making a script to make the model from math equations if even possible
then you can export this mesh to make a 3D print of it
@Atom: Thanks for pointing out TopMod3D. It’s quite a nice tool and very versatile when it comes to remeshing. I will use it for some other projects. However, it only has basic texture support and does not allow me to build a mesh from tiles or stencil the mesh based on texture.
@RickyBlender: I have the formulas to make the object. I actually generated it through a Matlab script. However, the pattern I want to project on the object/surface is from a bitmap image, which would be quite hard to code. Also I would have to invent some kind of mapping procedure (tiles onto surface). This is already in blender, would be shame if I couldn’t use it.
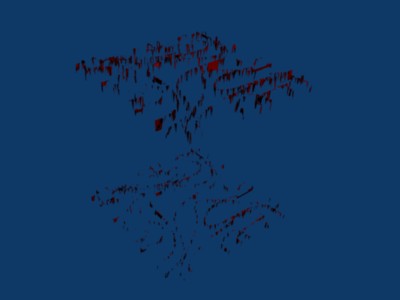
Actually there is a way to modify the mesh based on a texture: The displacement modifier. I experimented with a simple cube and the pattern from before. I did the following:
subdivide cube many times, till I finally had about 1.5mio verts.
add displacemend modifier based on texture, set to z-displace, strength: 10, apply.
-> the “transparent” verts are now well separated from the original cube location
go to edit mode, box select the displaced verts and delete them.
As you can see, there are some problems with this method:
P1. Although my texture only consists of black and white (no grays) the texture is somehow interpolated and so some verts are not displaced fully. Any idea on how to switch that off?
P2. The displacement is not applied to all faces, but sort of punched through the whole object.
Below are two tries. The second is somewhat better, as I switched texture interpolation off and did more manual clean up later, including solidify. Maybe that’s a start. Any idea for improvements?
so you want to add onto the strange object a pattern if i understand well
i mean that’s the first pic you’v shown
the second one is the final 3D model want generated
can you show a pic for the patterns!
here i’m assuming that the first object is the solid model you’v shown
and you said that you subdivided this solid object and applied a noise texture may be then a displacement tmodfier to get the general shape in the second picture
did you try the point density it may work - mind you this is something totaly new in 2.5 and not many peoples have experimented with it !
there is also volume texturing but don’t know if this is maiking a real mesh but i doubt!
2 - your frist method to add a texture and use displacemetn modifier
i would go with the normal instead of Z i think would give better results
then you can use the Shrink wrap modifer to bring it back to the surface to get a nice smooth mesh!
this might work
but i don’t have the file to test this so difficult to try it !
don’t know if this is a secret project can you upload a sample file may be
so we can try it and see what we can get with this texture in 3D!
another way here if you can get the points for the 3d model
then you can use point cloud script to solidify it !
sorry to ask but does the pattern has to be something weird ?
i mean can you use a sort of bands black and white then retopo it onto the different parts
and use this for a model by extruding the bands to give some minimum 3D volume to give some structural strenght to print in 3D?
like this for suzanne with shrink wrap
hope you can see it here
You also suggested to use some B/W bar pattern to minimize printing volume. Sure, I could do that, but would be rather boring. In that case, the solid wireframe script or TopMod3D would do the job.
I guess the challenge is to make an object out of arbitrary tiles by having the tiles follow the object surface. Also the tiles attached look better than a wireframe-like model That’s why I’d like to get a solid/printable model like the second render from above.
There should be lots of applications for this, so somebody must have done it already, but how??
Thanks, RickyBlender. I looked at Cavernosa. The program seems a bit cryptic but also, it doesn’t seem to be doing what I’m looking for. So just to clarify things:
This is the challenge:
I have a B/W image texture which I map as alpha/transparency onto a surface. As a result I get the attached render. This very render shows exactly the what I want as a final mesh. So, I somehow need to find a way to modify the original surface based on the texture. The final result should be a mesh which produces the render below even without any texture or transparency applied. I can then use that mesh for 3D printing or to render the volumetric structure.
This is what we’ve looked at:
It seems this is so far not possible with blender. I also checked several other applications and couldn’t find any solution. Anybody knows an application that can do it? I haven’t looked at the pricy ones, like 3DMax or Maya, yet.
Idea of a solution:
Anyhow, I have an idea on how it might be possible to do this: In the materials section one can map the texture to a displacement. This affects the rendered mesh just like the alpha. Now one just needs to map not to the alpha or the displacement, but delete the faces where the texture goes below a threshold gray value. Guess it could be done with some scripting, but I have no experience with blender-scripting. Any smarties out there that know how to implement this?
did you look at my other thread in news and discussions i think we found a script done in 2000
that can do what looks like what you need here but it does not work in 2.49
so just waiting answer from owner to see if he can make it in 2.49 or 2.5
should have an answer hopefully soon if he’s still available !
you say that you began doing it with displacement map
an you upload the file - i like to look at what you got right now
may it 'll give me some ideas cause i was not able to come up with something even close to it here
you can PM this to me if you don’t want to share it here
Thanks for the support, RickyBlender. I just looked through the news thread. There are a lot of interesting links and I just had time to skim through them. Matt Ebb’s work looks very promising. About cavernosa, I’m not quite sure - guess I don’t really understand the program yet.