In “Blender Foundations,” the author says “beside the pivot style menu on the 3D view header is a button called Manipulate Object Centers Only.” I can not seem to find the button. I am modeling a chair and I am trying to scale the legs outward using proportional editing, and to keep the legs the same width while expanding the legs outward, the author says to select “Manipulate Object Centers Only.” Any suggestions as to where this button is? I am hoping someone can do a screen capture with the button highlighted. Thank you in advance!
In blender 2.5+, this option (manipulate pivot point only) can be enabled or disabled in the 3D view header, left to the manipulator types icons. This is a button with three dots and a double arrow on it.
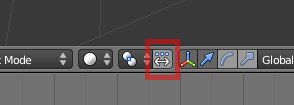
You only see it in Object mode
Yes indeed, I forgot to mention it.
By the way, even if you’ve enabled “manipulate pivot point only”, you can use it only in object mode.
So, if I can only use it in “Object Mode,” how I am supposed to select the bottom four polygons of the legs of the chair to spread them outward? Something seems fishy here. Of course, this book is for Blender 2.5 and I am running Blender 2.61. Actually, in the book it says “the effect works both in Object mode and Edit mode.” And now, I see that is not true.
I had the same problem when working on that tutorial. You just have to find another way to move the legs out, without scaling. Just use Grab. Move by numbers if you want to be precise (eg select a face and then G X .2 will move that face .2 units along the X axis).
I don’t know this tutorial but I think it’s a bit weird if the author ask to work with “manipulate centre point” in edit mode because, to me this is definitely a feature that is supposed to be used with several objects, in object mode, not for editing mesh in edit mode.
It’s in Blender Foundations by Roland Hess. He generally knows what he’s talking about. I’m guessing this functionality has changed recently.
Well, in “Blender Foundations,” the author tries to familiarize the reader with everything that Blender has to offer. That particular function might work better while selecting multiple objects in Object mode, but I think what he is trying to do is say: here is the function, now think of the possibilities. But it is weird that he would say it can also be used in Edit mode, when in actuality it can not.
Correct, doesn’t work in edit mode.
With your example Manipulate Center Points works great if all legs are separate objects. You’d change the distance between them without scaling the legs
I didn’t want to offence the author, I just didn’t know this tutorial so it wasn’t easy to find what wasn’t wrong.
By the way, I use this feature a lot myself, this is really useful.
This can help to modify distance between objects as Sago said for instance or to place an object opposite to the 3D cursor (with mirror) ; obviously, you need to be in object mode to do those actions.
I can’t remember exactly but I got this working by adding array subdivide then using the scaling tool with 4 legs selected in edit mode and it worked fine. As it spread the legs out, but not by selecting the manipulate buttom.
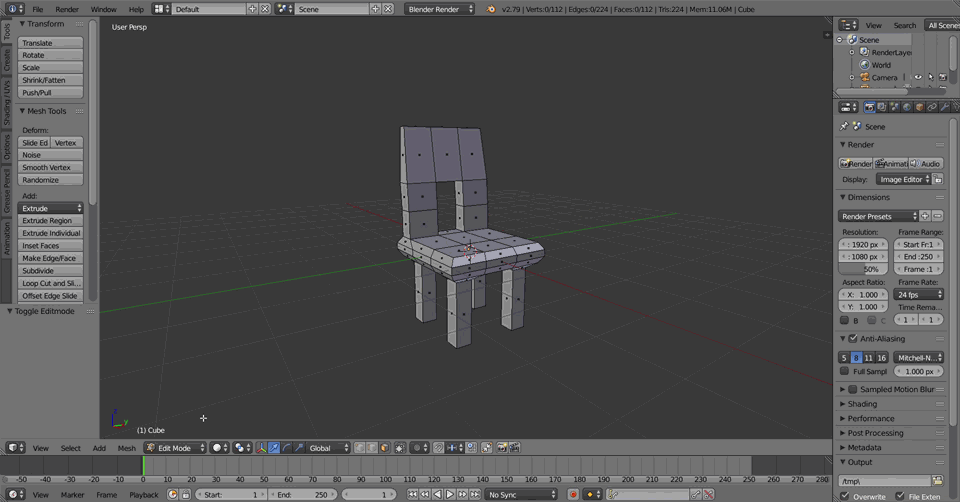
In Edit mode, shift to Face select mode. Select all four of the bottom faces of the legs. Activate Proportional Editing Falloff (O key), and then Scale outward. The lower sections of the legs spread outward, with only a small amount of scaling of the leg thickness. This must have been the way Hess did it, because in Figure 4.28, his legs are fatter at the bottom too.
Hope this helps. I’m working through his Blender 2.6 book, and there are a number of important differences in the interface compared to what he describes.
Here’s Roland’s official website for the book http://www.blenderfoundations.com/index.php
He calls this website the book’s “Web Bucket” and also in the preface he claims
The website contains not only these project files organized by chapter, but all of the screenshots from the examples, additional screenshots from the complex tutorials, and all of the videos mentioned throughout the book. You will also find material and updates for information in the book that has been passed by because of Blender’s amazing development speed
But if you check out the website, there are only pictures of the models in the various stages, and not the videos or even the blender files he is alluding to. Or at least they’re not easy to find, but if I am just overlooking the location of these files I would appreciate someone pointing that out to me. At least he has an errata though.
Here’s the pic of the chair following his apparent object center manipulation operation

It does look like the bottom segments of the chair have been scaled to a larger size in addition to having the 4-way splay. But I couldn’t find the blender files to verify.
Just as a side note, I feel that this author is a little crass in his treatment of the readership. Here’s a sample of some of what he says:
If you end up somehow not committing them to memory, then it is quite possible that 3D isn’t for you. Crayola makes some nice Model Magic stuff that is really cool to work with.
Look, I realize that we haven’t talked about selections yet, but, come on! You should have expected that somehow you’d be selecting objects for some reason or another
I think he is just trying to liven up the mood a bit with playful derision, but I have to say, this aggressive sense of humor is not appreciated after buying this book (new), not having access to all the online content he claims to exist, and then dealing with the discrepancies between his book and Blender (which I guess isn’t his fault though).
Well, the challenge here is working on four sub-meshes at once.
One thing you can do is p > By Loose Parts. Then you’ll have the top and legs as separate objects, and the button in question will work. When you are done Shift-select the pieces (select the one with the original name last, so that becomes the final object’s name), then Ctrl+j. This temp-split (and occasionally temp-join, the opposite) is often useful and nothing to be feared.
The other thing I notice is that the legs should be modeled as a single that is mirror-modified on x and y. Depending on the symmetry of the top piece, it could either be mirrored one way or two. Super-fast, completely precise, and even if you do Apply and late change your mind it is almost nothing to whack away the mirror verts and readd the modifier.
In Blender, there is almost always a way. In fact, I’d say there are almost always two competing ways: a by-hand/eyeball way that is quick but sloppy, or the tools/precise way that is perfect but can sometimes get ridiculous. The question becomes: which kind of awesome are you maximizing at the moment?
-rking
Yeah, I am one hundred pages into the book and he has yet to go over how to mirror an object. There is a lot of fluff in the book that I wish was not there, but it does add the author’s character. I personally do not mind his sarcasm, but I could see how it could put some people off.
+1, on a simple symmetrical object like a chair I think this is the best way to go.
The x-mirror option in the Tool shelf is another way to edit objects symmetrically. Of course it only works across the x axis, and for some reason you can’t x-mirror proportional editing.
Very late to the game on this one, but this is one of the first results on Google, so maybe I can help at least someone with the solution I came across today ![]() :
:
- Change the “Pivot Point” to “Median Point”.
- Scale the bottom polygons of the chair (e.g. by a factor of 4).
- Change the “Pivot Point” to “Individual Origins”.
- Scale down the bottom polygons of the chair (e.g. by a factor of .25).
This is a way to essentially “Manipulate Center Points” in “Edit Mode”.
Hope this helps any passersby! Peace and God bless ^.^