Mapping of RGB Values for NPR Rendering

Hello Everyone!
I had an idea on how to implement something like zBrush’s possibility to have a model shaded by selecting an image of a painted or rendered sphere of a certain material. I hope you are roughly familiar with that feature or at least understand what I mean.

I’m looking for a way, to use this technique in blender. I’ll soon be working on a comic, and it would be awesome to use such a feature to achieve non-photo-rendering.

I thought there may be the following way of implementing it:
One could bake normals (probably cameraspace, I don’t know) onto a sphere and then could render an image of that sphere. This would be the refference. One could then take this to Photoshop, get a selection from the alpha channel, and paint a sphere of the desired material. Then comes the tricky part, where I don’t know how to do it in blender and think some coding would be necessary. To project the sphere’s material onto the final mesh, severel things are needed in a script:
-loading of refference image with normals of a sphere
-loading of refference image with material of the sphere
-access to a usable normal render pass of the target model (should work without UVs and baking of normals)
-mapping of the image data of the sphere to the rendered image, using normals as a refference. I have no clue of coding or optimization, but I think it might work somewhat in the following way. There will be better ways, I’m sure, but I can’t code.:
First, build a 3 dimensional array of RGB values for the normals (0…255 per R,G, and B channel). Second, get the RGB values of the painted sphere and insert them in the array as full color values (unless the image is very big, i think there won’t be many pixels in the normal map that have the exact same RGB value on a sphere?! When it happens, a blending of values would be perfect, for a first try, I’d say “first value wins”). Third, lots of points in the array will be missing, this is probably the hardest part, because interpolation between values and extrapolation towards borders of the field is needed. I have absolutely no idea on how to do this! Fourth, the normal pass of the target mesh is converted to the actual NPR material, that has been painted on the sample sphere. This should be pretty straightforward: Get the first pixel, check RGB value, look corresponding RGB value up in the array, replace, repeat for every other pixel in the image.
It might also be cool to include alpha values in the process, so that one can paint alpha values and have them assigned that way. This could be used to break up the silhouette of a model. But I admit, once there is the way for RGB mapping in the described way, one could find a workaround for the alpha channel using another pass and a second black and white image.

That should be it. I have no idea if there already is a way to do this in blender, if yes, please point it out to me. If no, then I think this could become a very cool render node or material node. Some creative mind will probably come up with other good uses for this.

I hope I’m not bugging you with a feature suggestion. I can imagine, that there are quite a lot of people wanting their cool custom feature ;). If I can help the process by faking an example or if you haven’t understood my confusing description, let me know :).
have you looked into material ramps? it’s not exactly what you’re asking for here, but it is a method of remapping the shaded colours to different RGB values.

Thanks broken, yes, I know that feature. It could for example be used for a cell shading look.

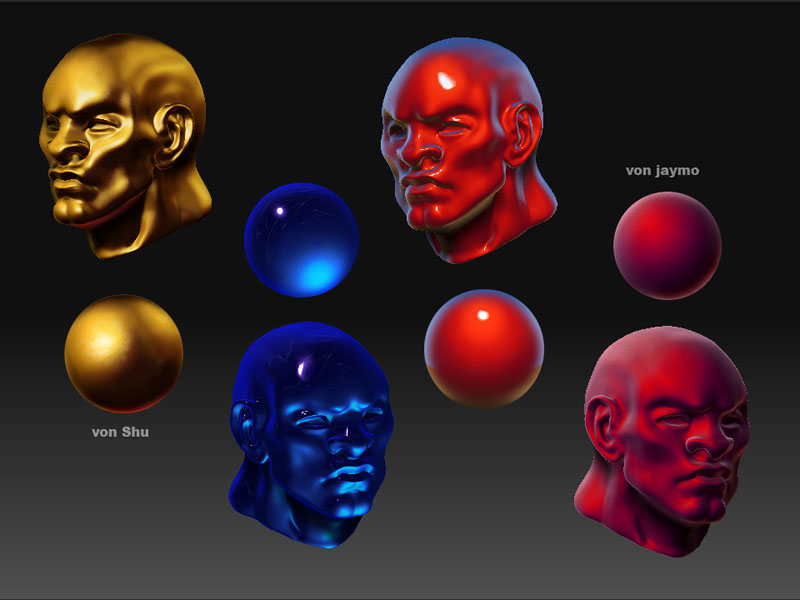
I found a good sample of what I’m looking for.

Cinema4D Sketch&Toon:

zbrush:

Martin H.:
As you are a German anyways you might want to take a look here: http://blendpolis.de/f/viewtopic.php?t=18337&start=0&postdays=0&postorder=asc&highlight=

I set something like this up with nodes a while ago and described the process. If there are any questions left just drop me a message.

To all of you who don’t understand any German: The images should describe most of it but If you’d like/need I can of course do a summery in english, too.

really good texturing and node shading… :wink:

@frigi: Awesome! Thank you so much, that’s exactly what I was looking for. Have you ever posted this in the DAF? I can’t remember. If not, you should put it in the Blender Thread, it’s really cool, although I don’t really understand how it works. I was able to copy your setup and now it’s happy blending again :). Great!

Glad it helps.

About how it works: It takes the normal information of the surface and puts the pixels of the image accordingly… simple as that. :wink:
Depending on how exactly you set it up it overrides all other material information or just does so with the color pass, that’s basically up to you.

Don’t expect this to be a solution without issues though. I’ve outlined some of them in the thread and put a few possibilities to overcome them but those might not be the only ones. (That shadowbuffer thing being the most annoying if you want to have shadows. If you don’t then you shouldn’t have to face many problems. :slight_smile: )

I guess I’ll post this and the analysis script in the DAF later this day.

It takes the normal information of the surface and puts the pixels of the image accordingly… simple as that.

Yes, obviously :D. I just never would have thought that connecting the nodes that way would do this ;).

For shadows you could build a normal white material that receives shadows and have them both multiplied. That will darken the material. Or you could use the white material between two painted materials (areas in light and in shadow painted separately as a sphere each).

Hehe, when I tried it I was just like “If it works somehow it gotta be something like this… hey it kinda works!” And then a seemingly endless time of testing and adjusting began. Was worth it in a way though I think. It’s definately no everyday render-technique but absolutely useful for some “special” stuff.

The thing with shadow is that it generally works fine but the shadowbuffer isn’t as clean as you would expect it to be. So you either don’t use shadows or set up the lamps veeeerrry carefully.
But yes with some compositing one can get completely rid of it.

I didn’t get that thing in German but you can do something similar to the C4D picture-based without much work using Shadeless material and use the “Nor” coordinate mapping mode:

http://img529.imageshack.us/img529/3148/panelshotpi4.jpg

I’m a big fan of nodes, but I’m a bigger fan of being lazy :slight_smile: I don’t know how similar the result is, but it ain’t too shabby (I’m using your sphere map there to make it easier for you to compare Blender’s results):

http://img512.imageshack.us/img512/2773/rendershotdt0.jpg

Nice renders CubOfJudahsLion.

I’m trying to get the same results but I must be missing the sphere map you spoke of.
I’ll look on the German site.

Update
Found it.

Hi,
I have hard time to find your post but finally 3 years after I first saw it, i find it.
Is there any chance that you could share your blend file for this nice render ?
Or maybe could you give me a little bit more of explanation from the opening of a new blender file to this nice render ?

Hoping you could help,