MASTER THESIS HELP! Newb to Blender

Hi everyone! I started to work on my master thesis about a year ago where I was introduced to Blender. I asked a question here, and got really good feedback, but I understood that I was asking all the wrong questions. I will therefore try again, now that I am further in my work.

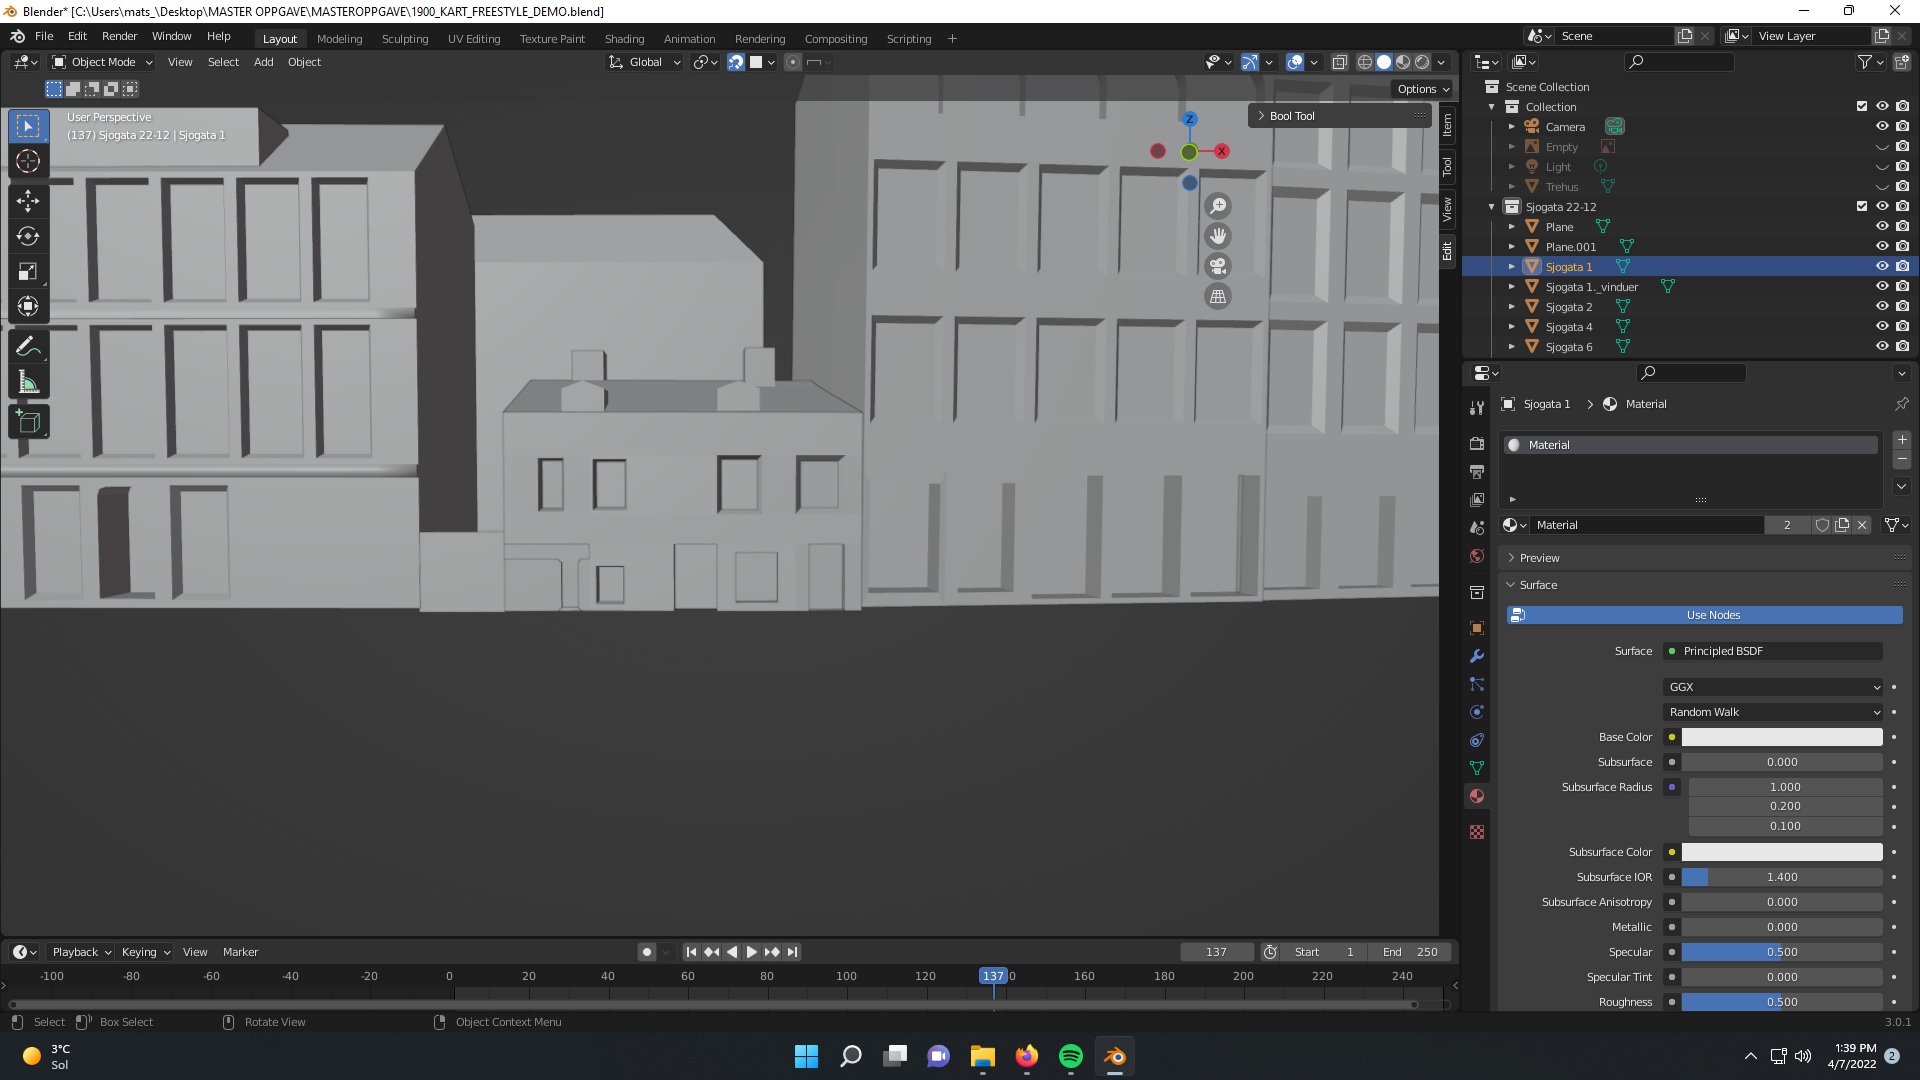
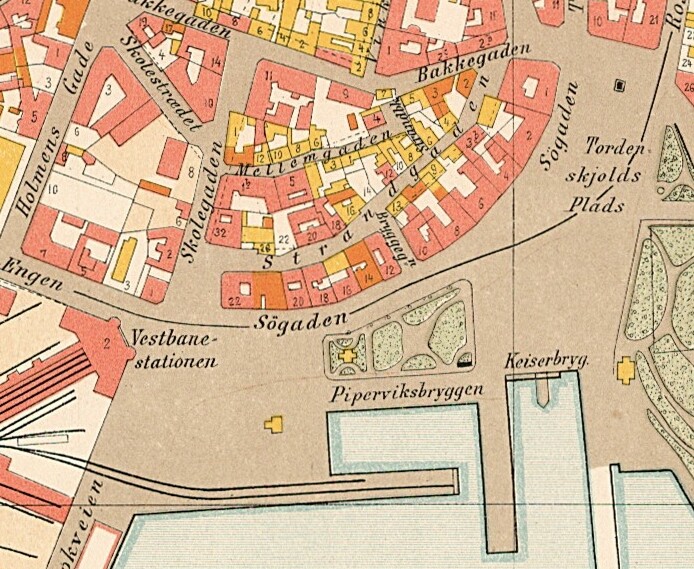
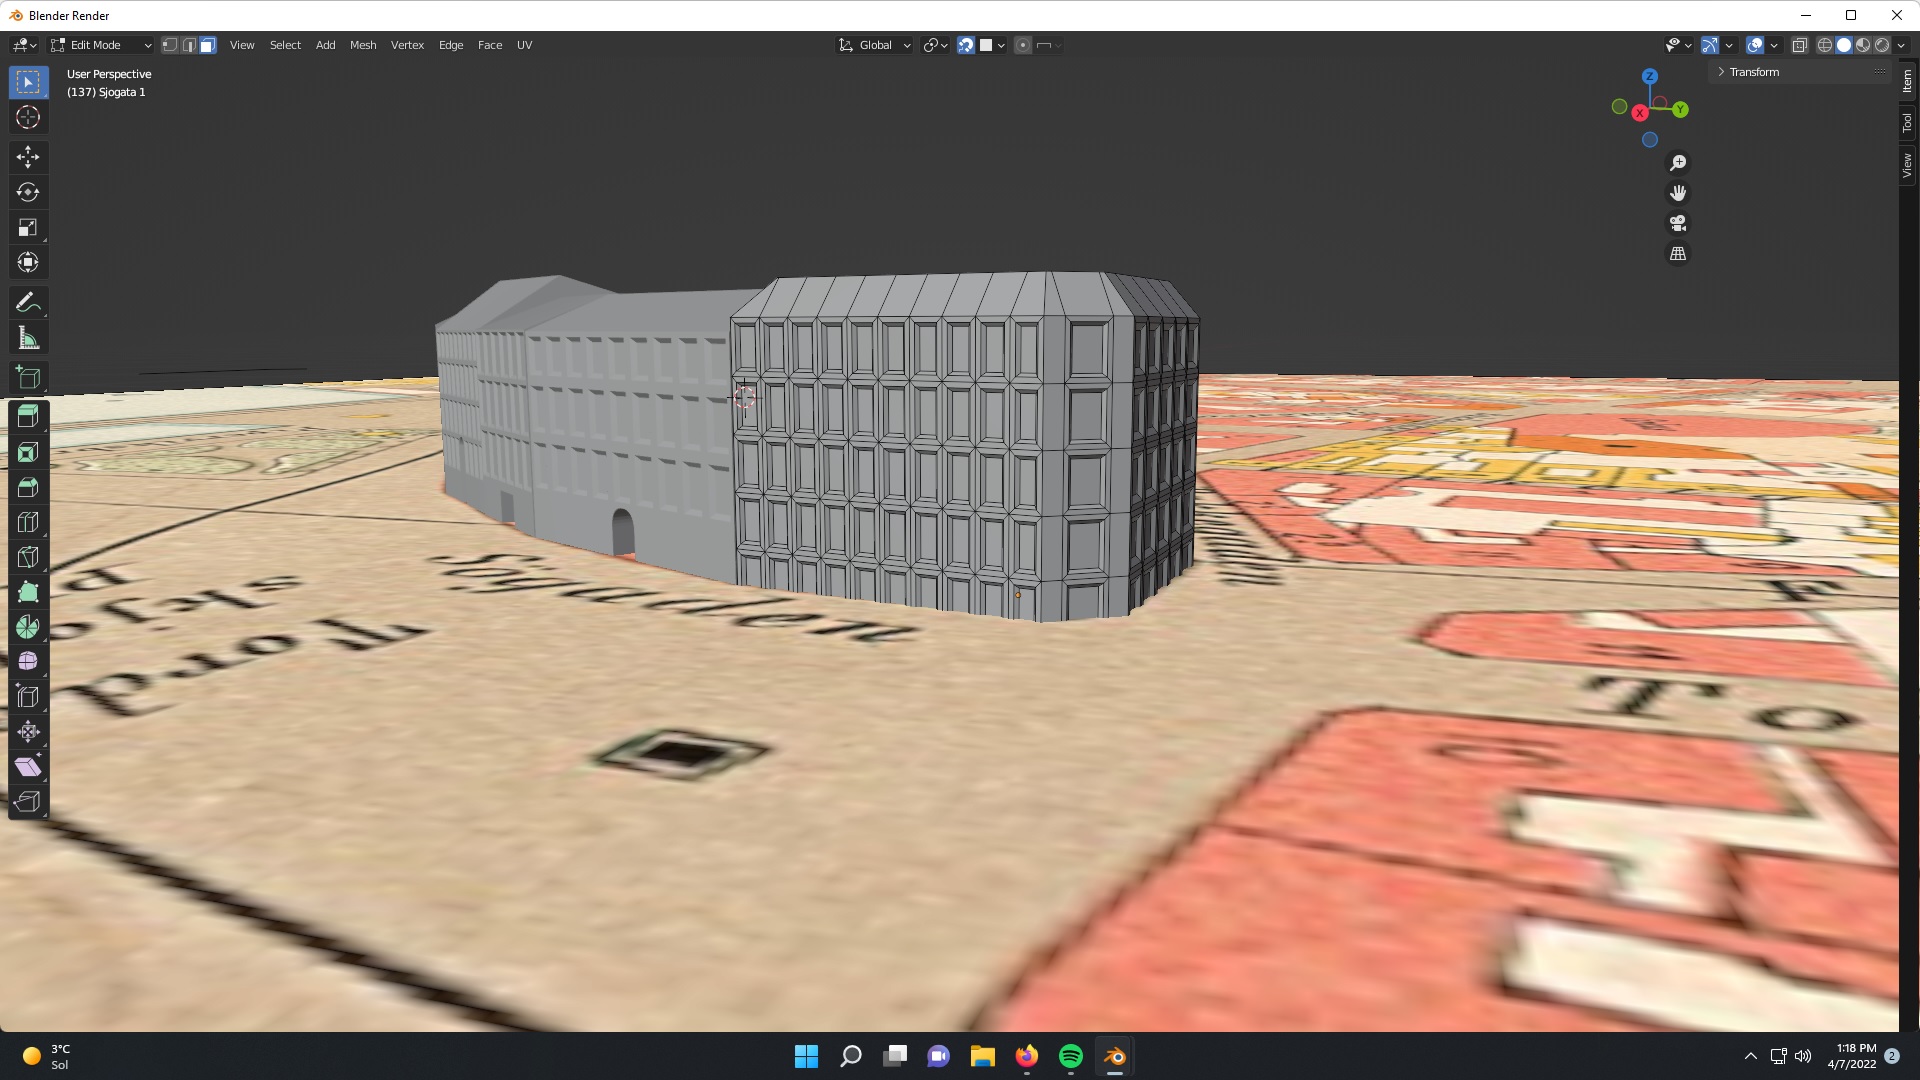
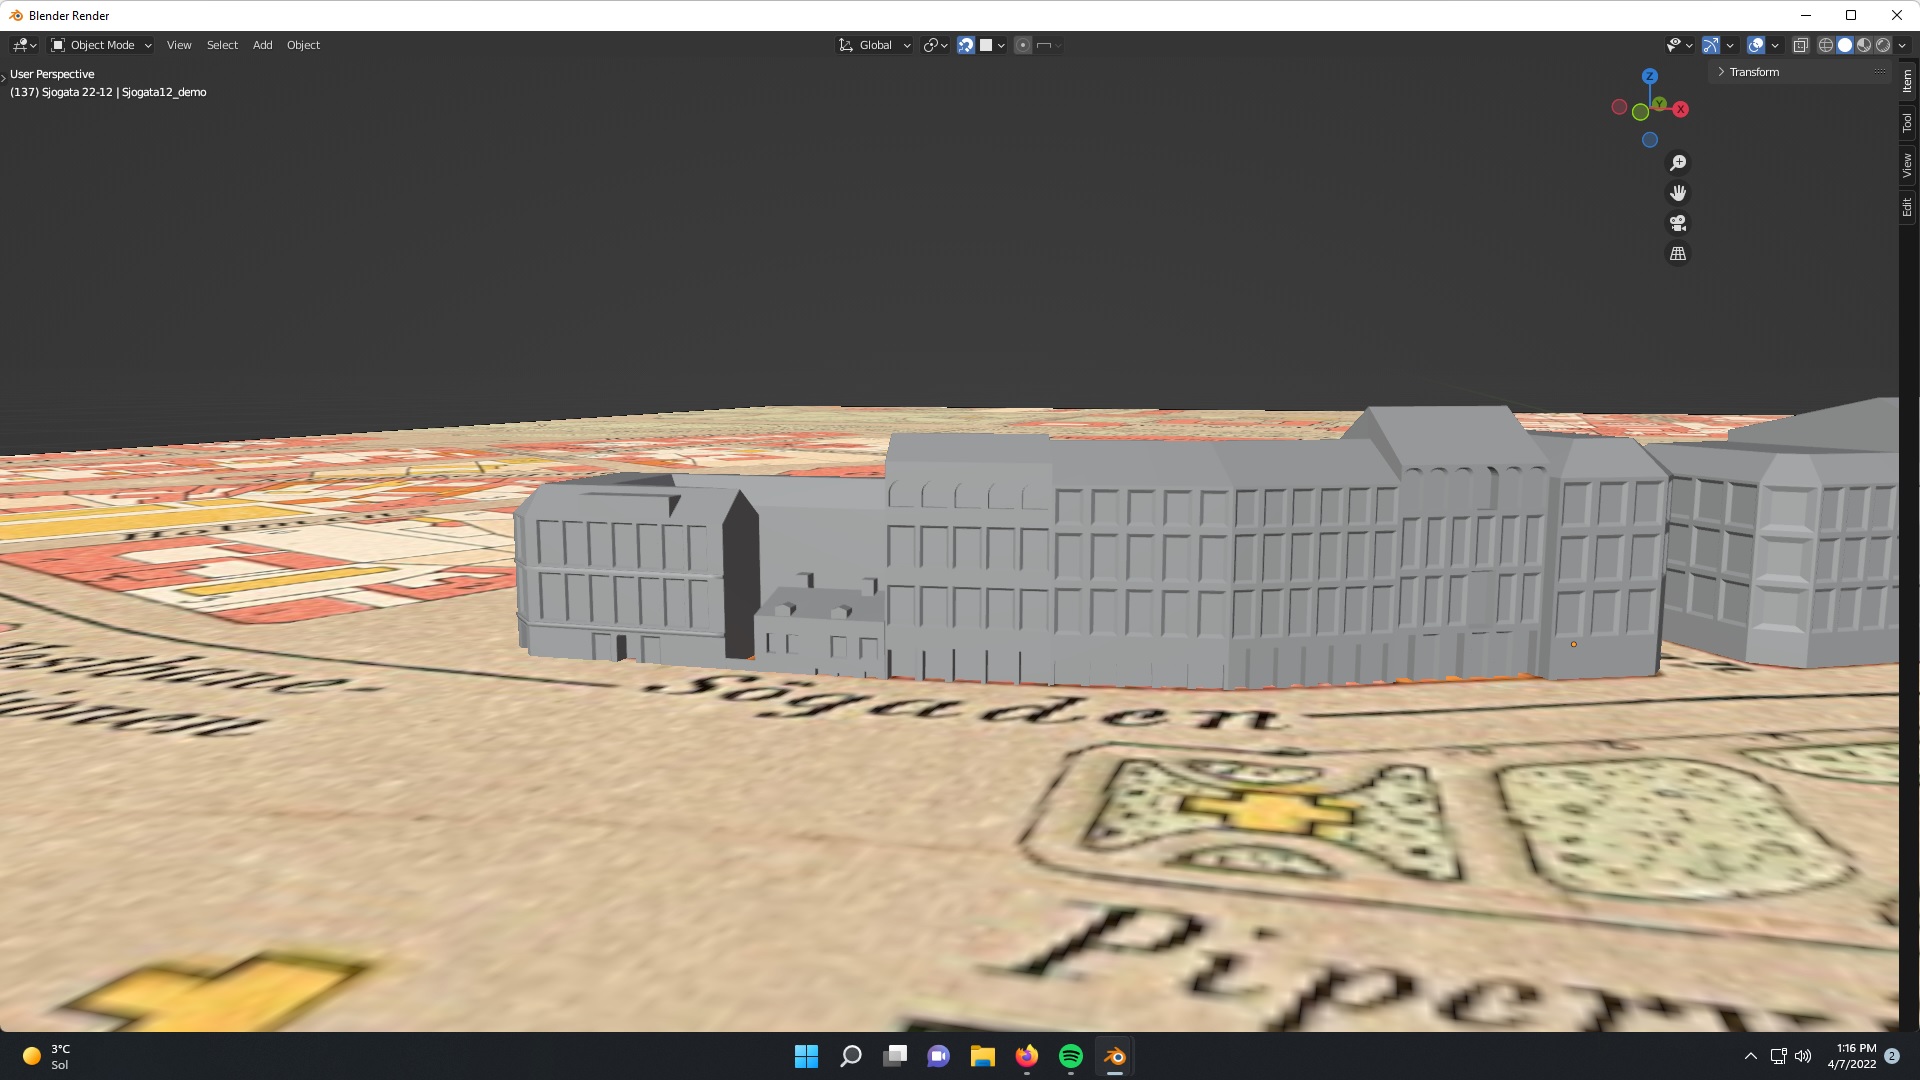
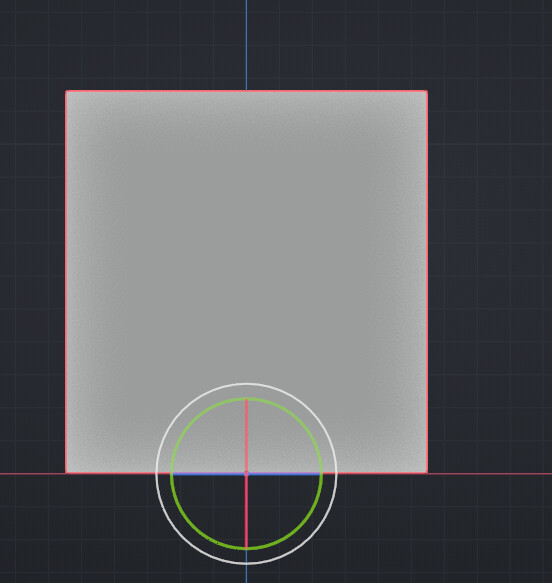
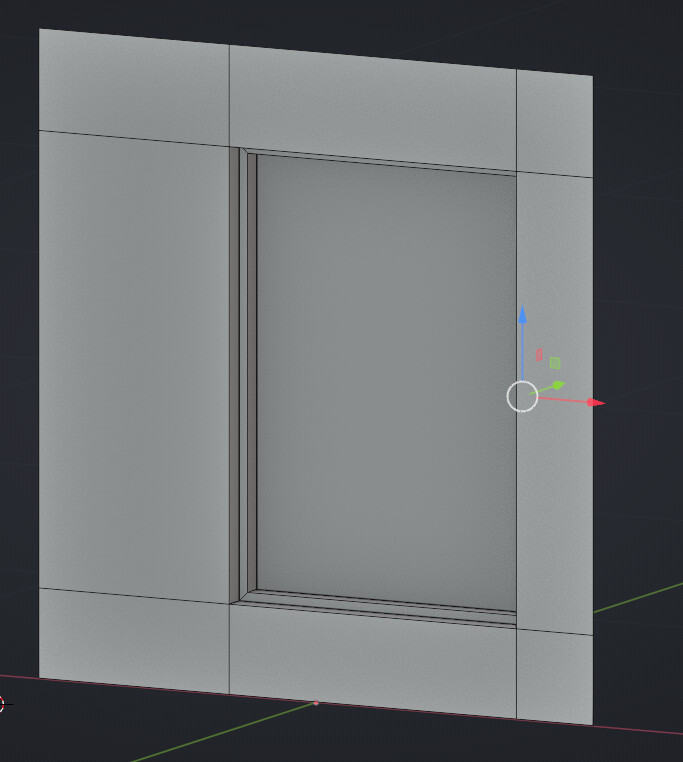
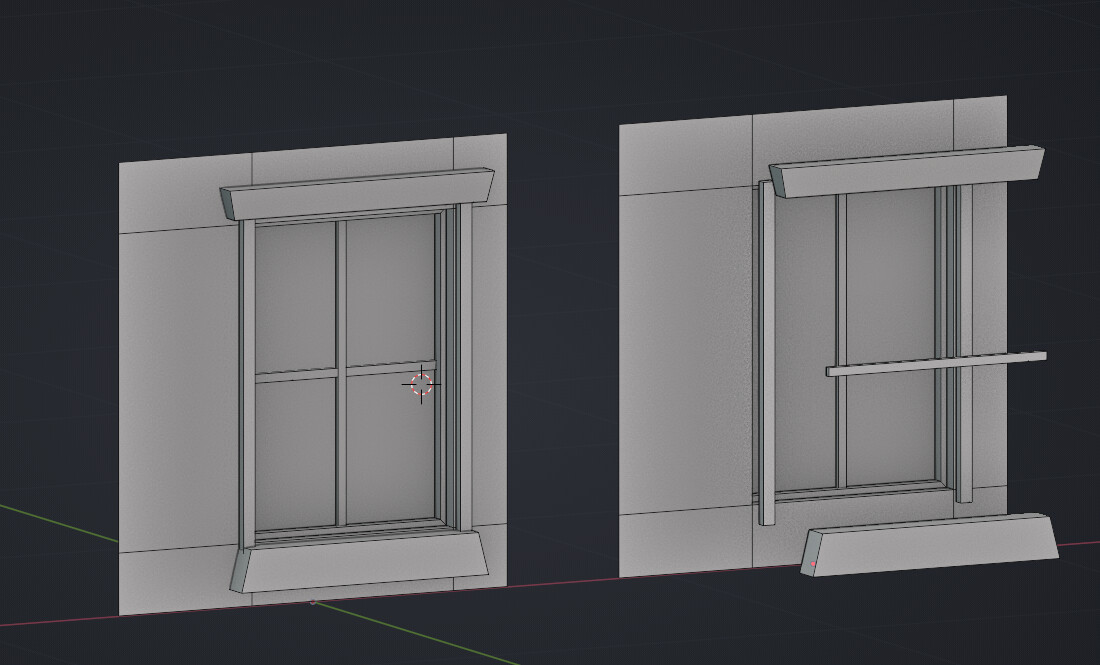
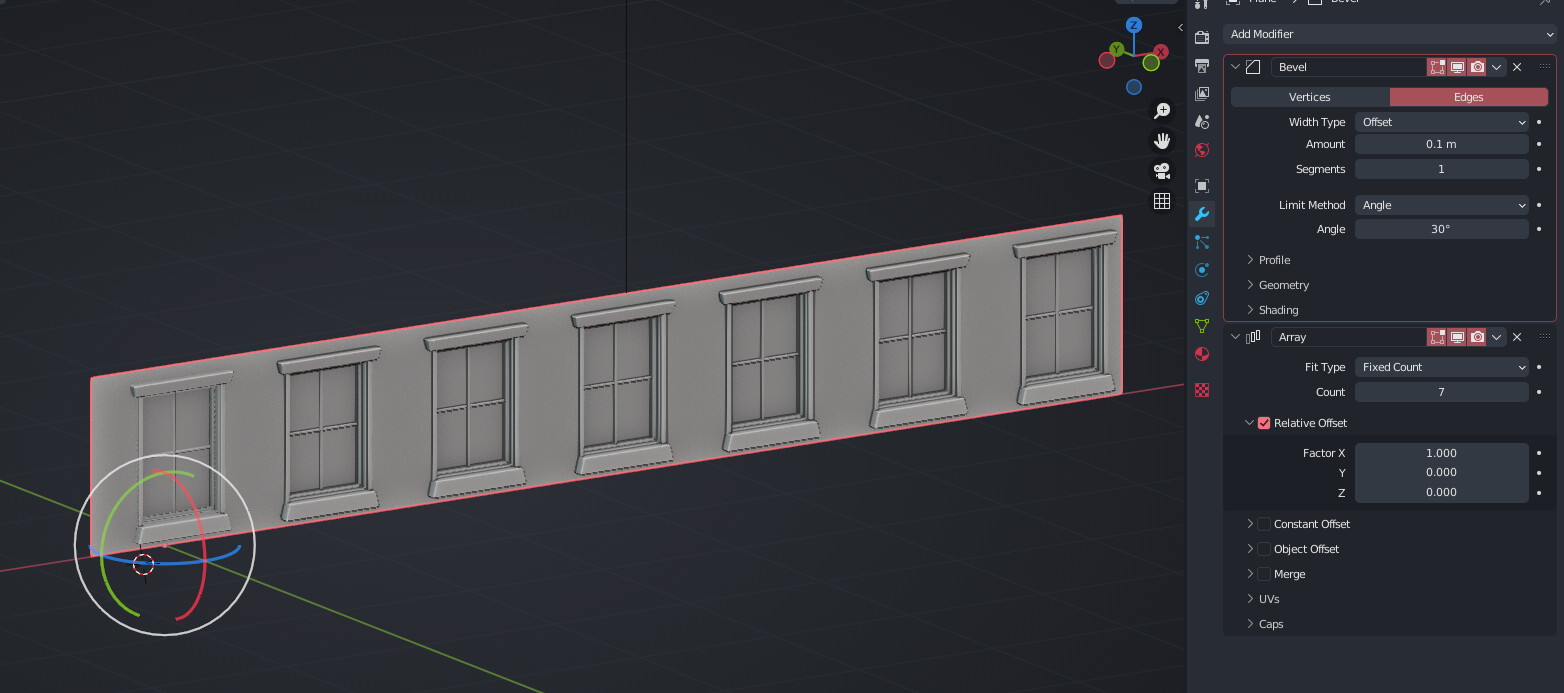
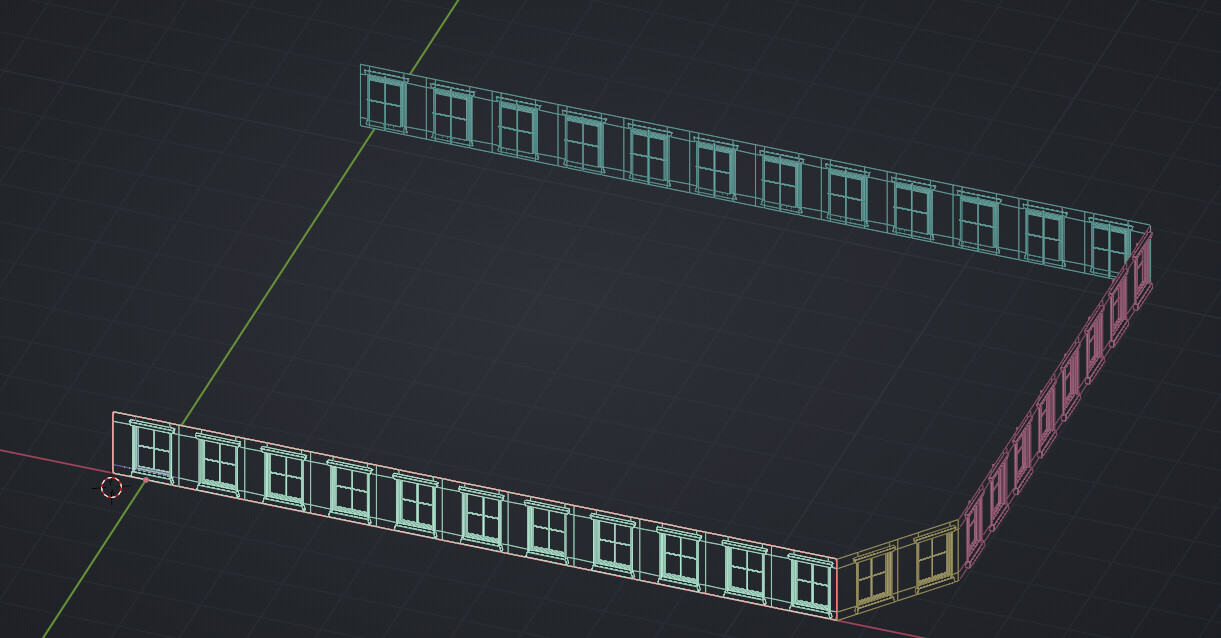
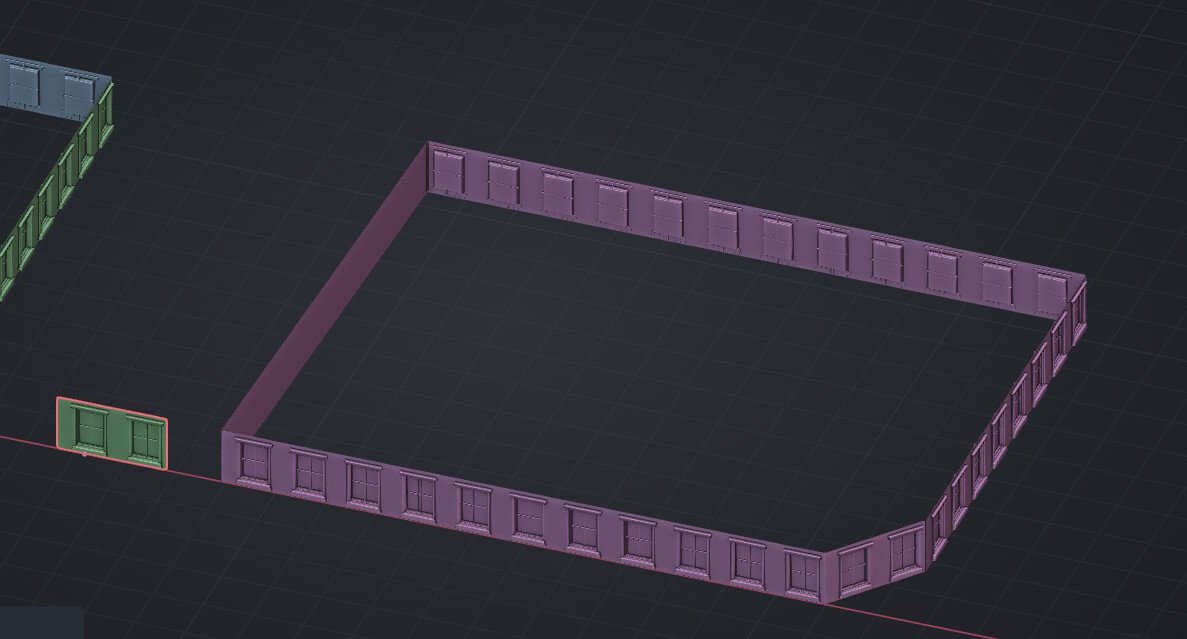
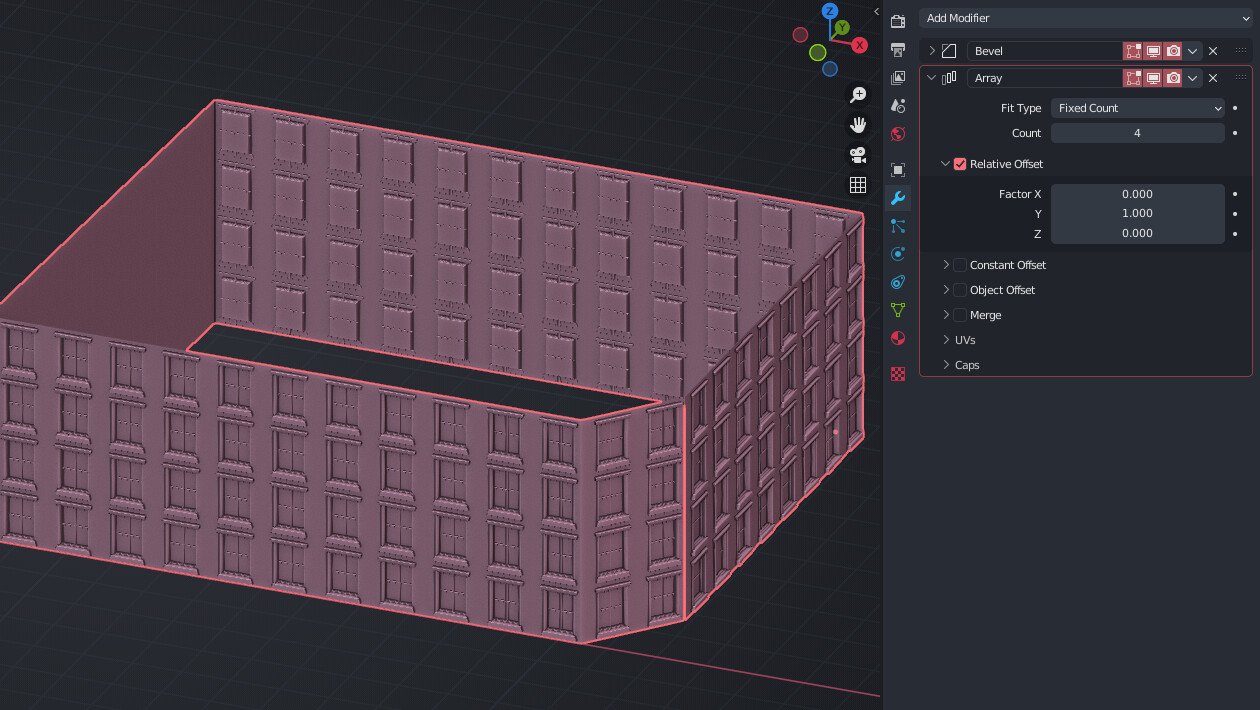
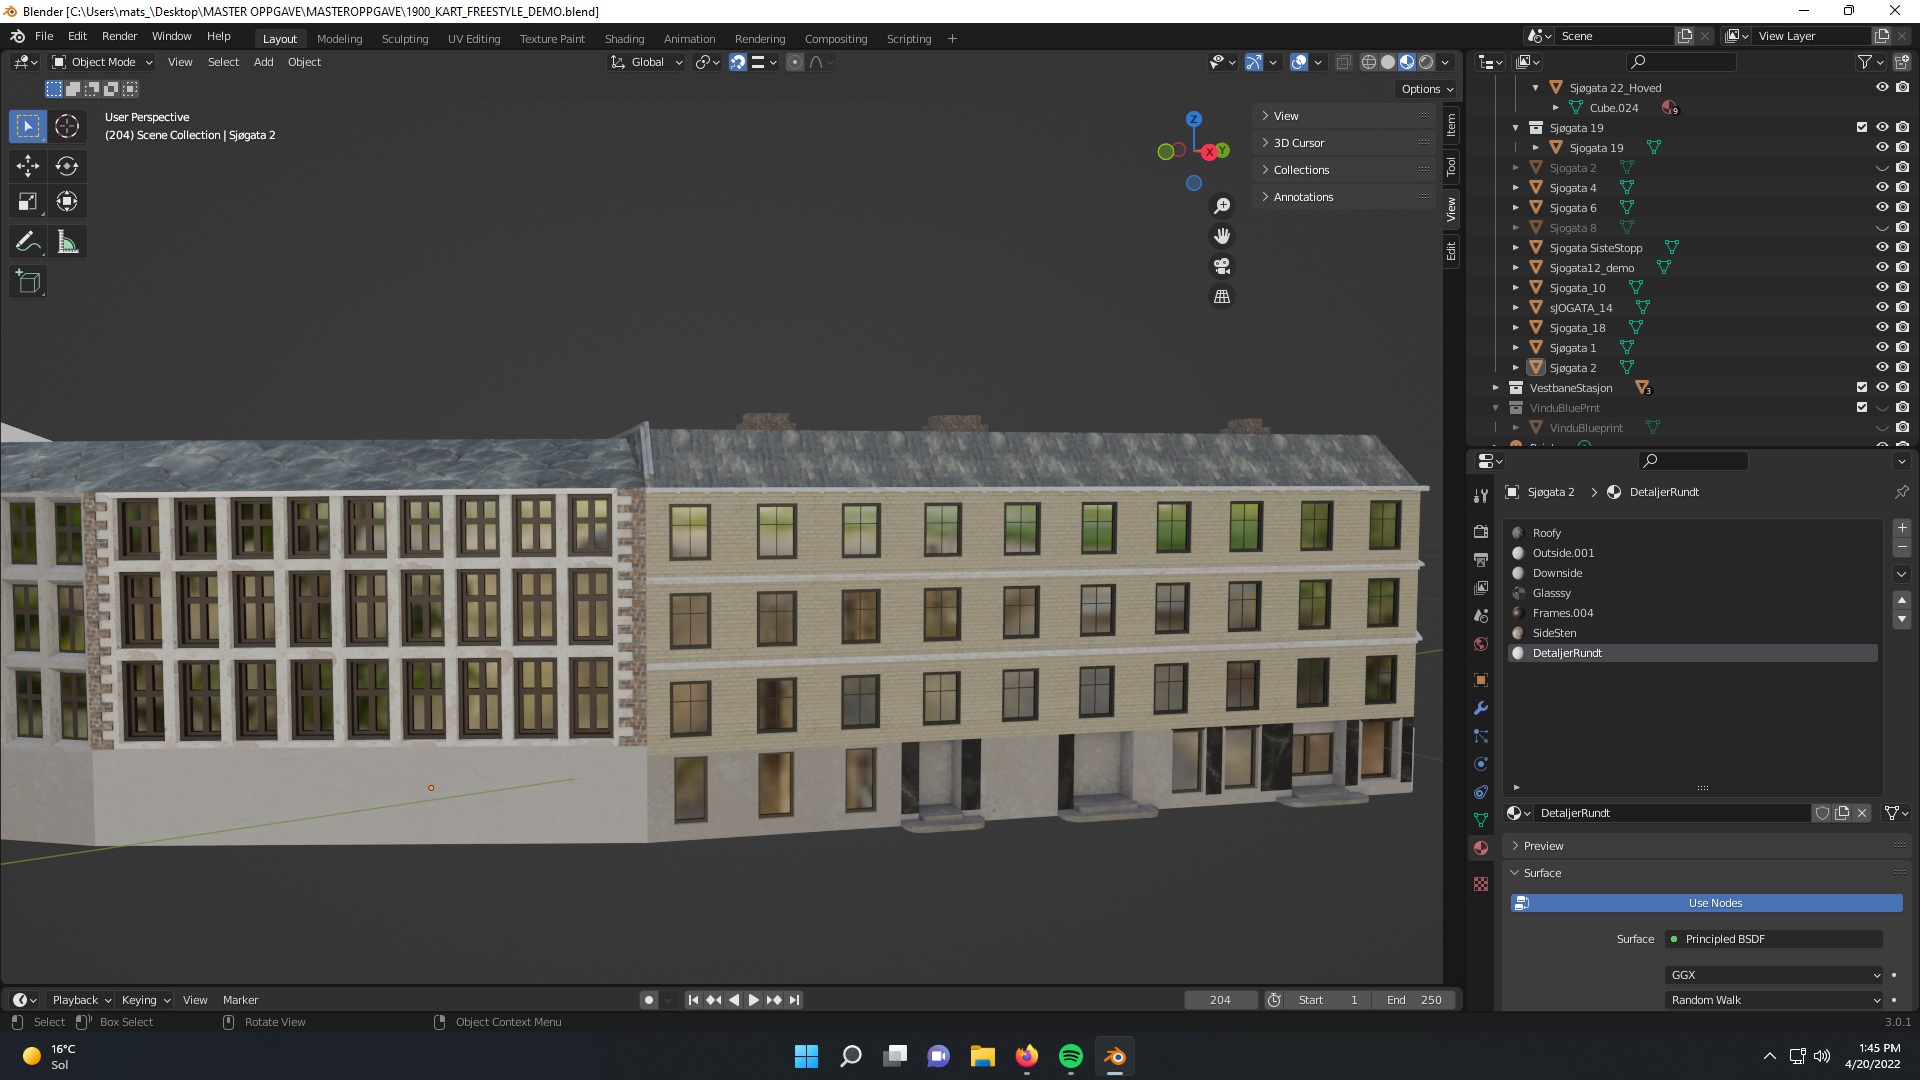
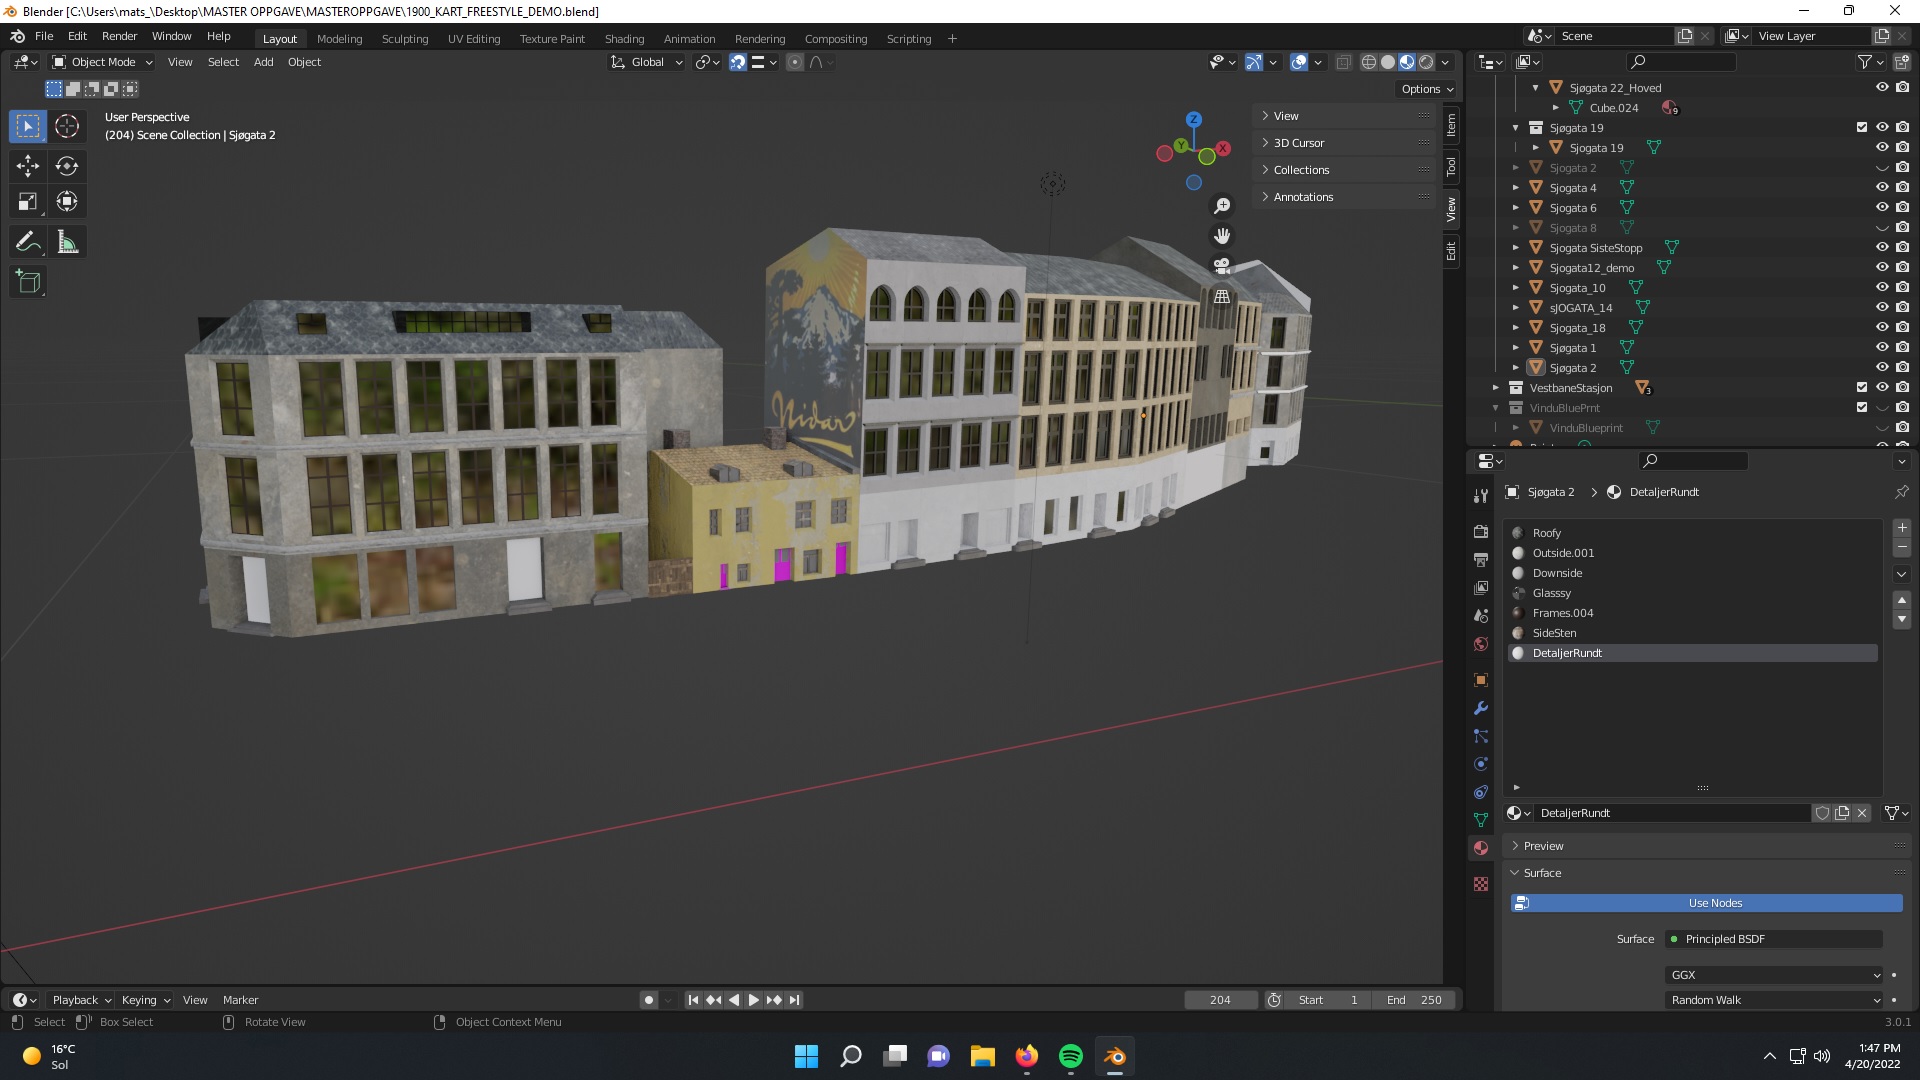
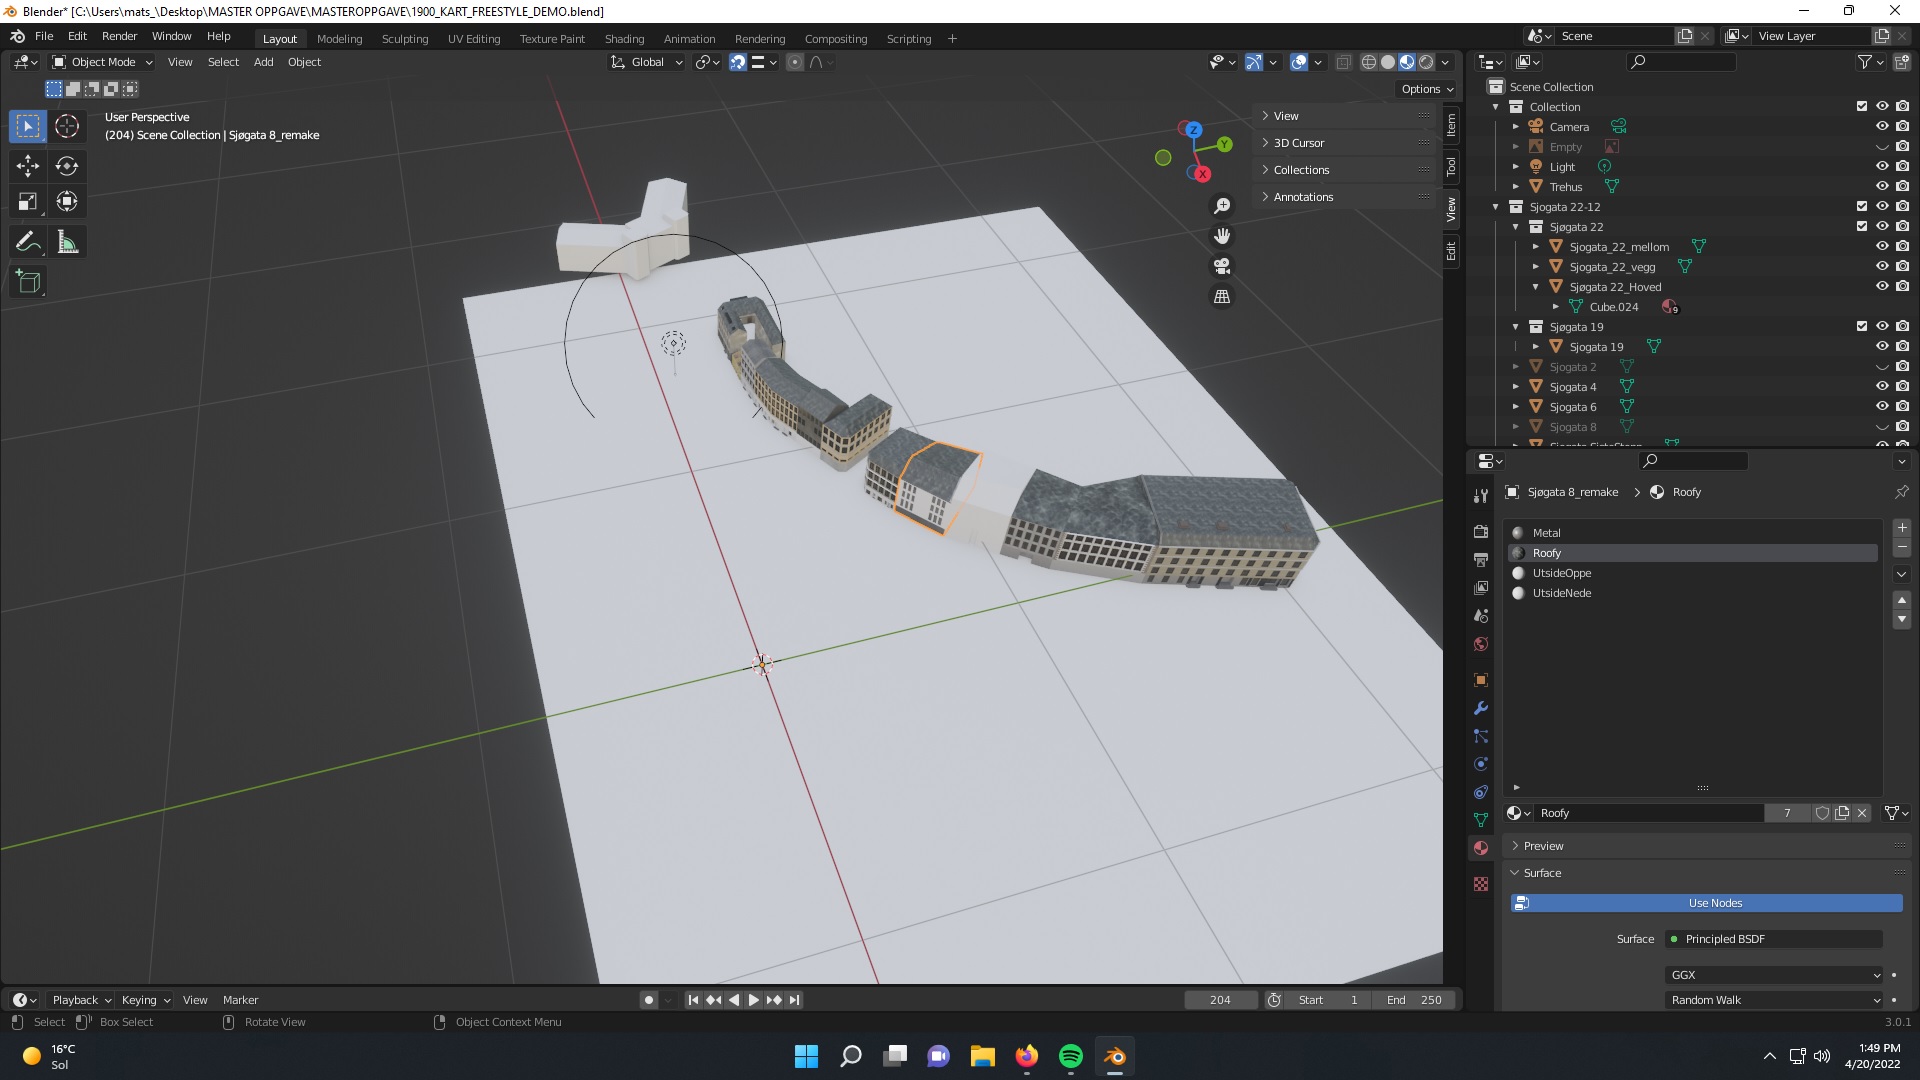
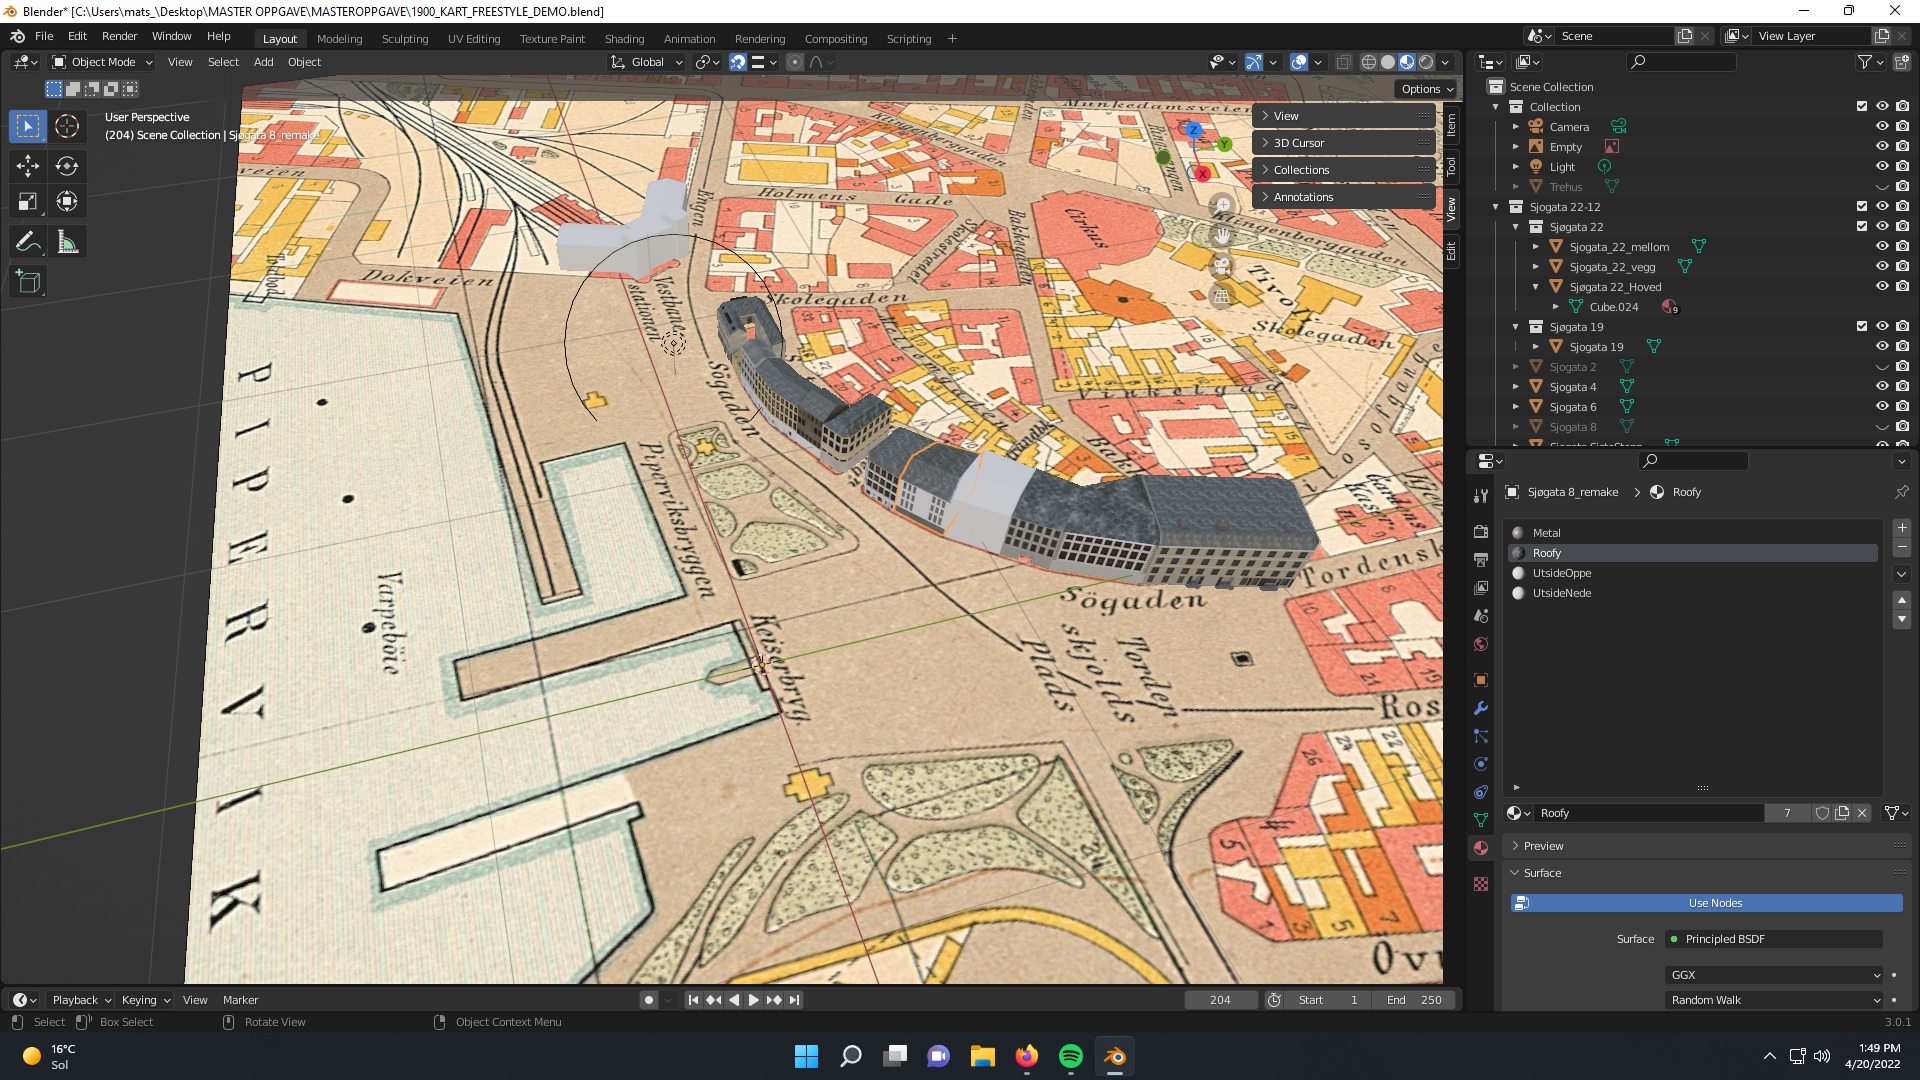
My thesis is a really simple Augmented Reality or a Situated Simulation which takes users back to Oslo, Norway in the late 1800s. The modelling is done in Blender, before i send it to my supervisor who will run it through Unity (which i know nothing about). I am fairly new to blender, and under this text I have pictures showing my approach to the task. In many cases I wonder if i should start again, because i see so many tutorials on youtube highliting the importance of “Subdivison Surface” modifier. I’ve tried it on my buildings, but it sure doesnt look right, no matter how many hard edge loops i give it. So I am wondering about the importance of the (SS)? Also the way i approached this was by adding the map as a reference photo starting from the top view. Then i proceeded to add cubes which i scaled down to match the image, i then moved the verticies manually in xray mode and top view to align with the photo. As with many old maps, the buildings are fairly crooked which means that the mesh becomes fairly crooked as well. I have made every Building as its own object, and applied the scale after I am fairly happy with how it looks. For the windows and the doors i have mainly used the “insert faces” tool and then instead of extruding inwards, i used the “insert faces” angels to create depth. I dont know which one is the right to use.

I’ve made this post because I’ve come so far with the modelling I must be doing something wrong. And before I start to train myself through youtube videos in Texturing I was wondering if any of you could see the problems I am facing ahead of time.

And also I was wondering which would be the appropriate way to apply textures to meshes like these. My understanding is that I can separate the windows, frames of windows, roofs and exterior of building. I have done this to one building, and then tried to add pbr materials to the exterior. Which doesnt look great to be fair.

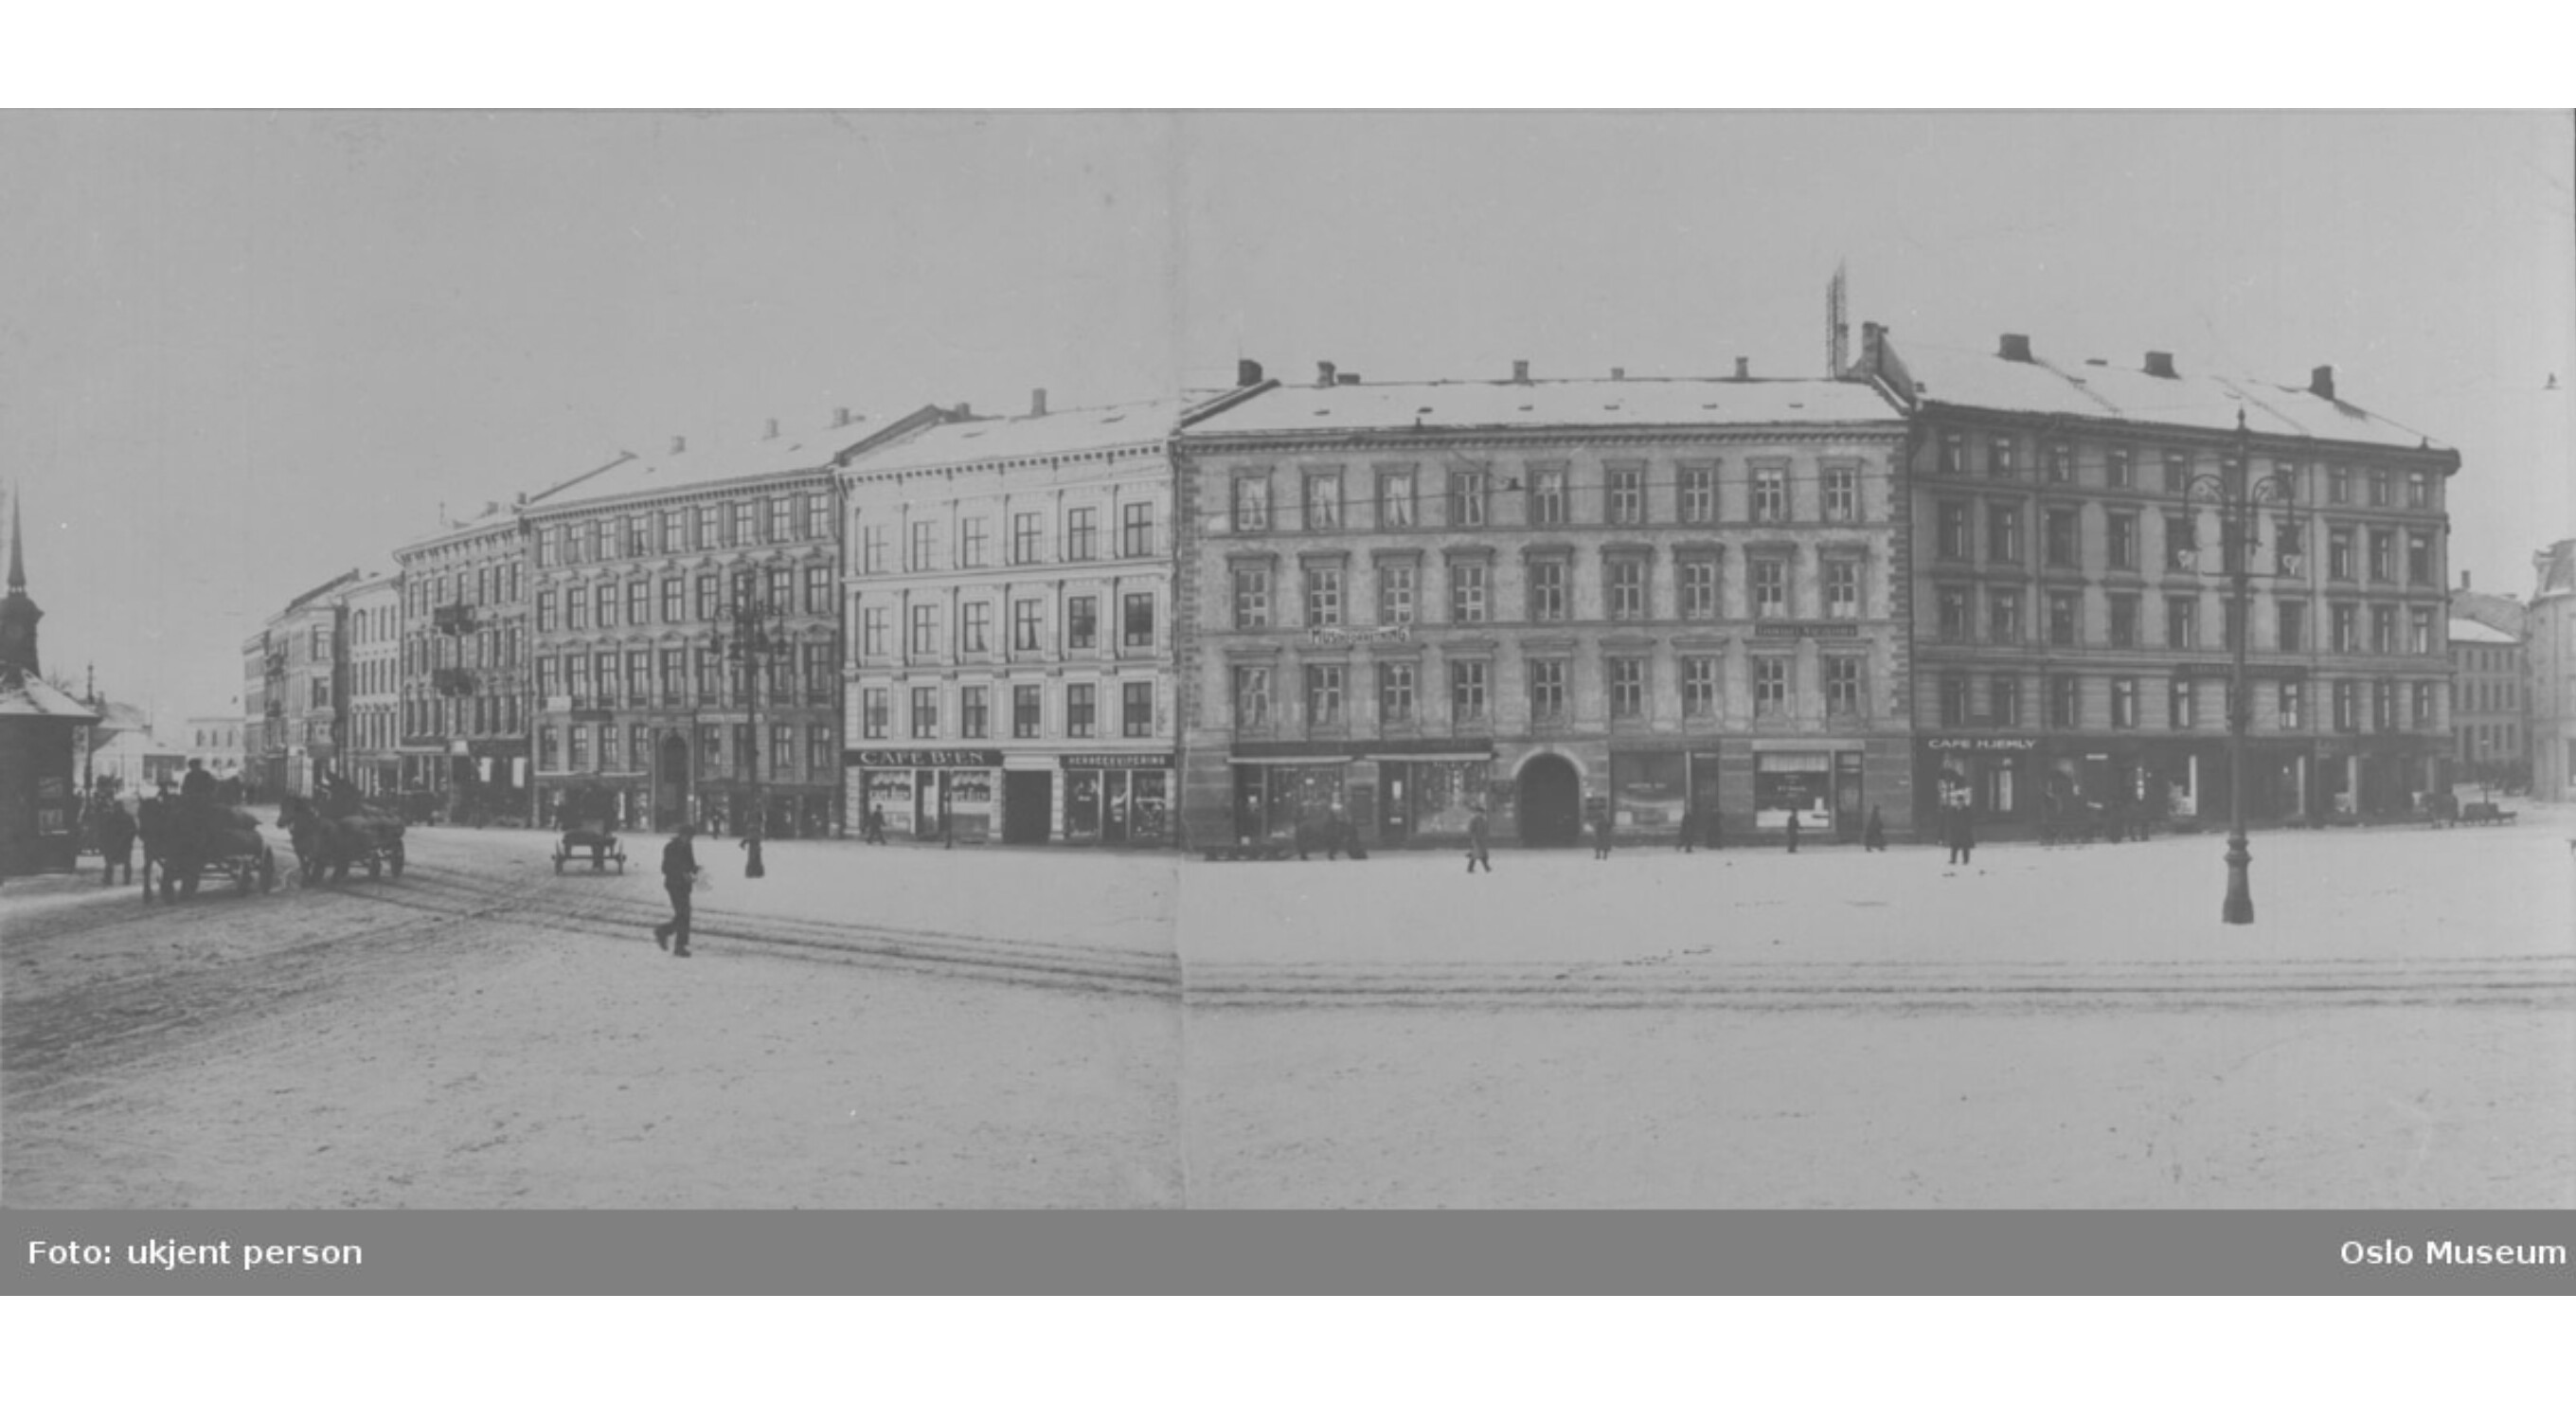
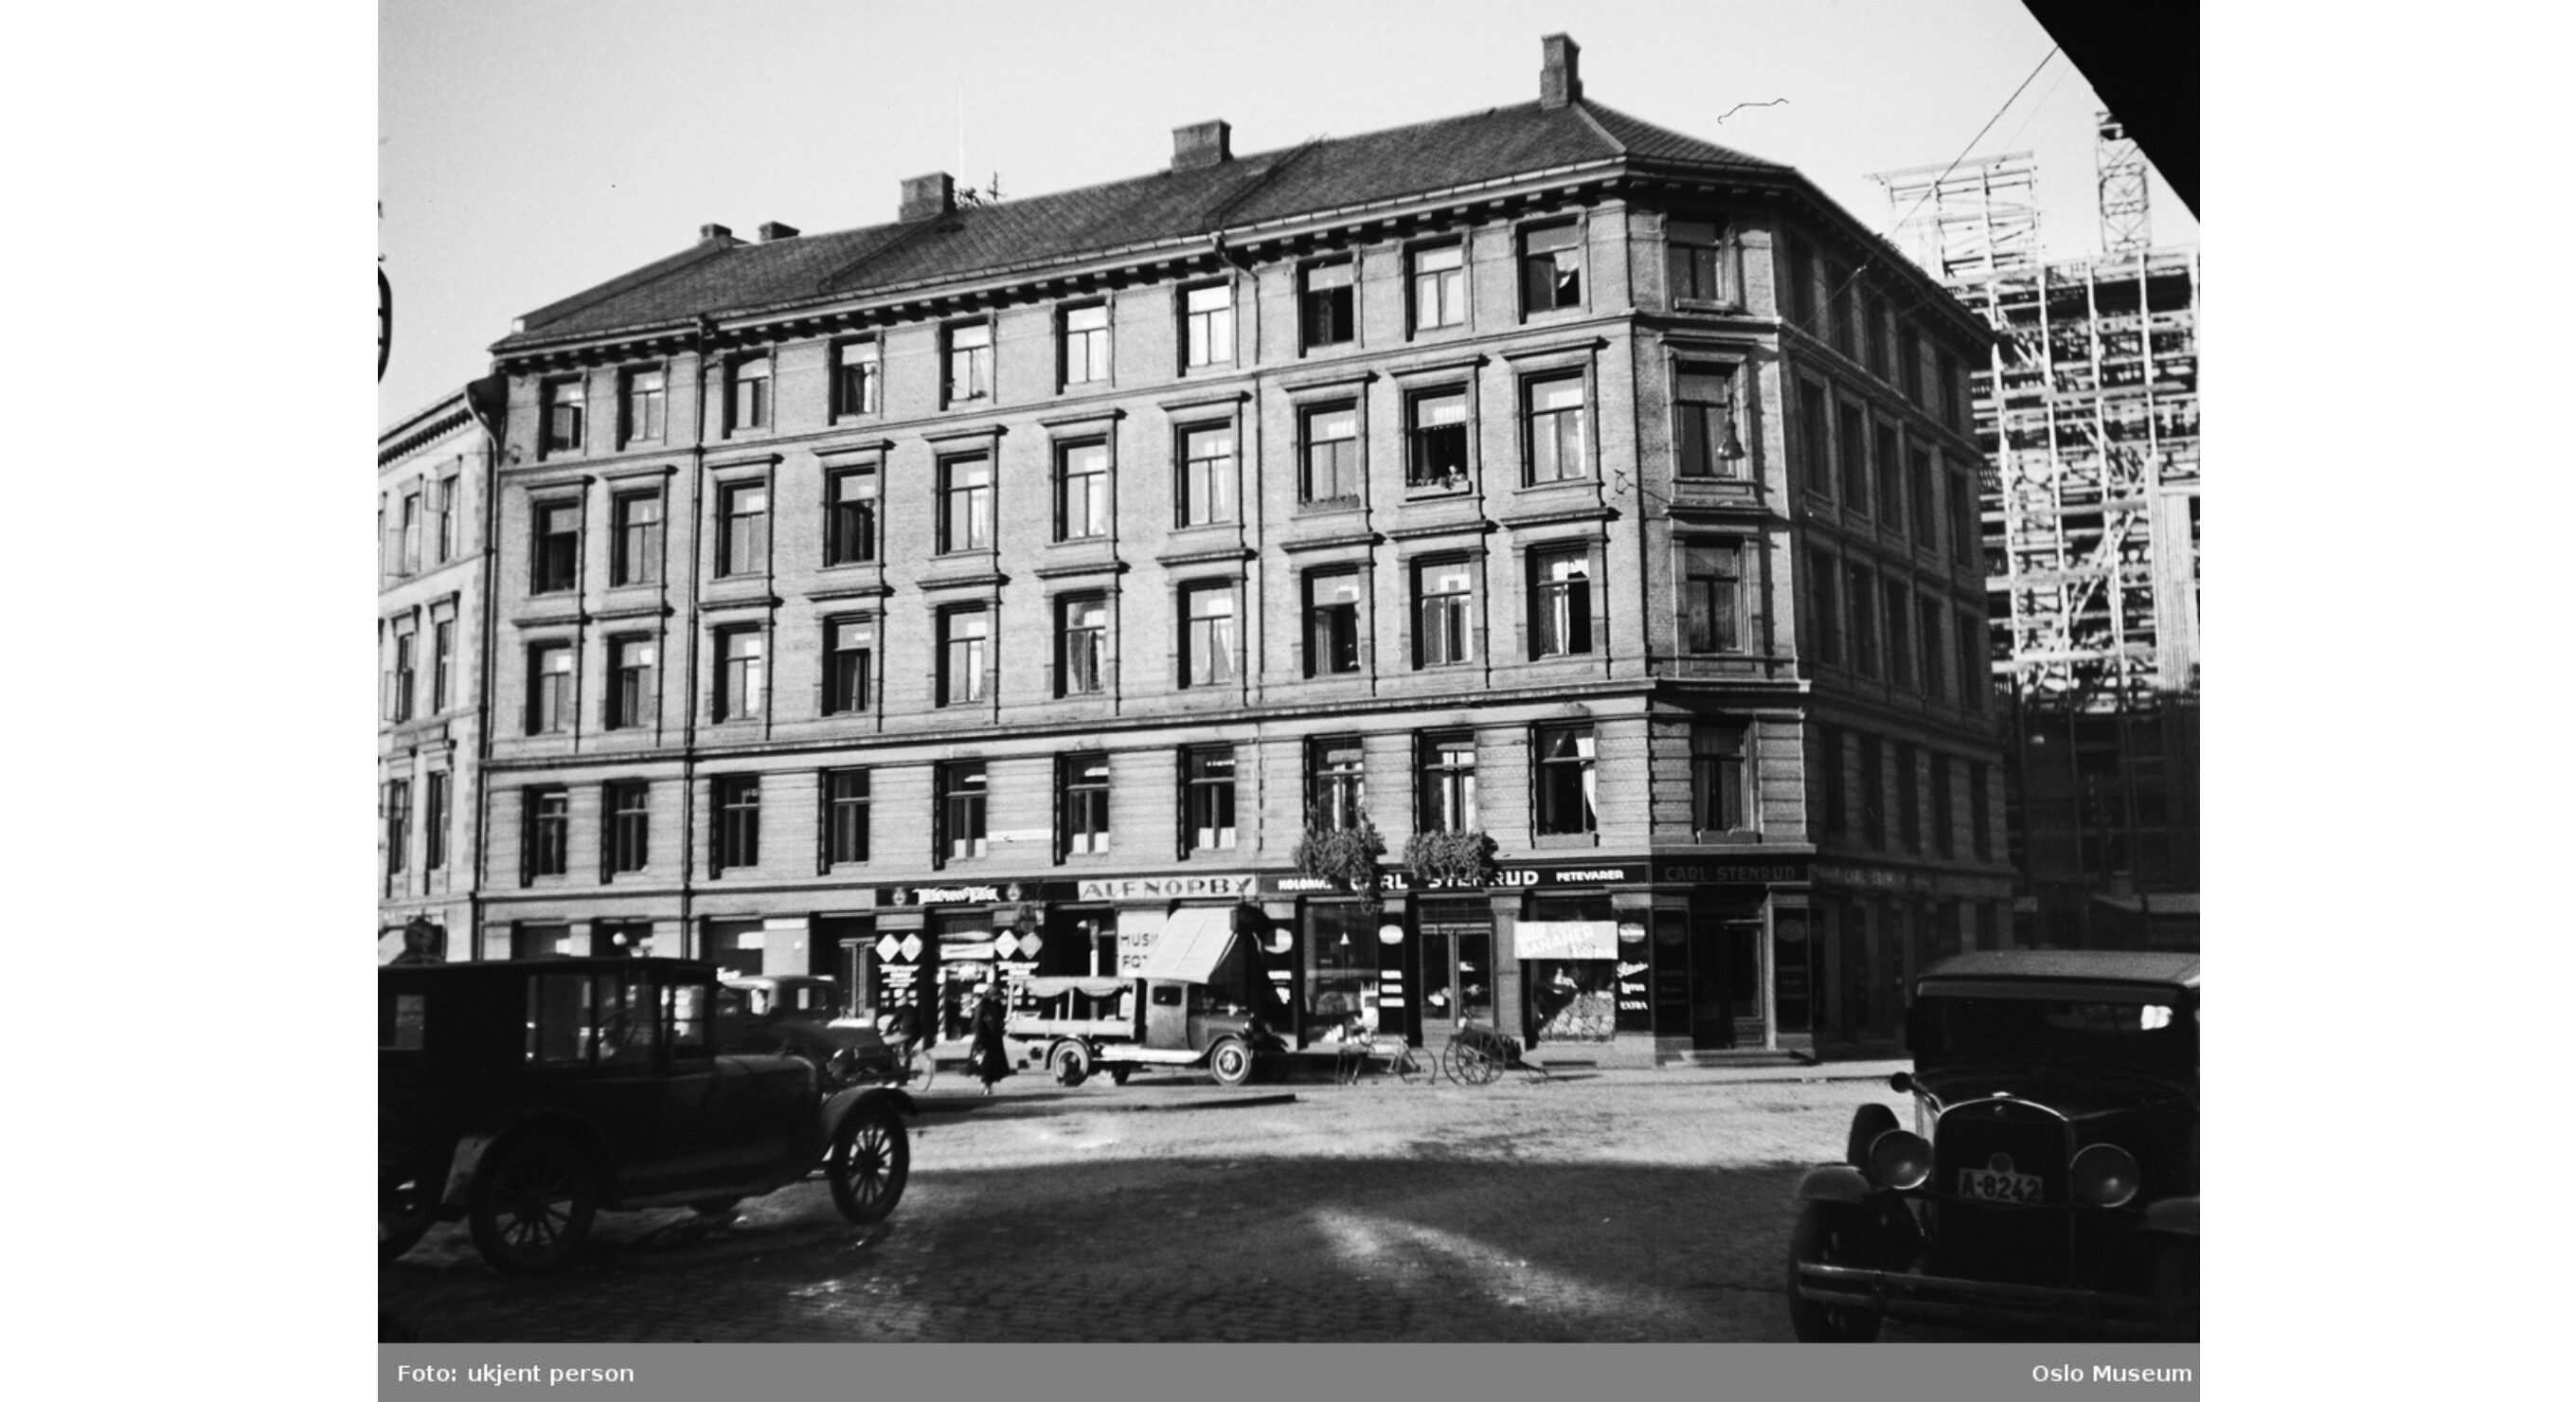
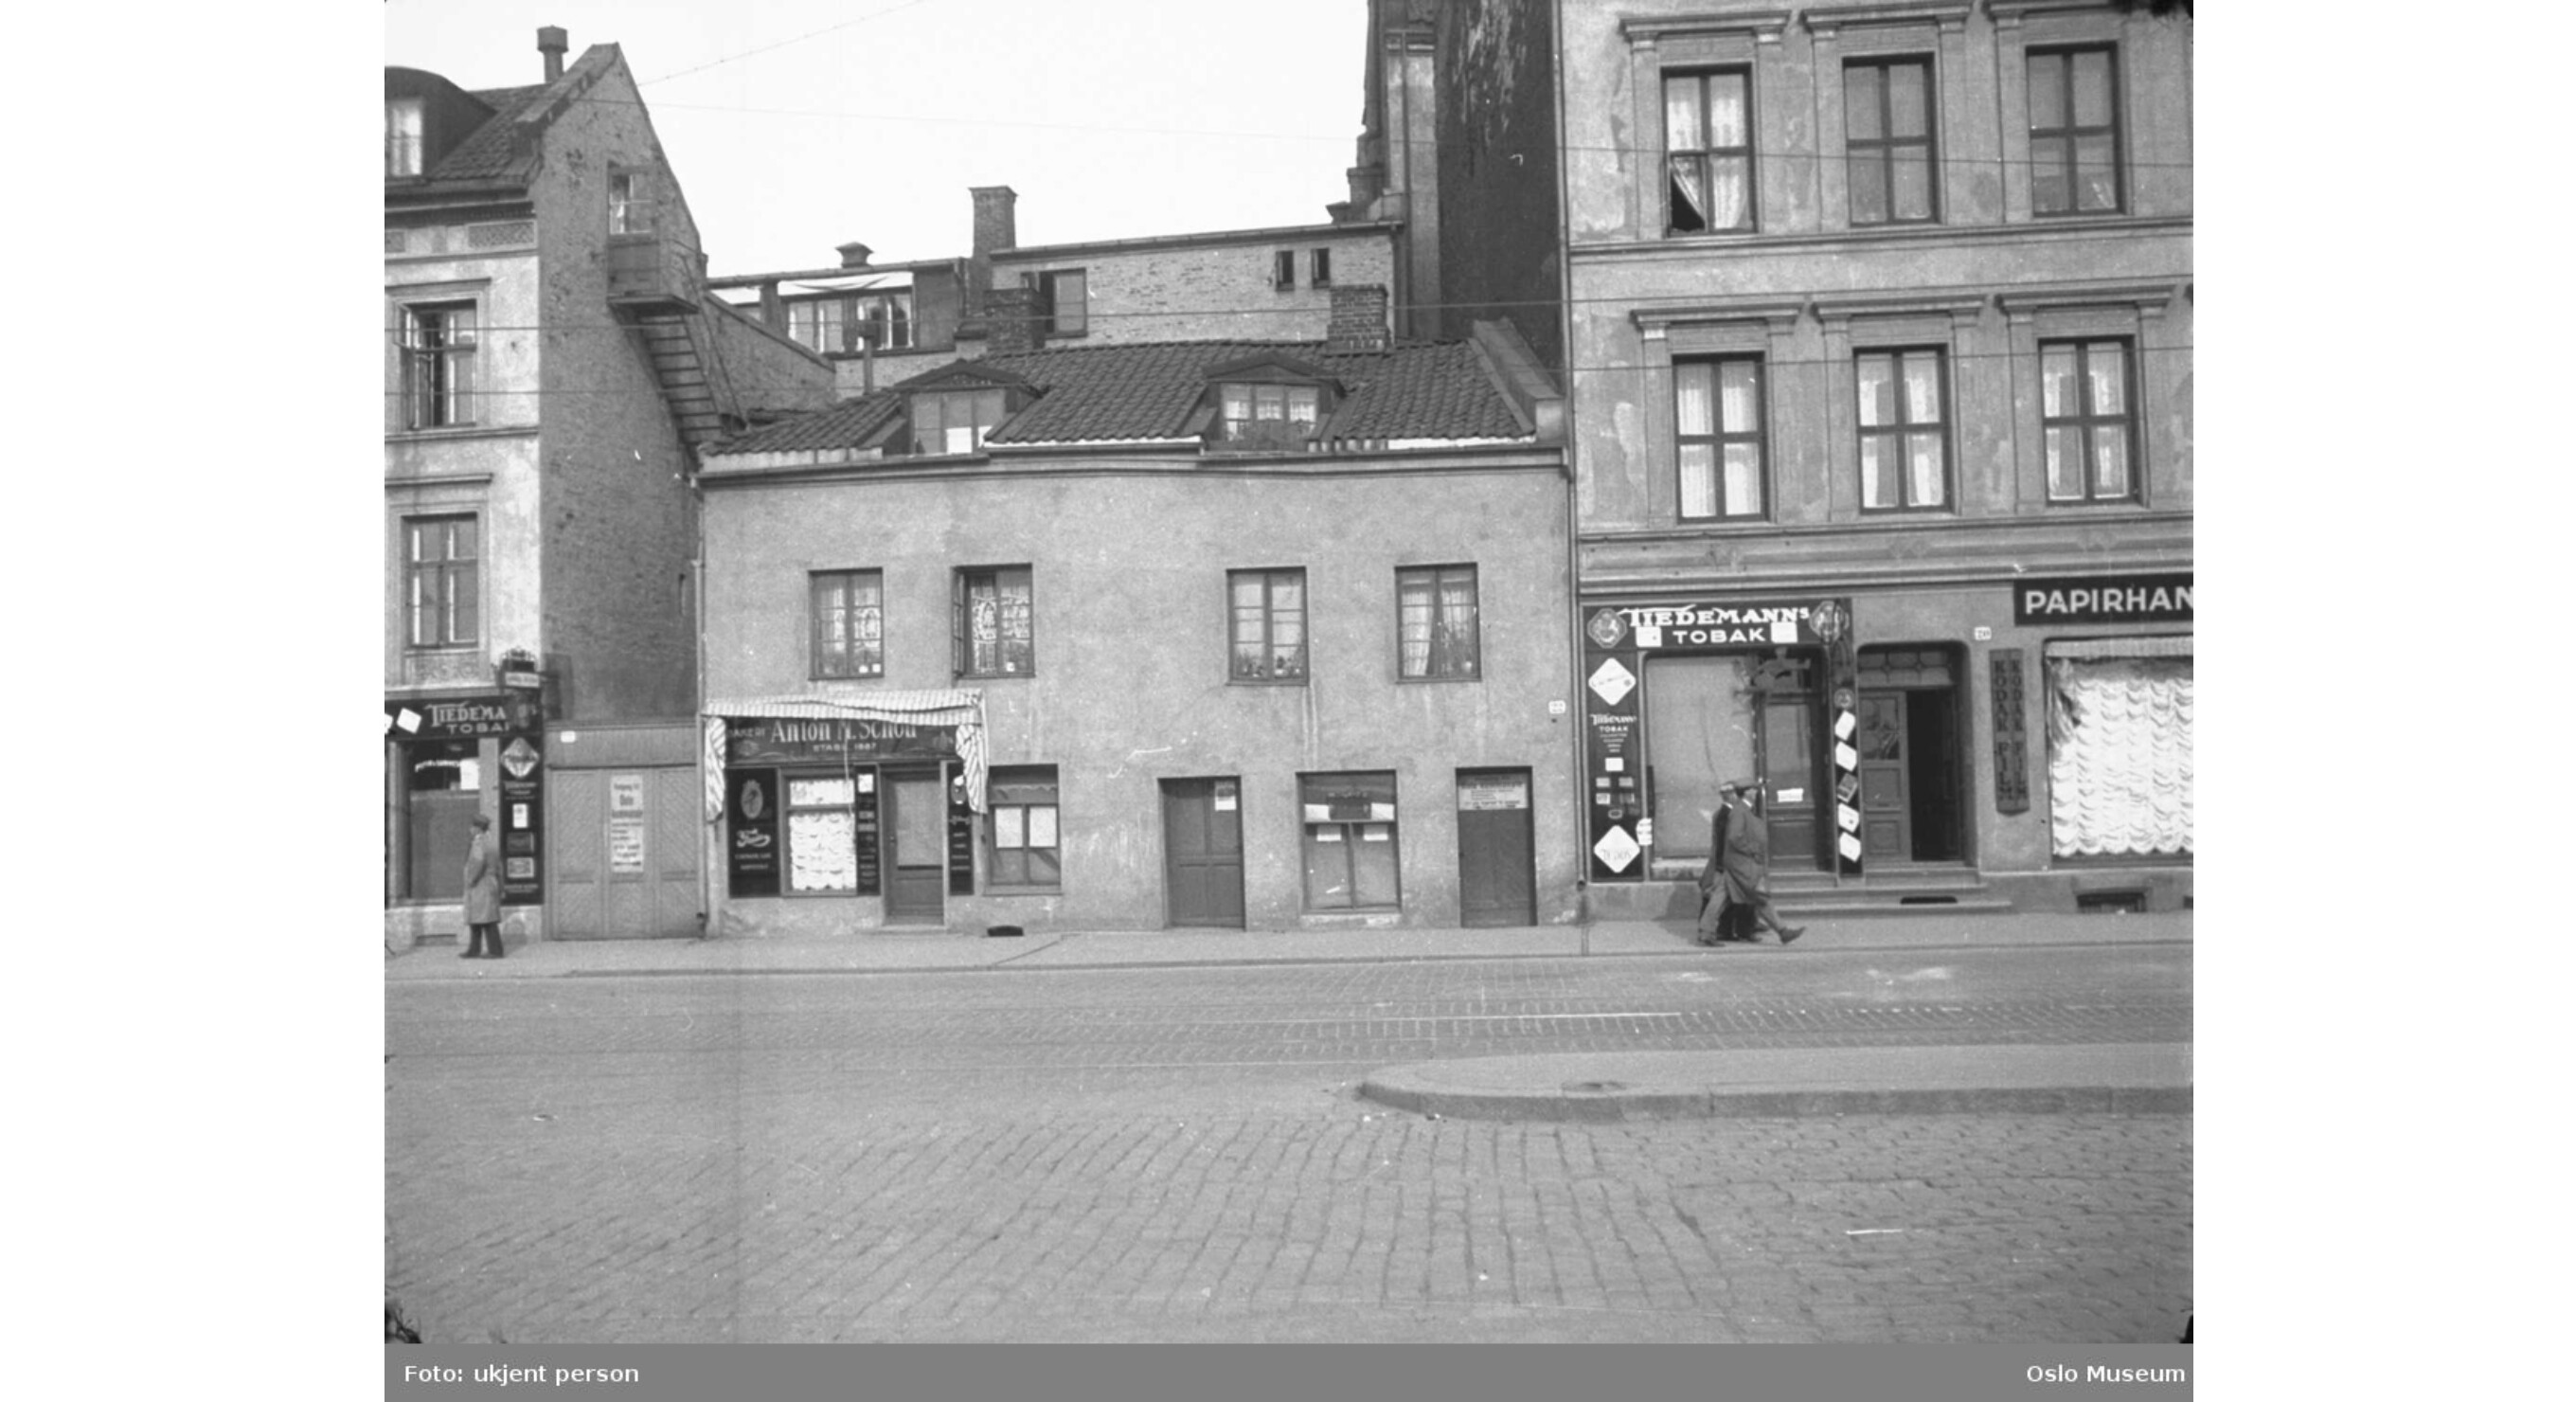
Generally what I am asking is further help with texturing, and modelling tips if things doesnt seem right. Under this text I will post some of the actual pictures from early 1900s which i use as referance photos.

2 Likes

Hi !
It’s quite an ambitious project to begin with blender ! But what doesn’t kill you is supposed to make you stronger !

About subdivision surface, you don’t need that in your case. It will make much more polygons than needed, and because you have many hard edges you’ll have to “cancel” the smoothing effect that it provides.
It’s great in many cases, like if you want to model one object with a lot of detail, but that really not what you want to use here.
You can look into the bevel modifier to add a bit of detail to your building for free.

It’s basically the same result in two different ways. Pick the one that you prefer !

In 3D there are many ways to get to a similar result, and there are a lot of techniques to make your buildings. The important is that you get to a result that you like and you can manage your project.

How many time do you have to finish the project ?

I’d start by making a lot of tests, try to answer as many questions as you can in that period of time.
So you get a bird eye view of everything needed in your project.
How to model the building is one of them, texturing also, do you plan to add other things like trees , other type of architectures ? Do some tests.
How many time does it takes to create an elements, does it fit the schedule ?
It’s a bit stressful to work like that , but it also help to not get too much carried away.
Having a small todo list with all the questions, answers, in which order doing things help me when managing complex projects.
But of course, some answers you’ll find them later , you’ll get better with blender while working also, so probably what takes you a day now, will takes a few hours latter. No need to be hardcore with all this, just make sure you stay organized and keep the big picture in mind.

You can try to make a few buildings and a street up to a finishing level and ask for a test in unity to make sure everything run smoothly. And then proceed to the whole.
That way you make sure all the questions are answered and avoid last minutes discoveries that are quite painful when you think everything is done.

For the buildings , you may try to see if there isn’t a way to minimize repetitive tasks, how precise you need to be ? can you duplicate and reuse some of them ?

Here is one way of doing a building :
I start with a plane :

Do some loop cut (Ctrl-R) , and extrude / inset the windows.

Duplicate some face and extrude them to form other elements,
They don’t need to be “attached” to the other mesh.

Add a bevel and a array modifier :

The object are duplicated 4 time, I changed the array settings to get different wall size.

Now I apply all the array modifier and merge all the objects into 1 (Ctrl-J),
I keep one window as a backup , so I can reuse it latter.
The best would have been at this stage to have the window already textured, so I don’t need to take care of that latter.
I also added some faces to fill the last wall.

Then with another array I create all the floors :

Of course more work is needed to add the roof and first floor.
here is the .blend if you want to look at it :
buildings test.blend (192.3 KB)

I’m not saying that’s how you should do it, try it and see if you like working this way.
The cool things is that you can work on small elements like the windows, and use that as a basis to make one building relatively quickly.

Hopes that helps, feel free to ask questions, I’m sure you’ll get good advices from many people !
And good luck on your project, it will be great to see it evolves , it’s a big task but also quite fun to do !

4 Likes

Thank you so much for the reply, the submission is in middle of August, so yeah, not much time! But yes! Working in Blender gets faster every time and is honestly addictive. But I have also seen many people use arrays in that fashion, but when i tried it myself it seems as if I loose control over the object? In that case that i only get one surface to work on? Array is a kind of mirror & duplication mod no? It seems quite fun to work in this way, but by watching the video i am already trying to figure out what to do with the roof. And I am also only focused on the line of houses which are fronting the ocean, which i already have modelled. But I could try to model them in a way that starts out with windows or doors. But since i am only modelling the row of houses in “Søgaden” and the dock itself I would like the houses to look as different as they can. In the pictures i find that only two of the buildings are aligned and has the overall same shape. But maybe i should try and get depth from another perspective then this. I am not sure. I would also like to create some water, and yes, I would create the “park” infront of “Søgaden” which houses up to two trees. Another question is how i should be going forward in creating the environment around the houses, such as the trees, roads and bay/water. Should i create a plane, then elevate different elements and add texture?

Brilliant work on the details in the windows, that is another thing I am trying to learn, to add small details like that in every mesh i do, are you using any tools? How do you align everything so well, how many objects do you operate with in the picture with the windows and its details?

there is also the archviz addon for buildings
can do all sort of things like doors windows roof ect…

have a look and see if you cannot use it
might save time on the long run

happy bl

Hum, it’s hard to figure out what is your issue, the best thing to do in that case is to post a .blend and have someone look at it. But indeed, you need one object to work on, and the array will create duplicates of that object. You can choose in which axis the duplication will append in the modifier.

Maybe you can start looking into other things than buildings and come back latter on that.
Until August is a bit short to get along with blender and do the project, but still it’s not like a 2 week deadline. It can work !

Hum, each things must be solved differently.
For the water it’s just a plane with some material. You should take into account how that will work in unity, it’s quite easy to do in blender but it should be done again in unity.

You can take inspirations for the roads with this technique :

Or do some simple extrusions.

For the trees, maybe the best way would be to get your hand on some models. Rather than making one of your own.
https://www.blendswap.com/search?page=3&keyword=low+poly+tree
You can CTRL-C / CTRL-V the objects from one blender to another.

And for the other things like the bay, maybe starting with a plane and elevate elements could work.

No, it’s really just extrusion and face duplication, you can look at this guy which is really good at that, don’t pay attention about how he setup colors, you’ll probably need something else…
He do a lot of impressive 10mn challenges :

And aligning things is done by hand, nothing fancy you just need to get used to it.

2 Likes

A relative offset and a factor of 1 along your chosen axis should align the edges of each piece, as long as you don’t mess up the rotation on your objects origin. (To avoid messing up the your origin rotations: don’t apply rotation unless your model is parallel to an axis.)

1 Like

Thank you so much for replies you guys! I can try uploading my blender files to you here, the one called “Freestyle” is the one i posted here, whereas the one named “Forbedrermeg” is a new files where i try to make cleaner models. Ive spent the whole day trying to to the windows and the array, but I find it very difficult. The method I have been using consists of placing the map as a reference and then adding a plane on top before extruding to prefered height by looking at photos. Anyway, these are my files: Edit: I just found out that i cant recover my previous models in my original file “Freestyle Demo” I can see my objects, but not i 3dview.

1900_KART_FREESTYLE_DEMO.blend (1.6 MB)

Forbedrermeg.blend (769.3 KB)

This is what im trying to create, not much texture, but different colours for each house, and the street i dont know where to begin. http://www.oslobilder.no/OMU/OB.01310?query="Sjøgata"maleri&count=3&search_context=1&pos=1

with openXR you can do VR inside blender

there is upbge also - if you are not skinning a bunch of actors it should work fine.

we need gpu armature skinning to kick in, if armature modifier is last in the stack,
if you need many high poly actors that deform with armature

It occurs to me that working from photos and lining things up will lead to higher polycounts. I had a lot of trouble with a model (a mosquito) and references until I drew orthographic views, because in the interface you are constantly trying to fix the reference or suit your perspective. Do you draw? Simplifying the shapes and objects before you start in blender may help. Just a thought.

One thing to think about as well is how much do you need to actually model? At least in detail terms.
You might be able to get away with projecting photos over meshes and using the knife tool to cut around windows etc and extrude them in. I appreciate you won’t get many photos necessarily from that time but you might find you can doctor things to give you enough texture assets to use.

You say it’s an AR project. How large will the content be viewed? If it’s overlayed on real Oslo as you walk around it life size then that’s very different from a table top version of the whole city when you’ll see each building no bigger than 10cm. Definitely don’t add any more detail than required.

As for workflow, because it’s a fairly expansive project, once you have a workflow worked out on one building, start working on everything together. It’s good to bring everything up at the same rate. An experience will look very unfinished with 20 excellent assets and 80 rushed ones. Compared to looking intentional having 100 decent but cohesive assets. Uniformity is a big part of selling a visual style.

1 Like

I featured you on BlenderNation, have a great weekend!

1 Like

Thats the thing! I dont really need to model any more then I have already done. Sjogata is the street i need to model (which I have already done in the opening pictures), and i need to create the park infront, the main road infront and the bay/water. The AR is SitSim, which means that it uses only map reference and gps location to function, whereas it doesent apply itself onto the real world, it is already applied through testing. So it is a simulation, the only thing which is being used by the iPhone is the gps, gyroscope so that you can walk inside the simulation.

This is an example of what Erindale is talking about.

Ian Hubert’s fast and dirty techniques might also be your friend.

One problem is it’s better for static viewpoints, where you can hide or fudge parts that don’t work. This will be more difficult in AR. The technique will probably work well for the background buildings though.
If the viewer is walking around the park, and the buildings are effectively the backdrop, then the park should also take alot of your time to get right. Good luck!

1 Like

WOW, @Mats_Ausland, you should be very proud.

Lot’s of free advice.

Good luck on your Masters.

1 Like

Hi @mats_ausland,

I came across this vid on Artstation Learning (it’s free). A concept artist producing the background to one of his scenes using Blender. I think his techniques are directly applicable to your problem- sorry if it’s too late.

https://www.artstation.com/learning/courses/KQ0/environment-design/chapters/aogL/planning

Yes! As Calp mentioned! Thanks for all the free advice! I understand that there is a difficulty understanding why and for what I am making this. As so far my understanding goes, I will only make these models before inserting them to Unity. I will not be using fixed camera angles from Blender side, and I am not sure about the lighting. It is basic modelling I need help with. This is how far I’ve come so far. I found this video on youtube on how to create buildings from a single window, and applied textures before duplicating and expanding the size. This worked quite well as far as the mesh goes, but was hard to scale, and fit the already made houses.

Its the one on the far right.

The next thing i did was to erase all the positions I have made for the windows, to revert the face. But this led up to me not being able to use the cut cool because of the previous verticies. So in some cases I tried to create new objects from scratch using my new knowledge, and in others i just cleared out the window frames, and filled them again.


I am glad that I have gotten so used to nodes and textures at this point that I can work pretty fast between finding new textures and replicating old ones, the modelling still looks pretty tame though, there are a lot of details on the actual houses that dont get their time to shine; in some cases I have tried for a simple extrusion along the windows, or the edge of the building, creating a sense of reality, where the buildings are engrailed with details. I have so far, only been able to create squares, and tried to “sew” up the endings, but I find it hard to create a natural transition between walls, roof, windows, etc.

My next to do (because I am tired of texturing houses at this point) is to create the surroundings, not the houses, but the park and road ahead of “Sjogata”. This part:


Any tips on how to create the roads? I have started with a plane scaled underneath which I would try to make cuts in and extruding the roads and the sidewalks out, but maybe that is not the right way?